Mobile Service > IAP > Google Console Guide
This document describes how to register and link information from an app released on Google Play to NHN Cloud IAP Console. For more details on releasing apps with Google Play, please refer to the Google Play Console guide provided by Google.
Google site
We use the Google site below to get the information for the integration. * Google Play Console * Google Cloud Console * Google Developers - OAuth 2.0 Playground
Enter Basic Information
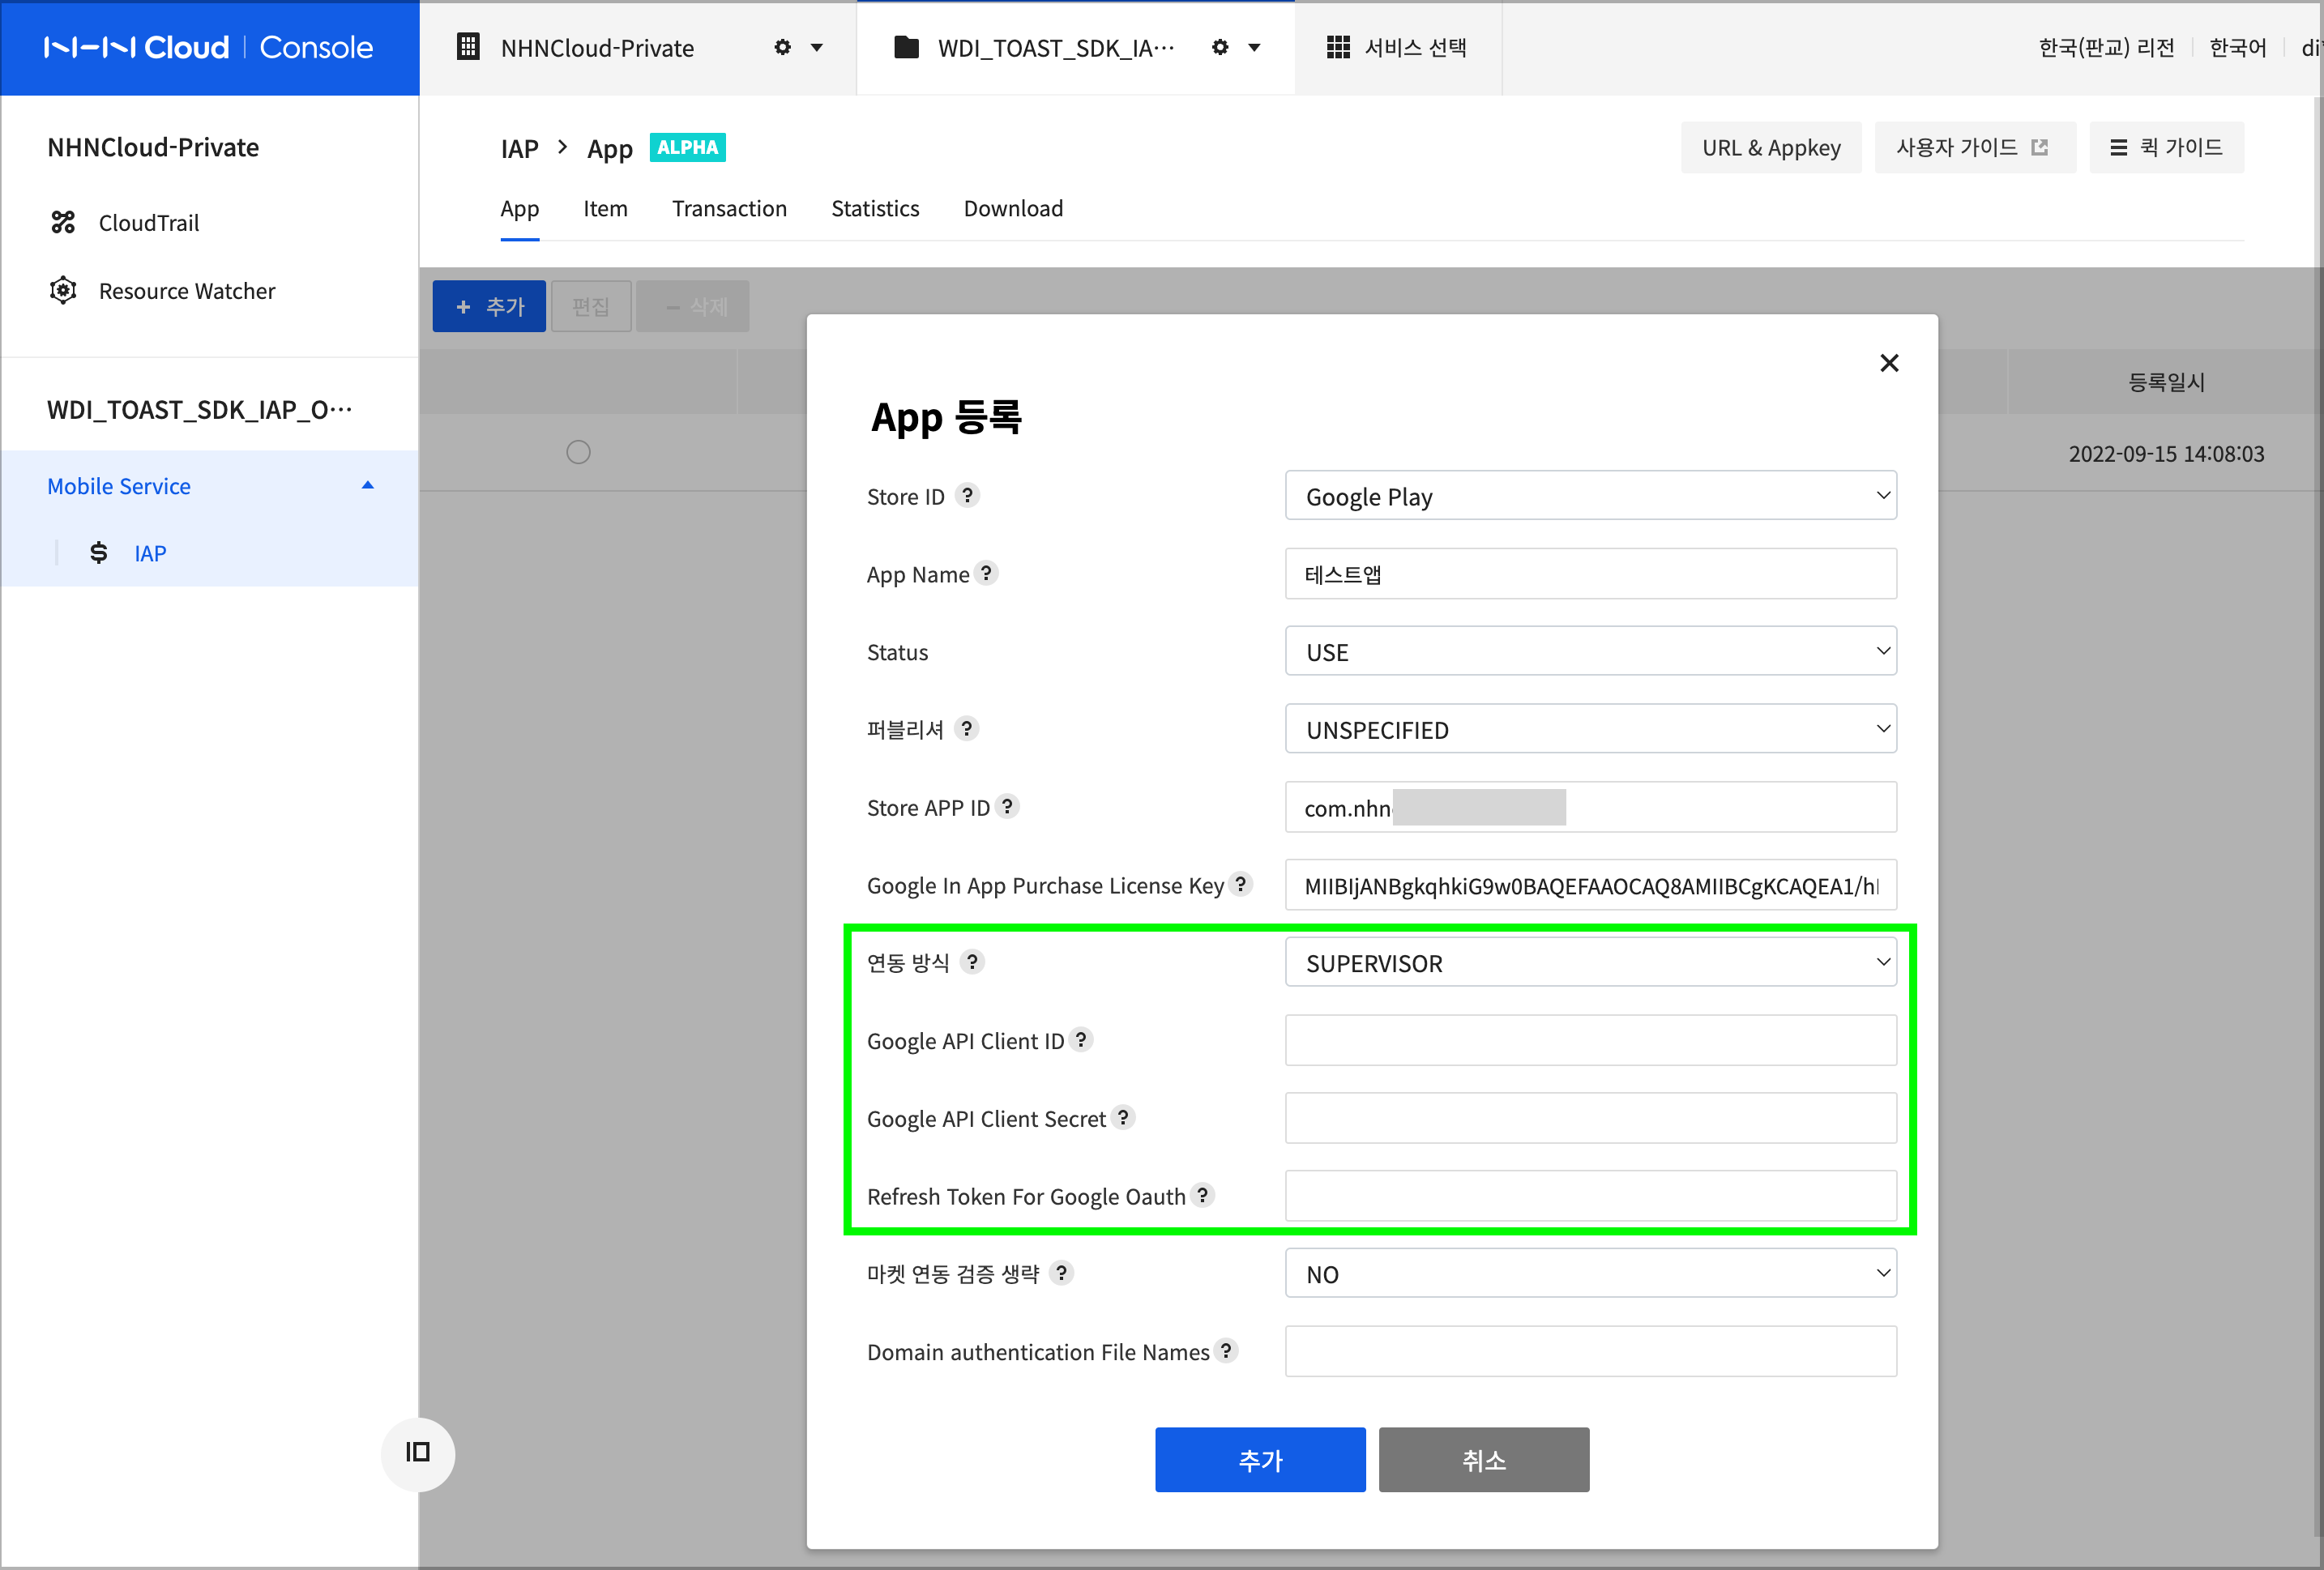
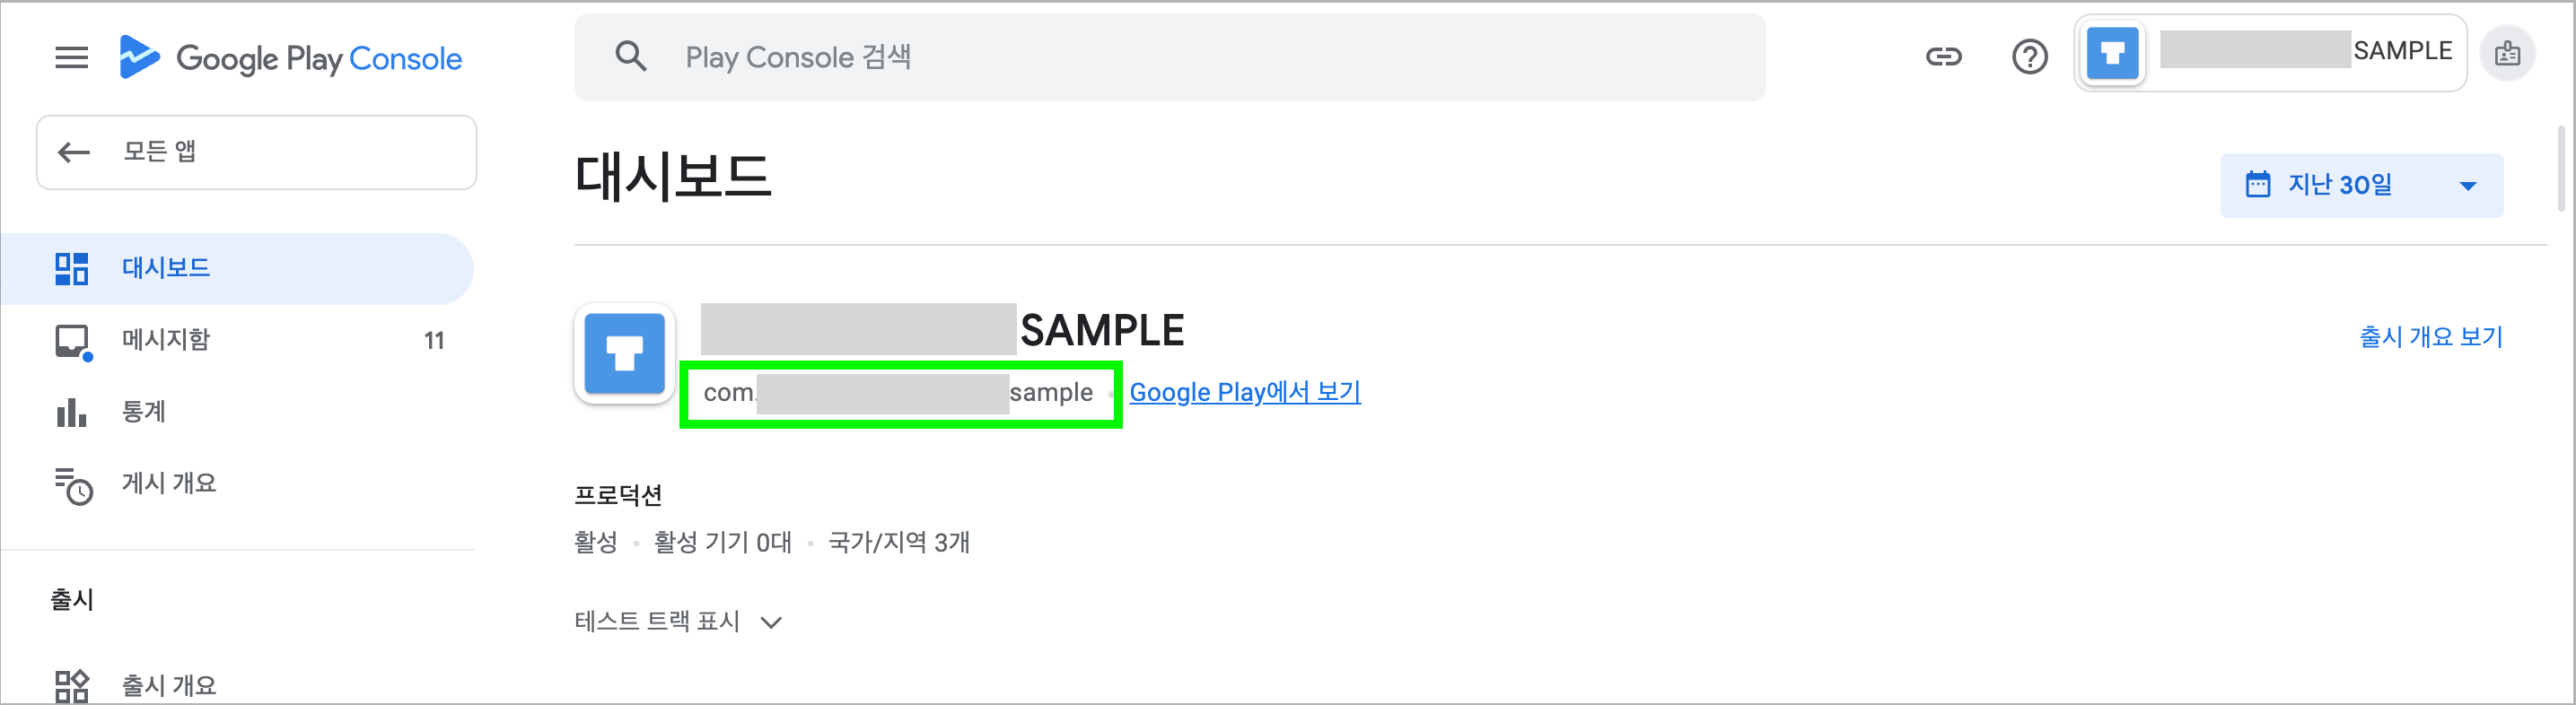
1. Store App ID
- The Package Name of the app you build for Google Play registration, a unique value that identifies your app within Google Play.
- If you've registered your app, you can see it in your app list in the Google Play Console, or in your dashboard.
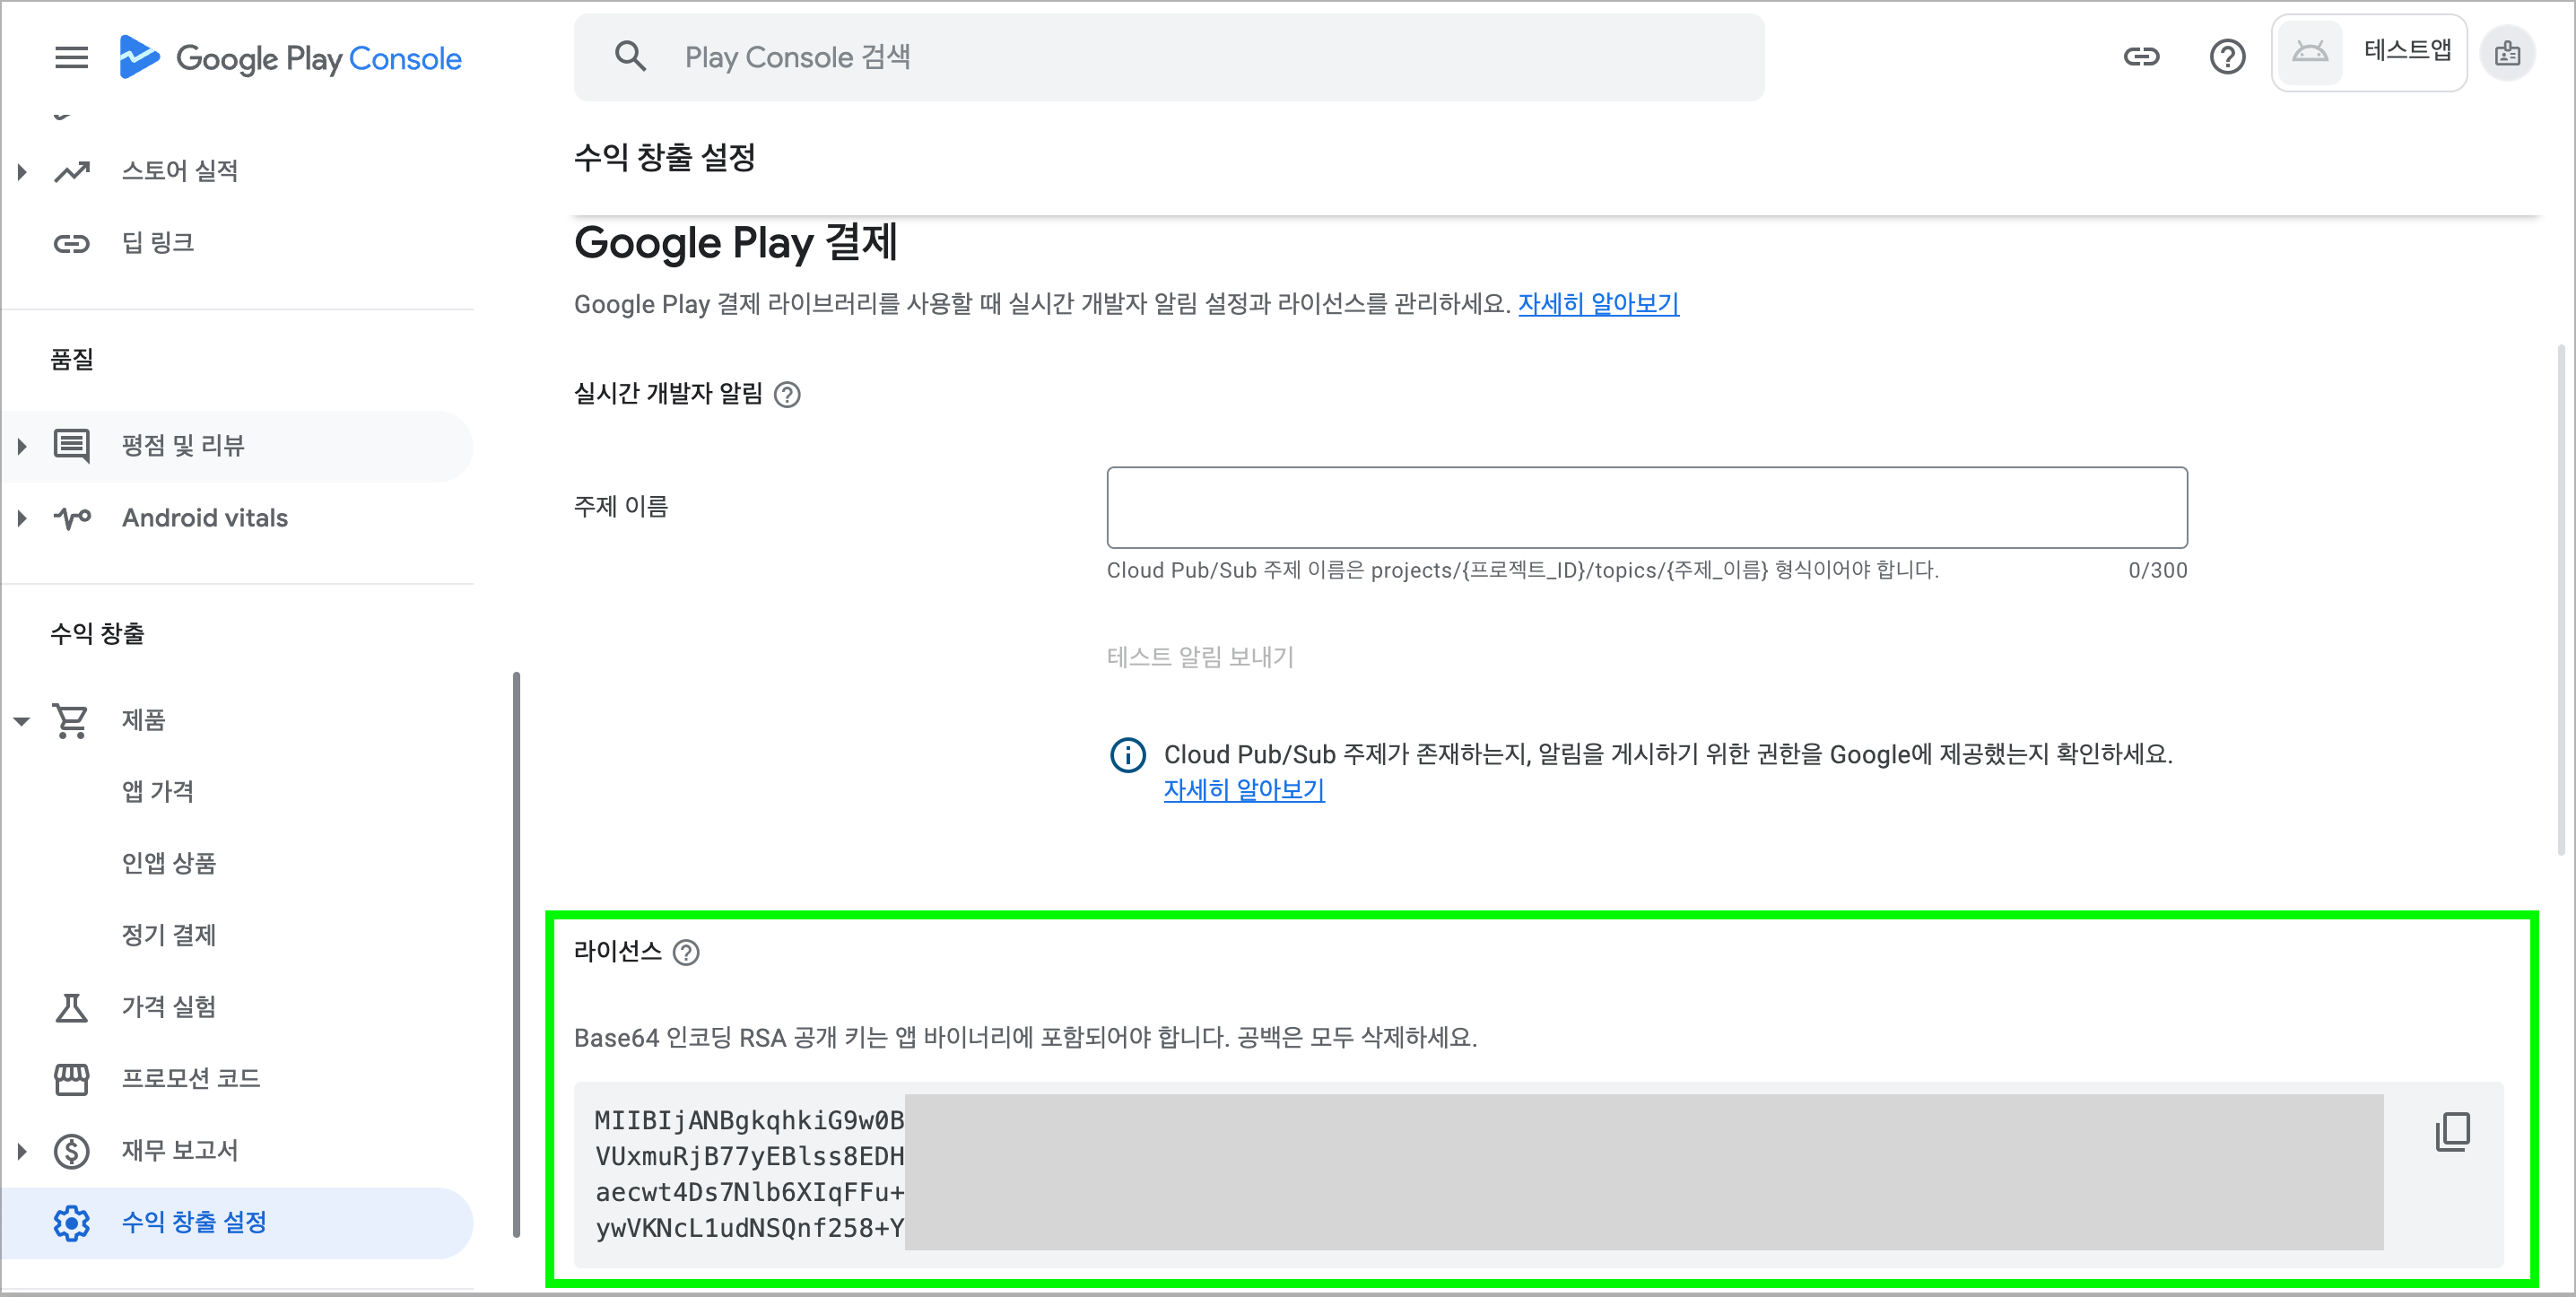
2. Google InApp Purchase License Key
- Access the Google Play Console to verify your license.
- From Home, select the app you want to set up and enter the Monetization setup.
- Copy and paste the Base64-encoded portion of the item from License.
3. Skip Market Integration Verification
- Set to NO, which is usually the default, as an option in case of a Google outage.
- When set to YES, it only checks for tampering with the sent payment information and skips verification by Google.
- Do not apply to all payments, and subscriptions and revalidations are excluded.
4. Domain Authentication File Names
- This field is left blank as it is no longer used.
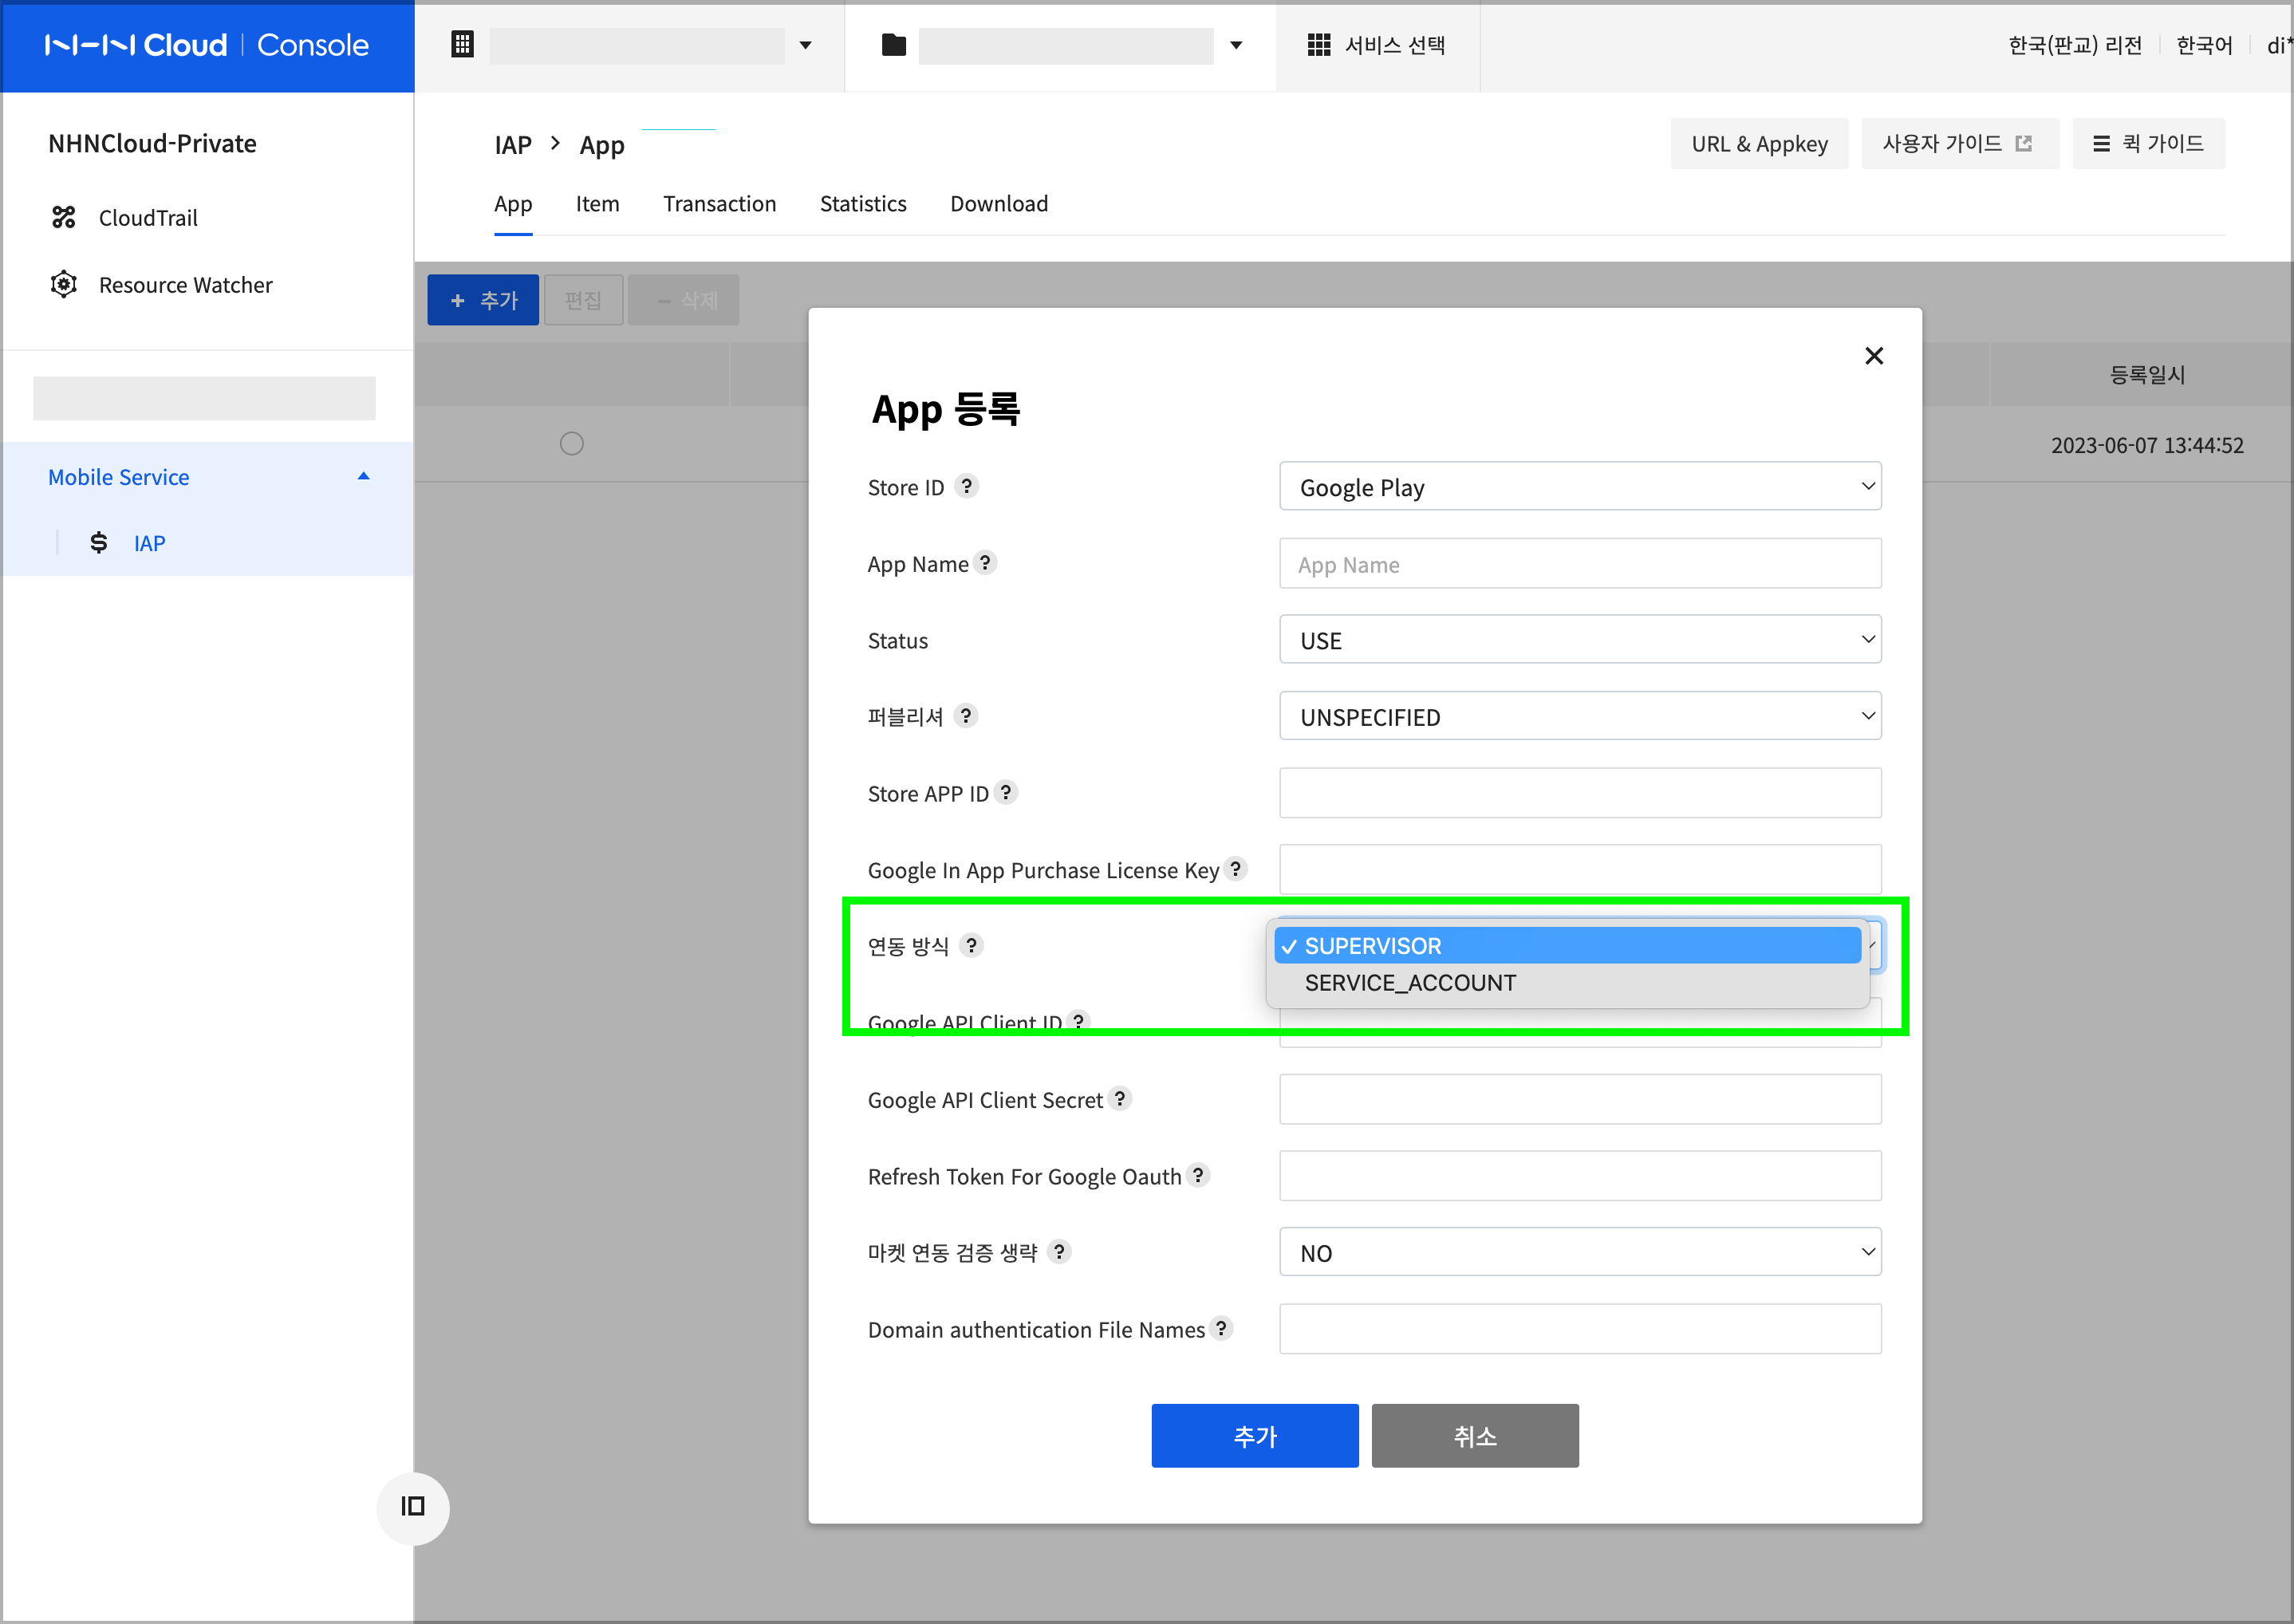
Two Authentication Methods for Integration
- To integrate with Google, you must use the Google Cloud API, which requires OAuth2.0 authorization provided by Google.
- NHN Cloud IAP supports the Client ID and service account methods among Google OAuth2.0 authentications.
- In the NHN Cloud IAP integration methods, the client ID is mapped to SUPERVISORand the service account is to SERVICE_ACCOUNT.
- The differences between the two are summarized below, and you can read more about them in Google's OAuth 2.0 guide.
[Client ID method]. * Create a client ID and credentials to use for authentication on behalf of the user. * While creating credentials, an approval from a Google user (developer) is required. * Authorization happens only once on the web, and the generated credentials and authorization results are returned to the website. * When you use the Google Cloud API with an authorized client ID, you have the same permissions as the authorized user. * If the credentials are generated by the user who creates (owns) Google Play Console, then that client ID can access any app within Google Play Console.
[Service account method] * In the Google Cloud Console, you can create a service account for your project. A service account is not a regular user account with a Google email. * Google Play Console adds and uses the service account you created in Google Cloud Console. * In order for the service account to access the app, you must grant the appropriate permissions.
Set up Google Cloud Project
- To integrate with apps registered on Google Play, you require a Google Cloud project.
- You can use an existing project if you already have one, but you can learn how to create a Google Cloud project first.
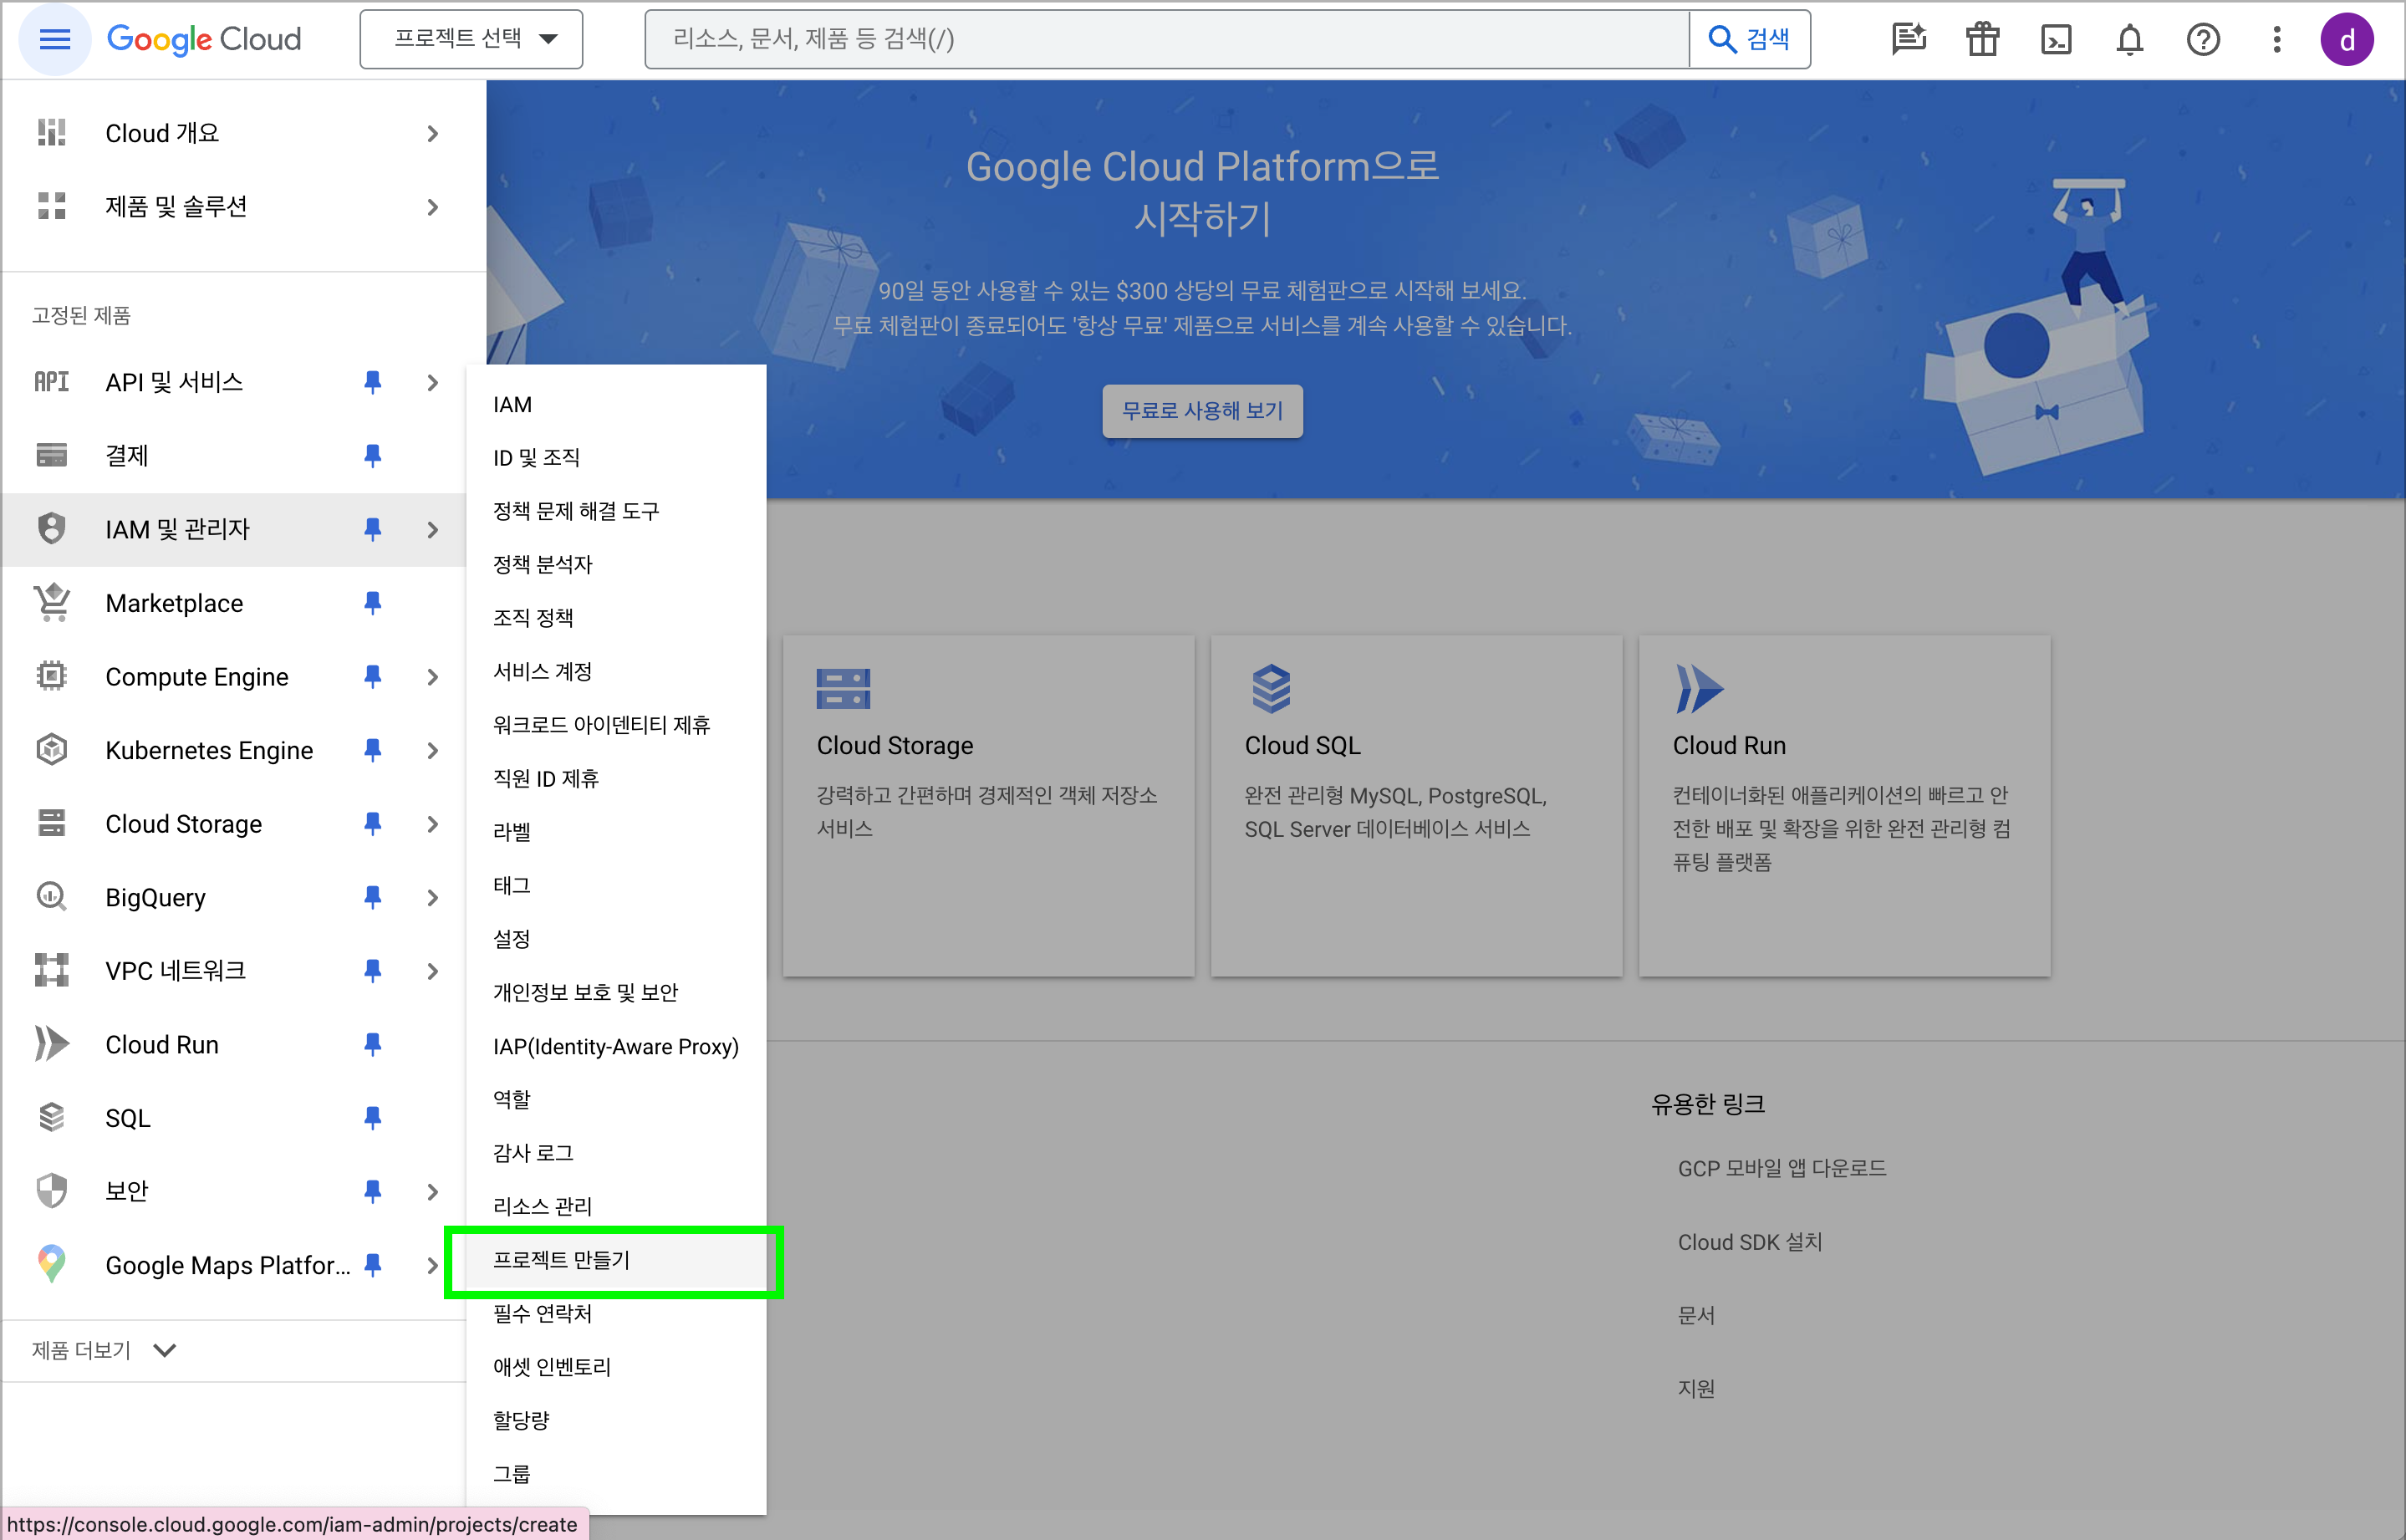
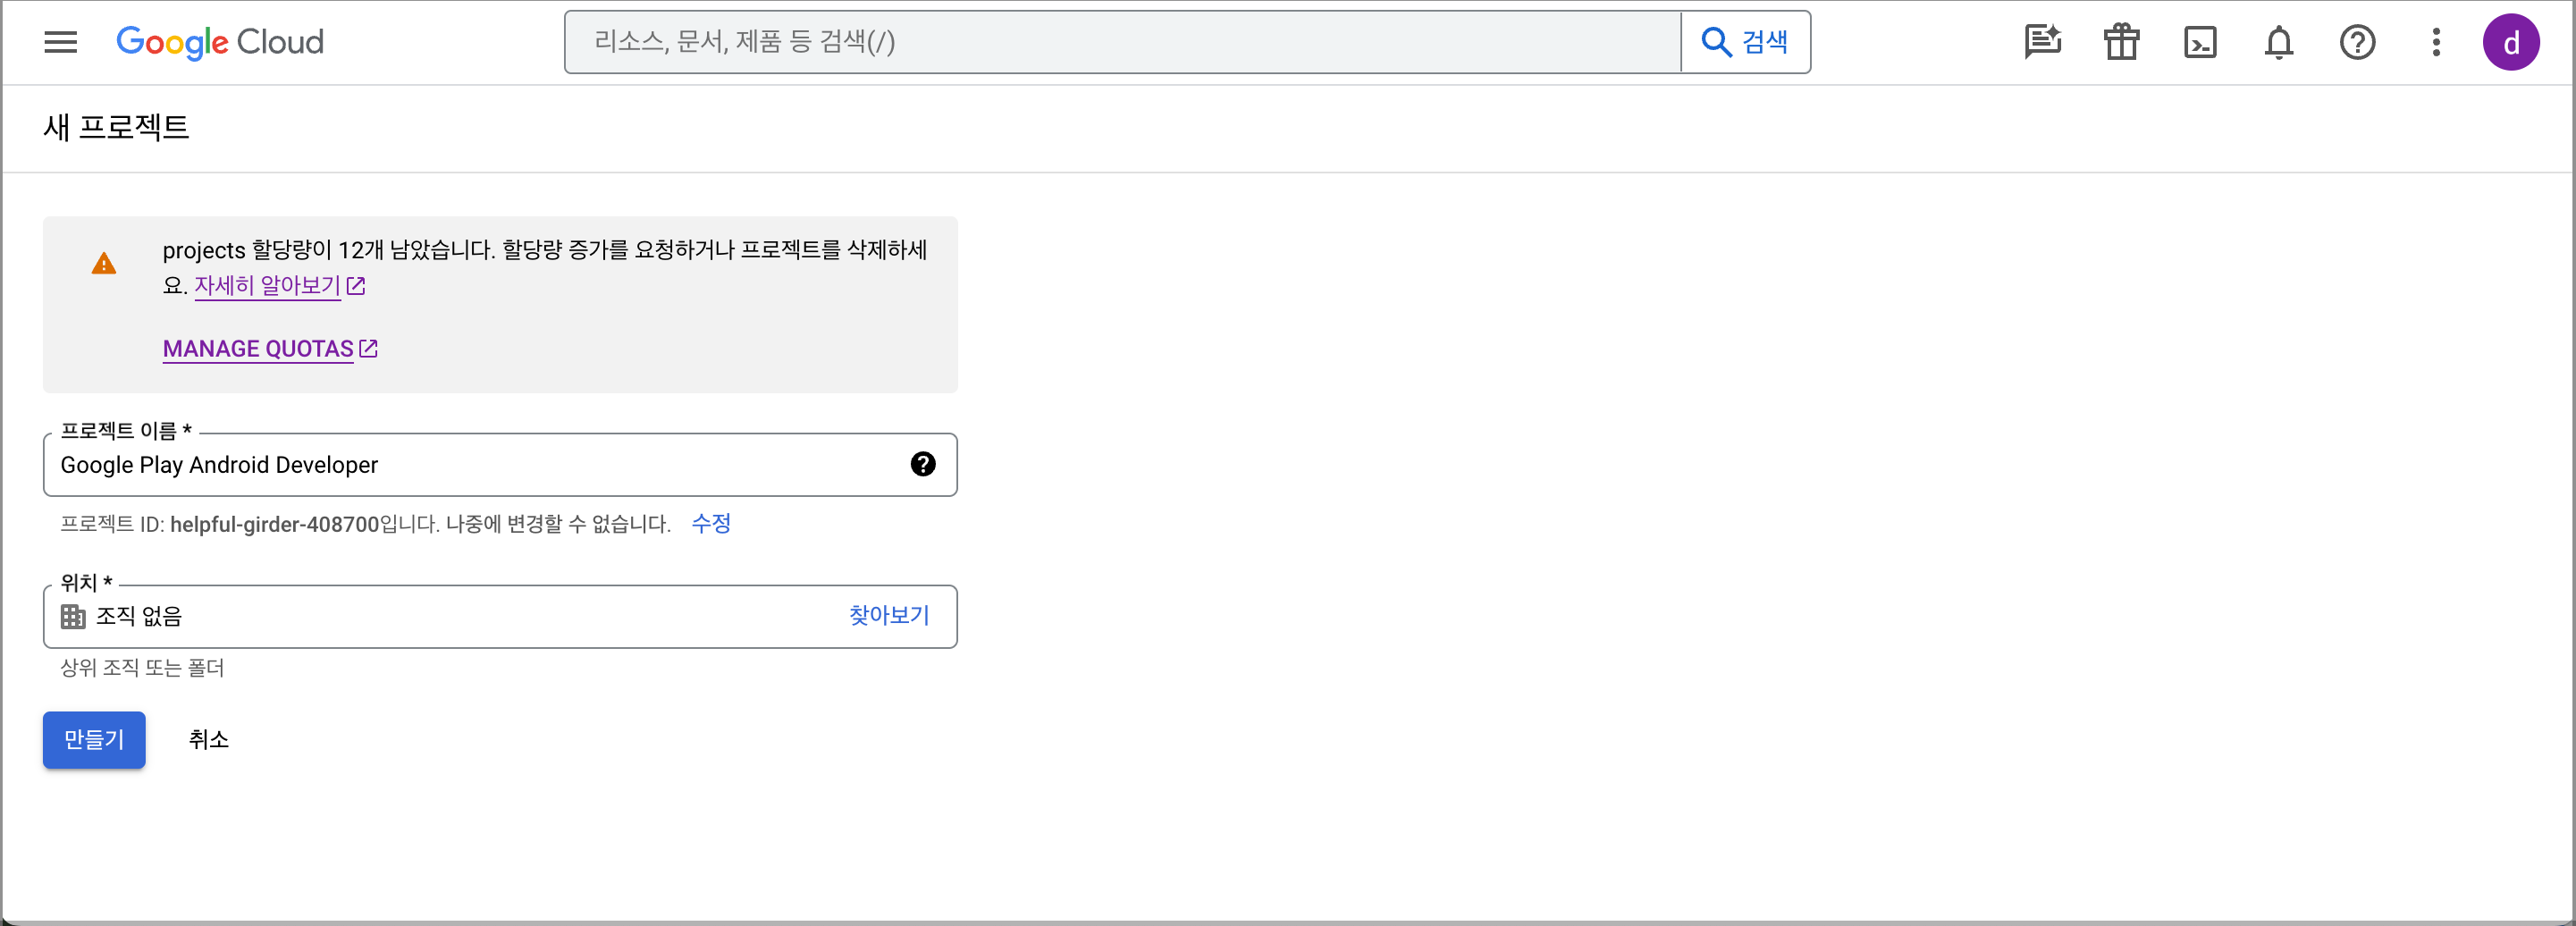
1. Create a project
- Access the Google Cloud Consoleto create a project.
- Sign in as the user who owns the Google Play Console developer account.
- Select IAM & Admin > Create Project.
- Create a project by entering a project name and location.
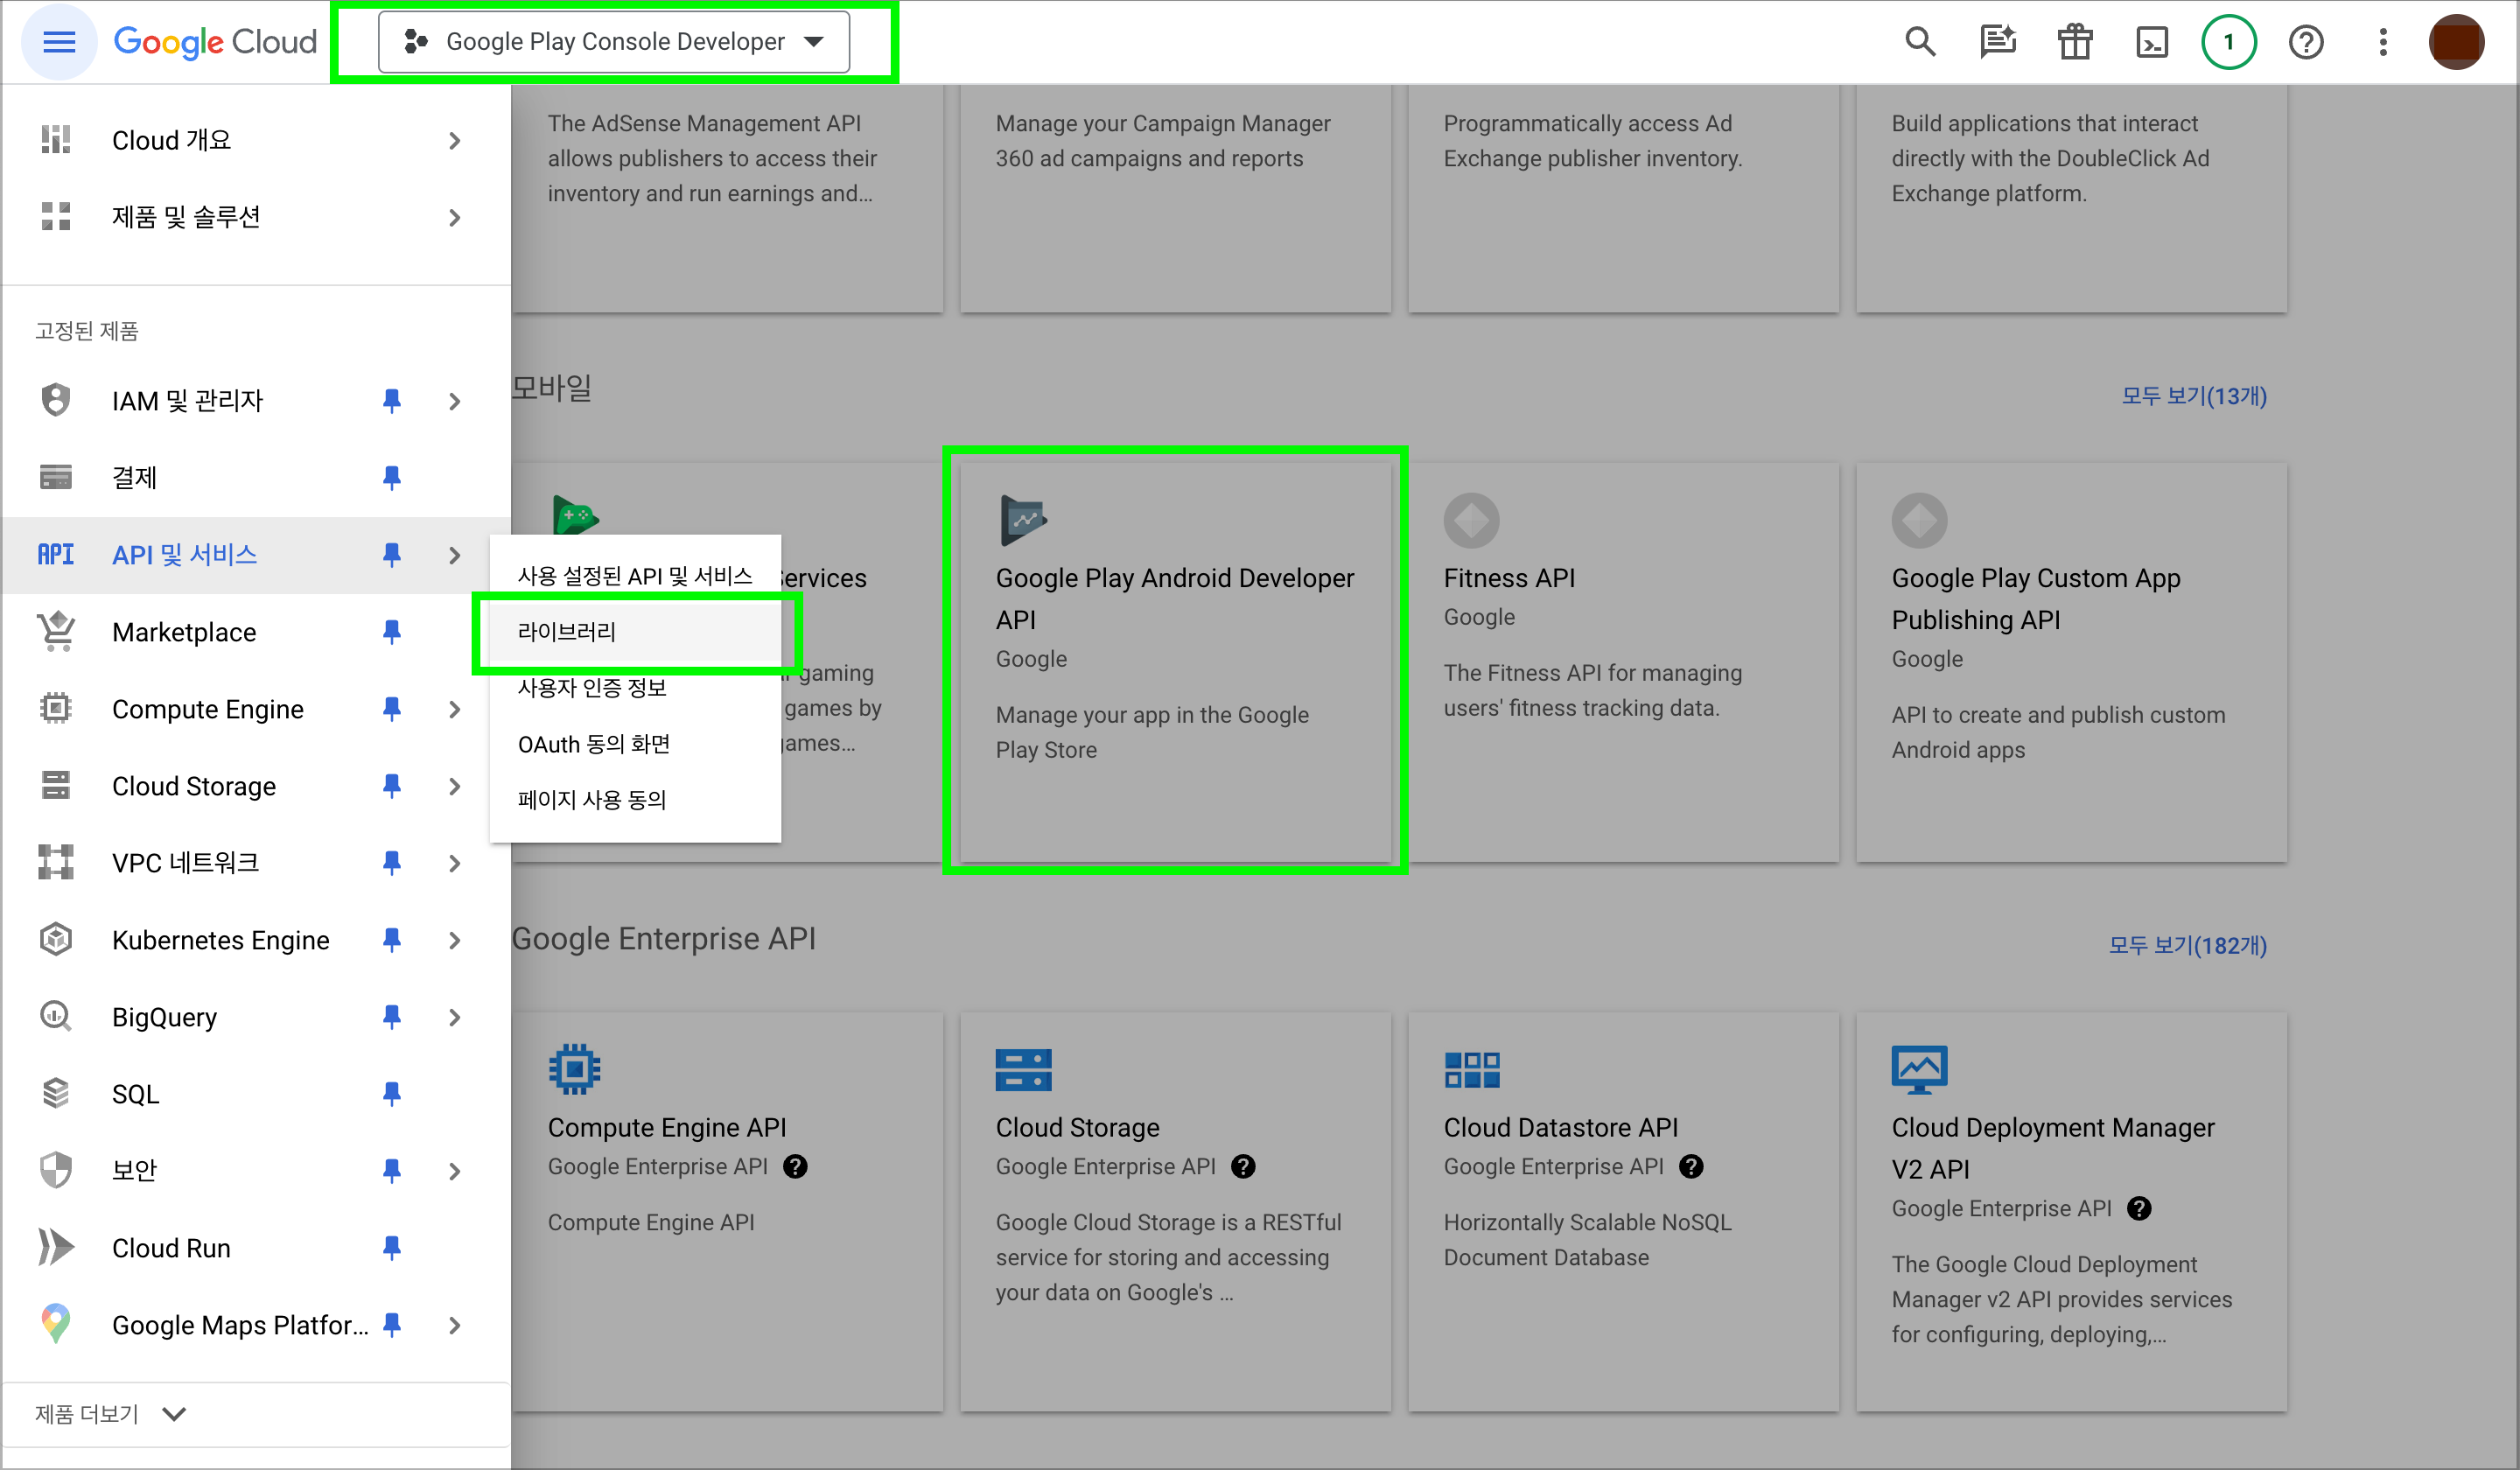
2. Add APIs to Use in Your Project
- Select the project you created, and navigate to the APIs & Services > Library menu.
- Select the API you want to use from API Library. The following APIs are required to integrate with apps registered in Google Play.
- Play Android Developer API
- Play Games Services Publishing API
- Select the appropriate API and enable it in the Product Details.
3. Show the Google Cloud Console Menu
- If you have an invisible menu during the setup process, such as Google Cloud Pub/Sub, you can add it to your menu (pinned products) by navigating to Products & Solutions > All Products.

Set up SUPERVISOR integration
To use Google Cloud Client ID authentication in NHN Cloud IAP, you need a Refresh token created with your client ID. While creating a Refresh token, there is a user authorization process, and you need to configure the OAuth consent screenin your Google Cloud project. The access permissions of apps registered in Google Play Console are based on the permissions of the user who approved the Refresh token generation.
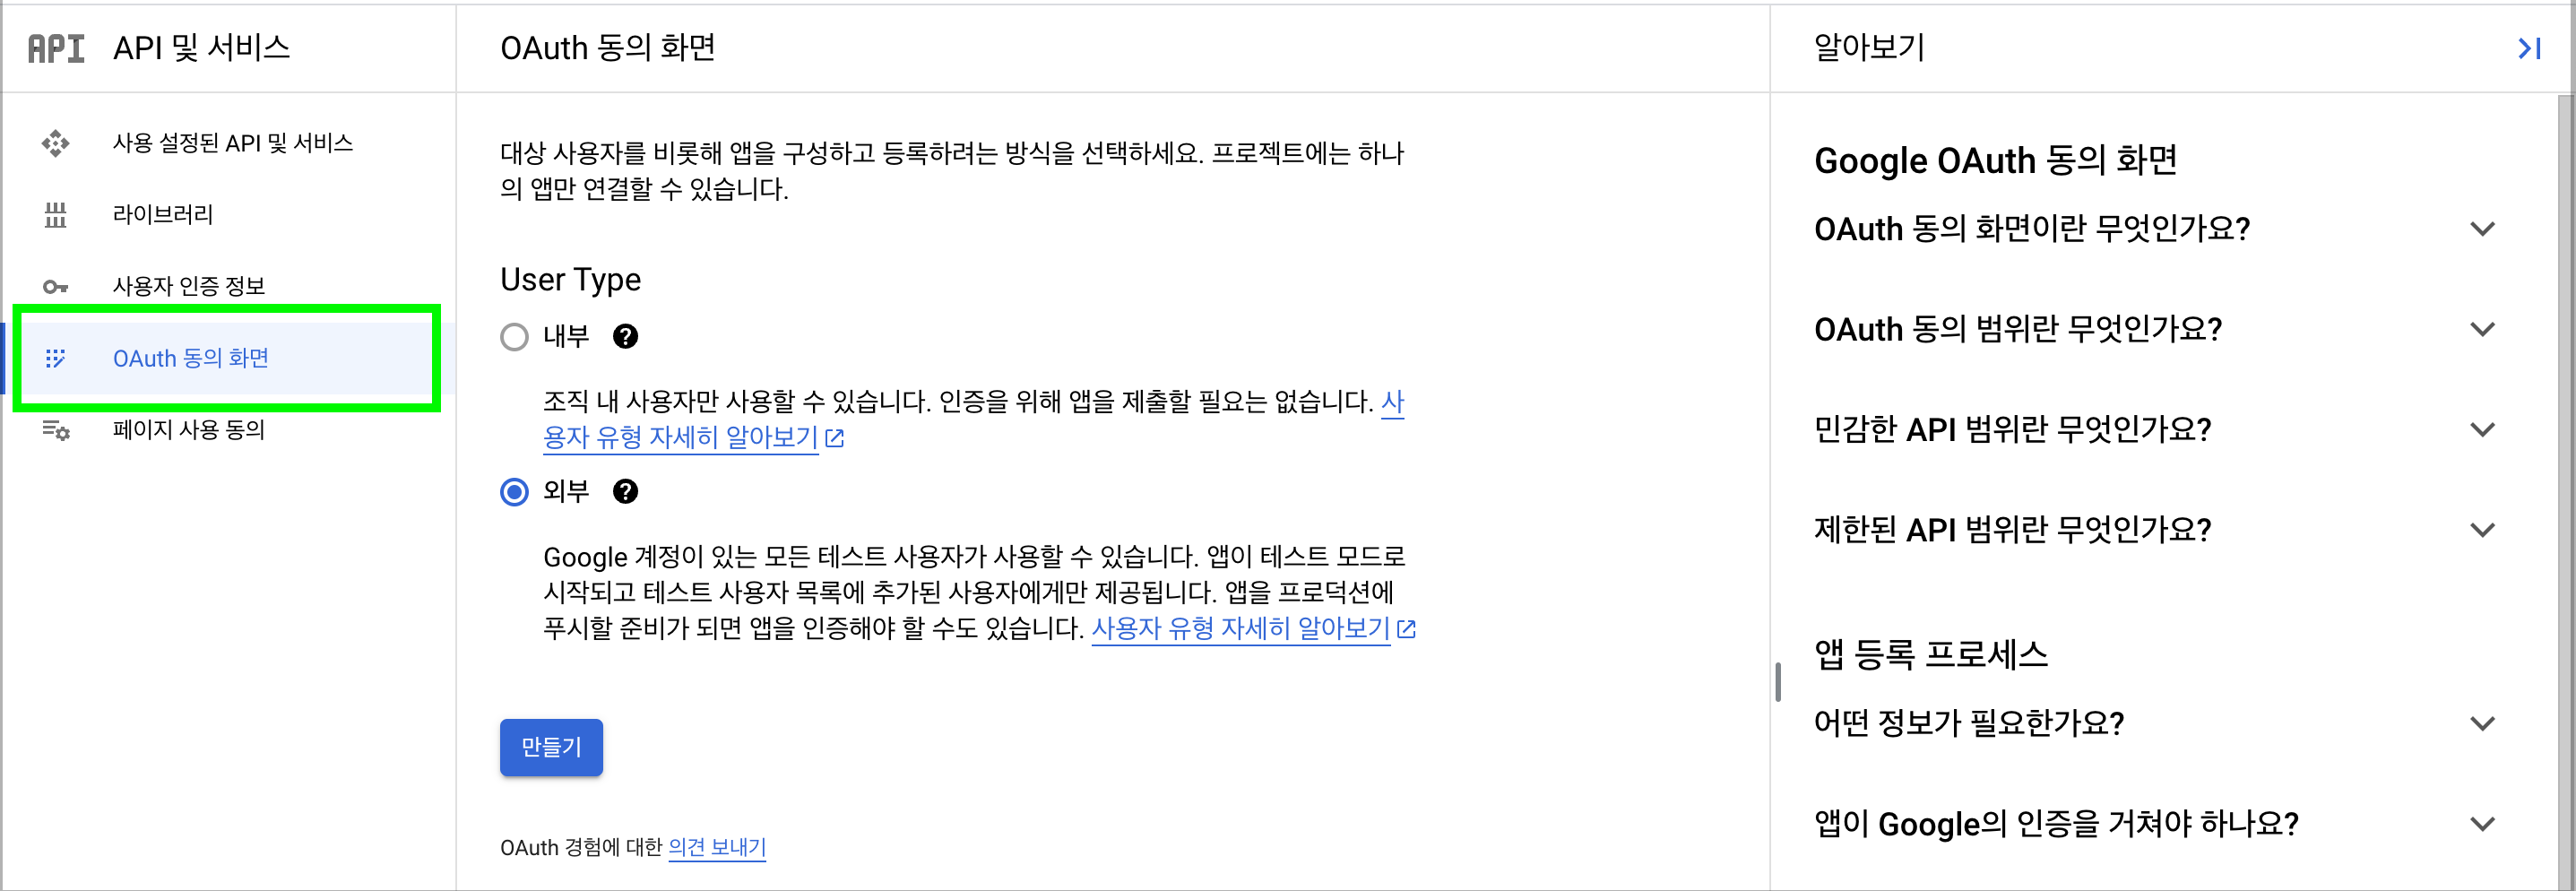
1. Configure the OAuth Consent Screen
- If you haven't configured the OAuth consent screen before creating a client ID, you must do so first.
- In APIs & Services > OAuth consent screen, configure the screen that users will see when they authorize the creation of their credentials.
- If you're not using Google Workspace, you can only select Externalfor User Type.
- Follow the Learn more on the screen for other configuration-related settings.
2. Create a Google Cloud Client ID
- Under APIs & Services > User Credentials, select Create User Credentials > OAuth Client ID at the top to enter the Create OAuth client ID page.
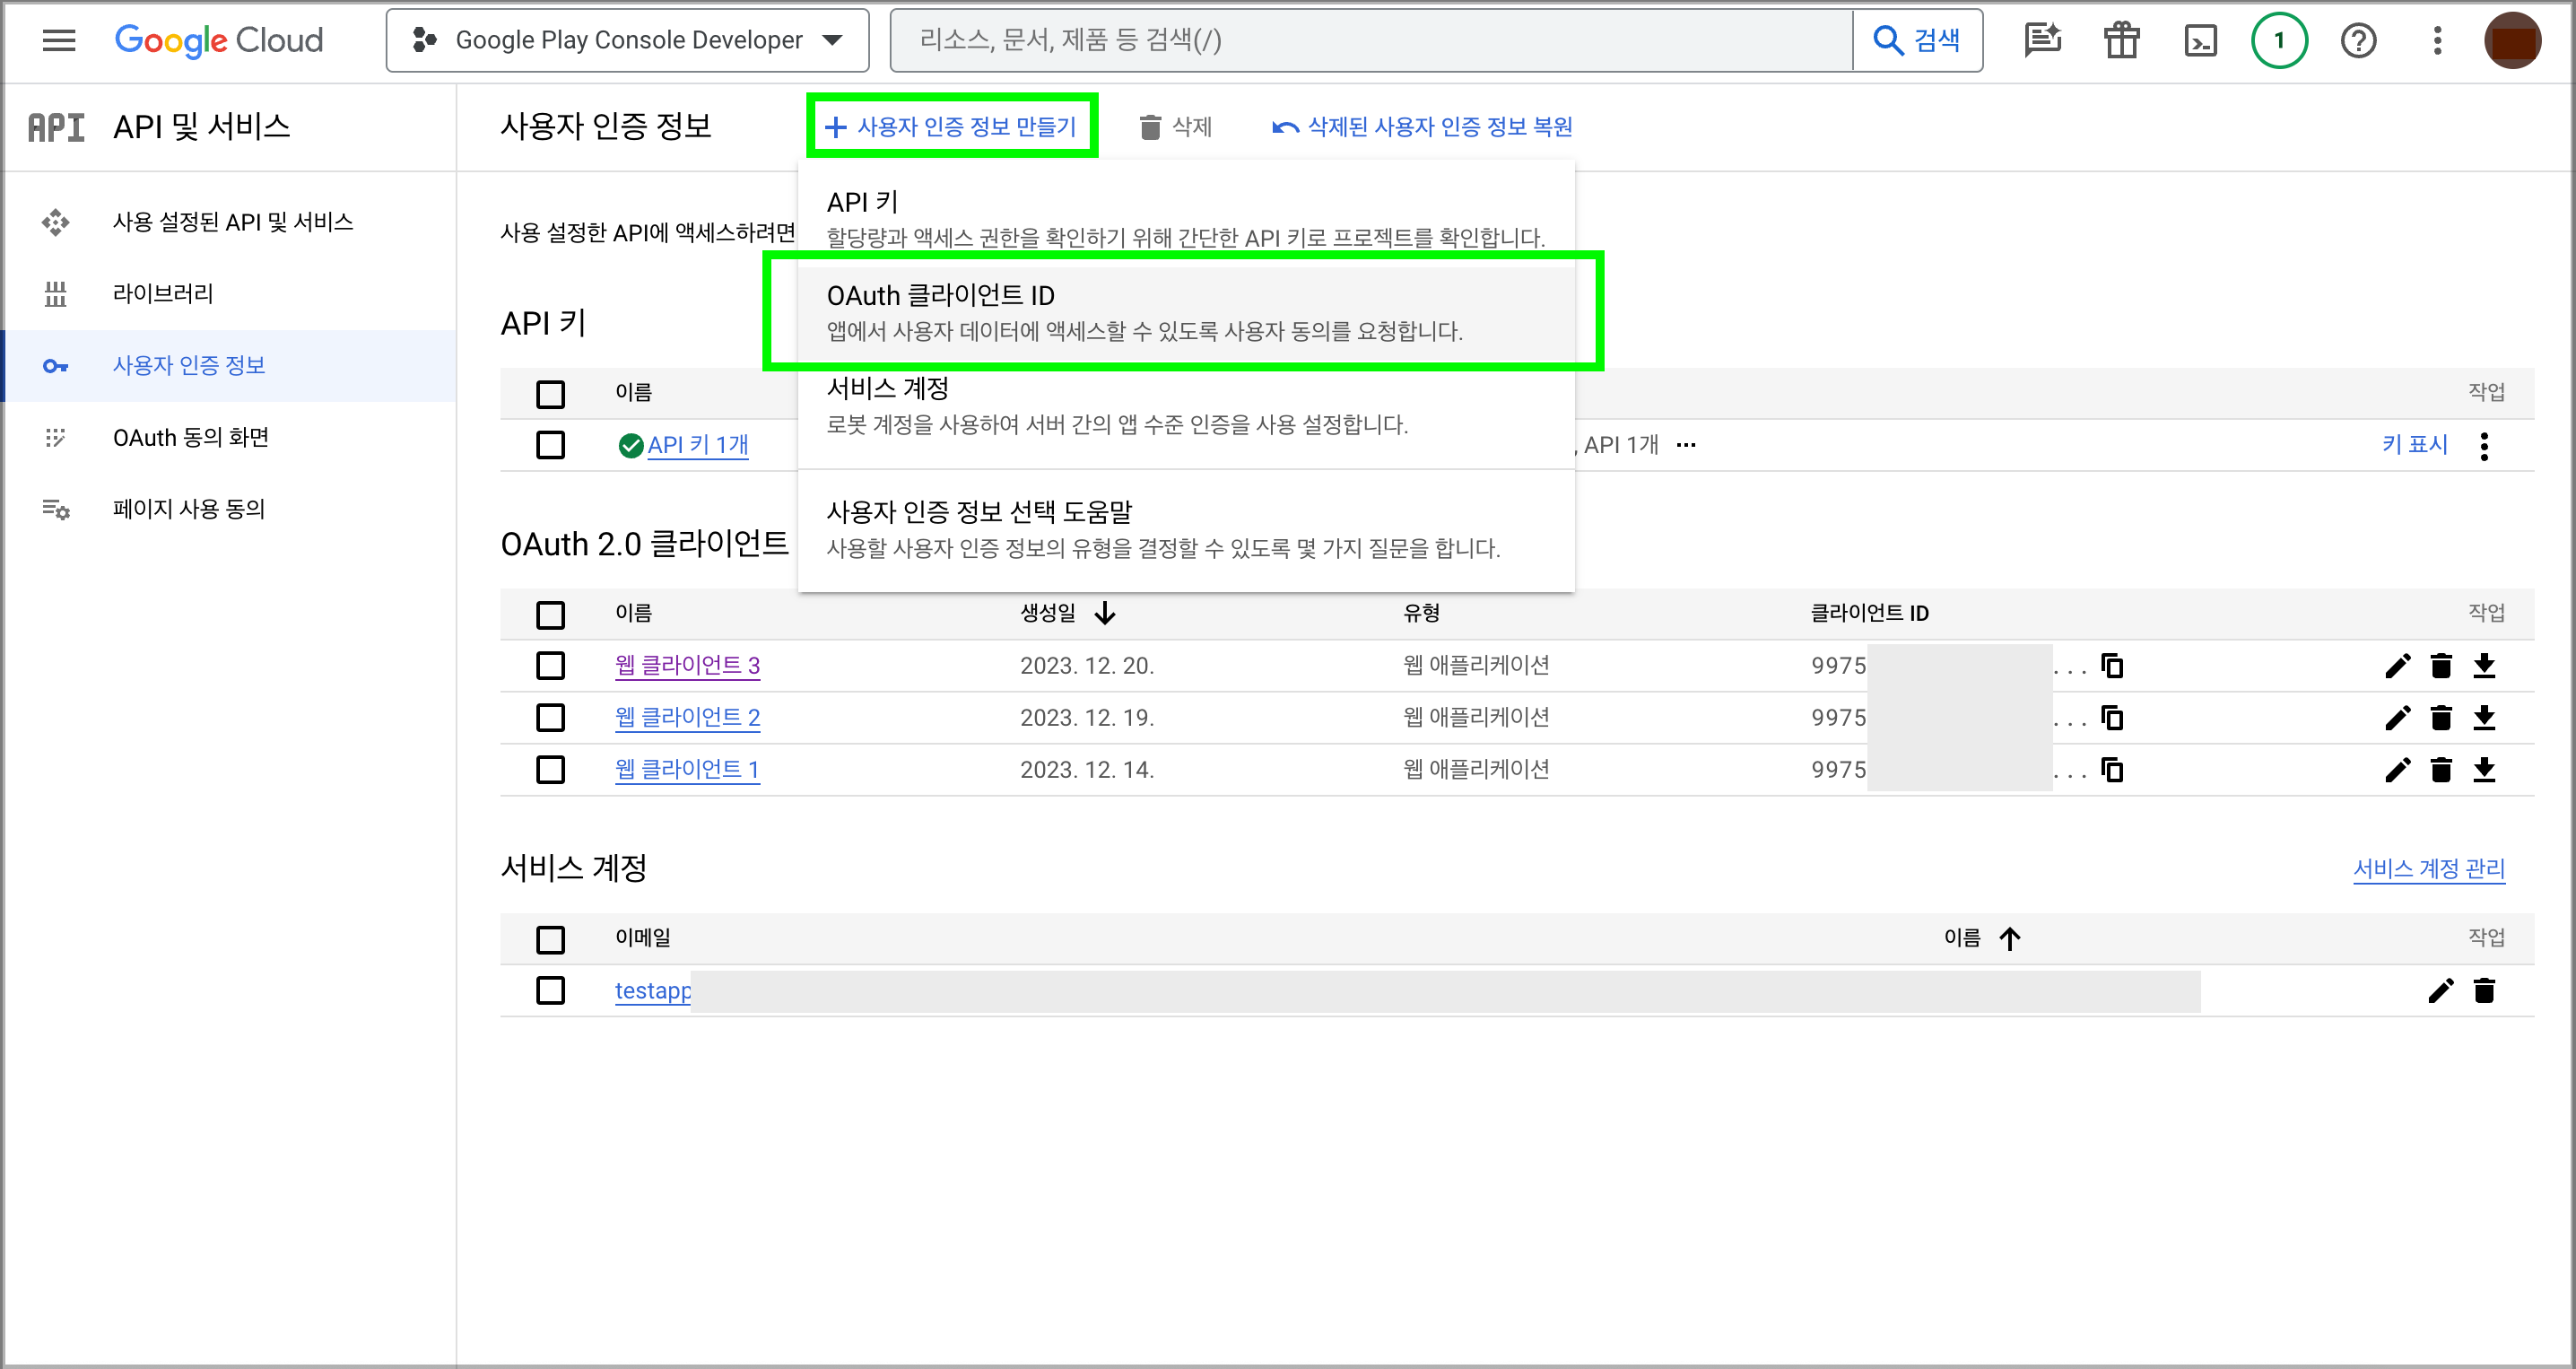
- For Application type, select web application.
- Enter a nameto identify the client ID.
- The authorized redirect URI is the address to which the result will be returned after user authorization on the OAuth consent screenyou set up earlier. If you set the application type to web application, you will receive the approved authorization code over the web.
- If you want to receive the authentication results in a separate user web application, you can also set the user's web address. In this example, we'll use the Google Developers site to verify the credentials.
- For authorized redirect URI, enter
https://developers.google.com/oauthplayground.
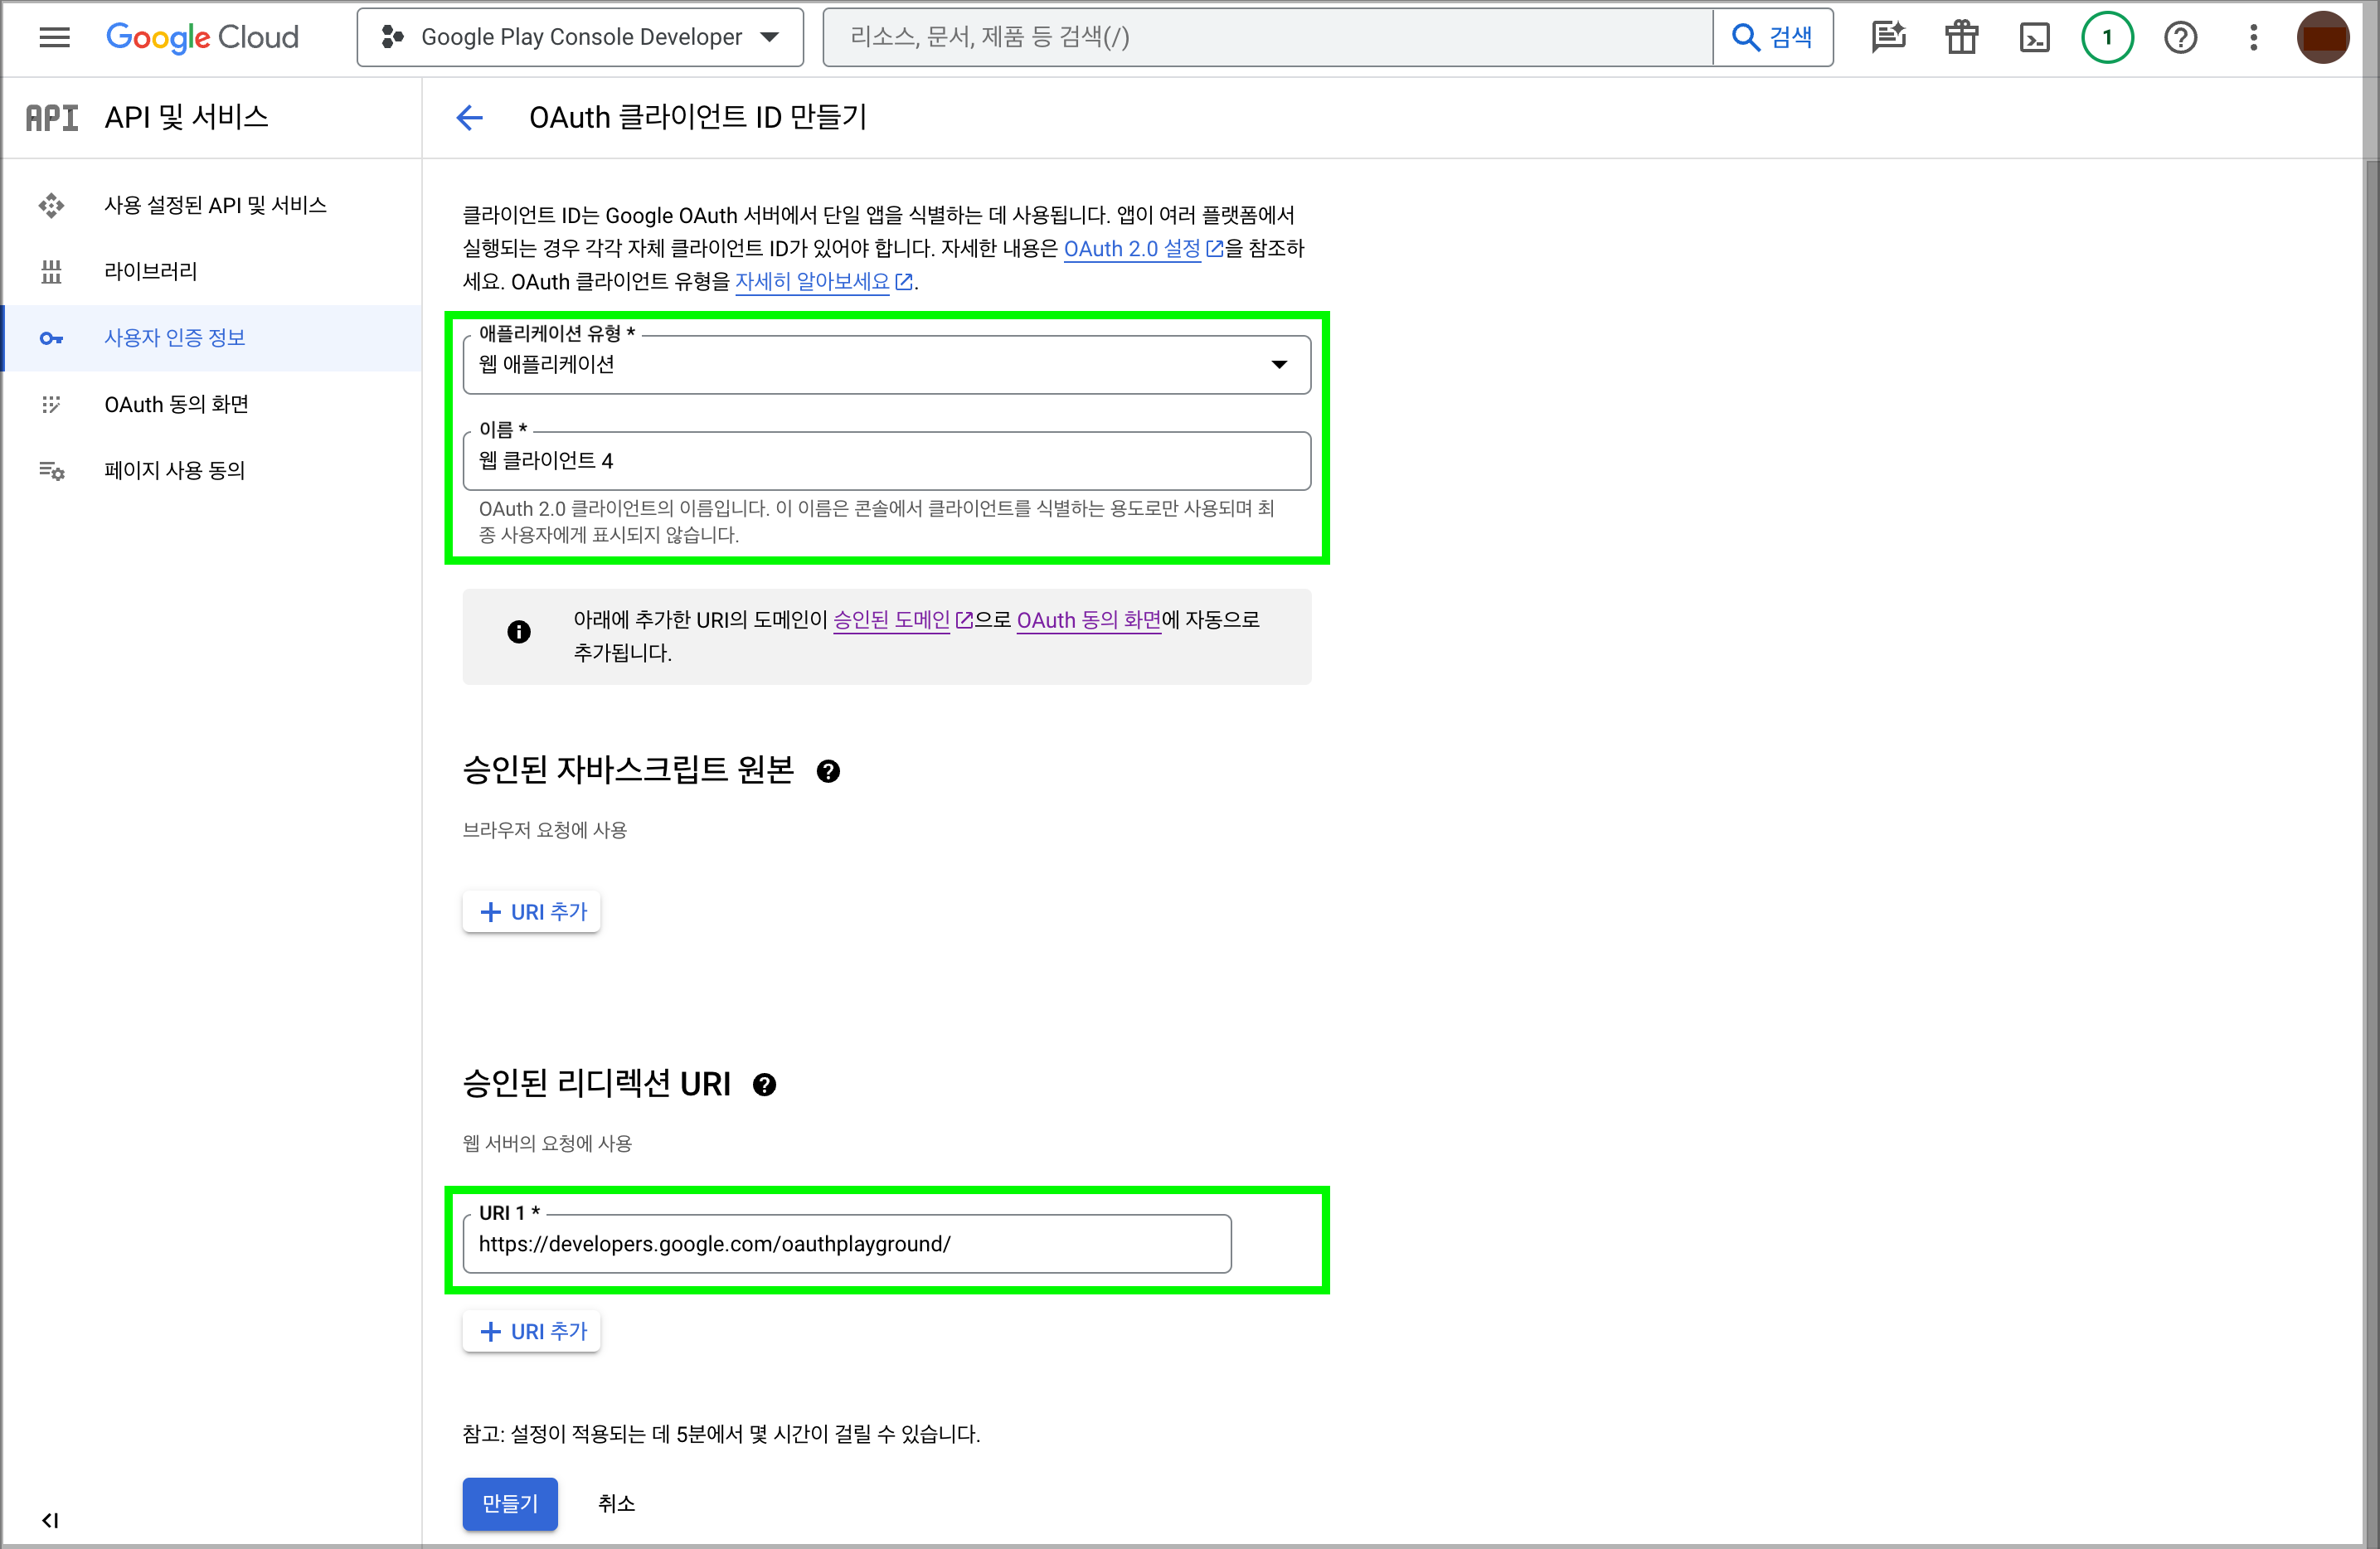
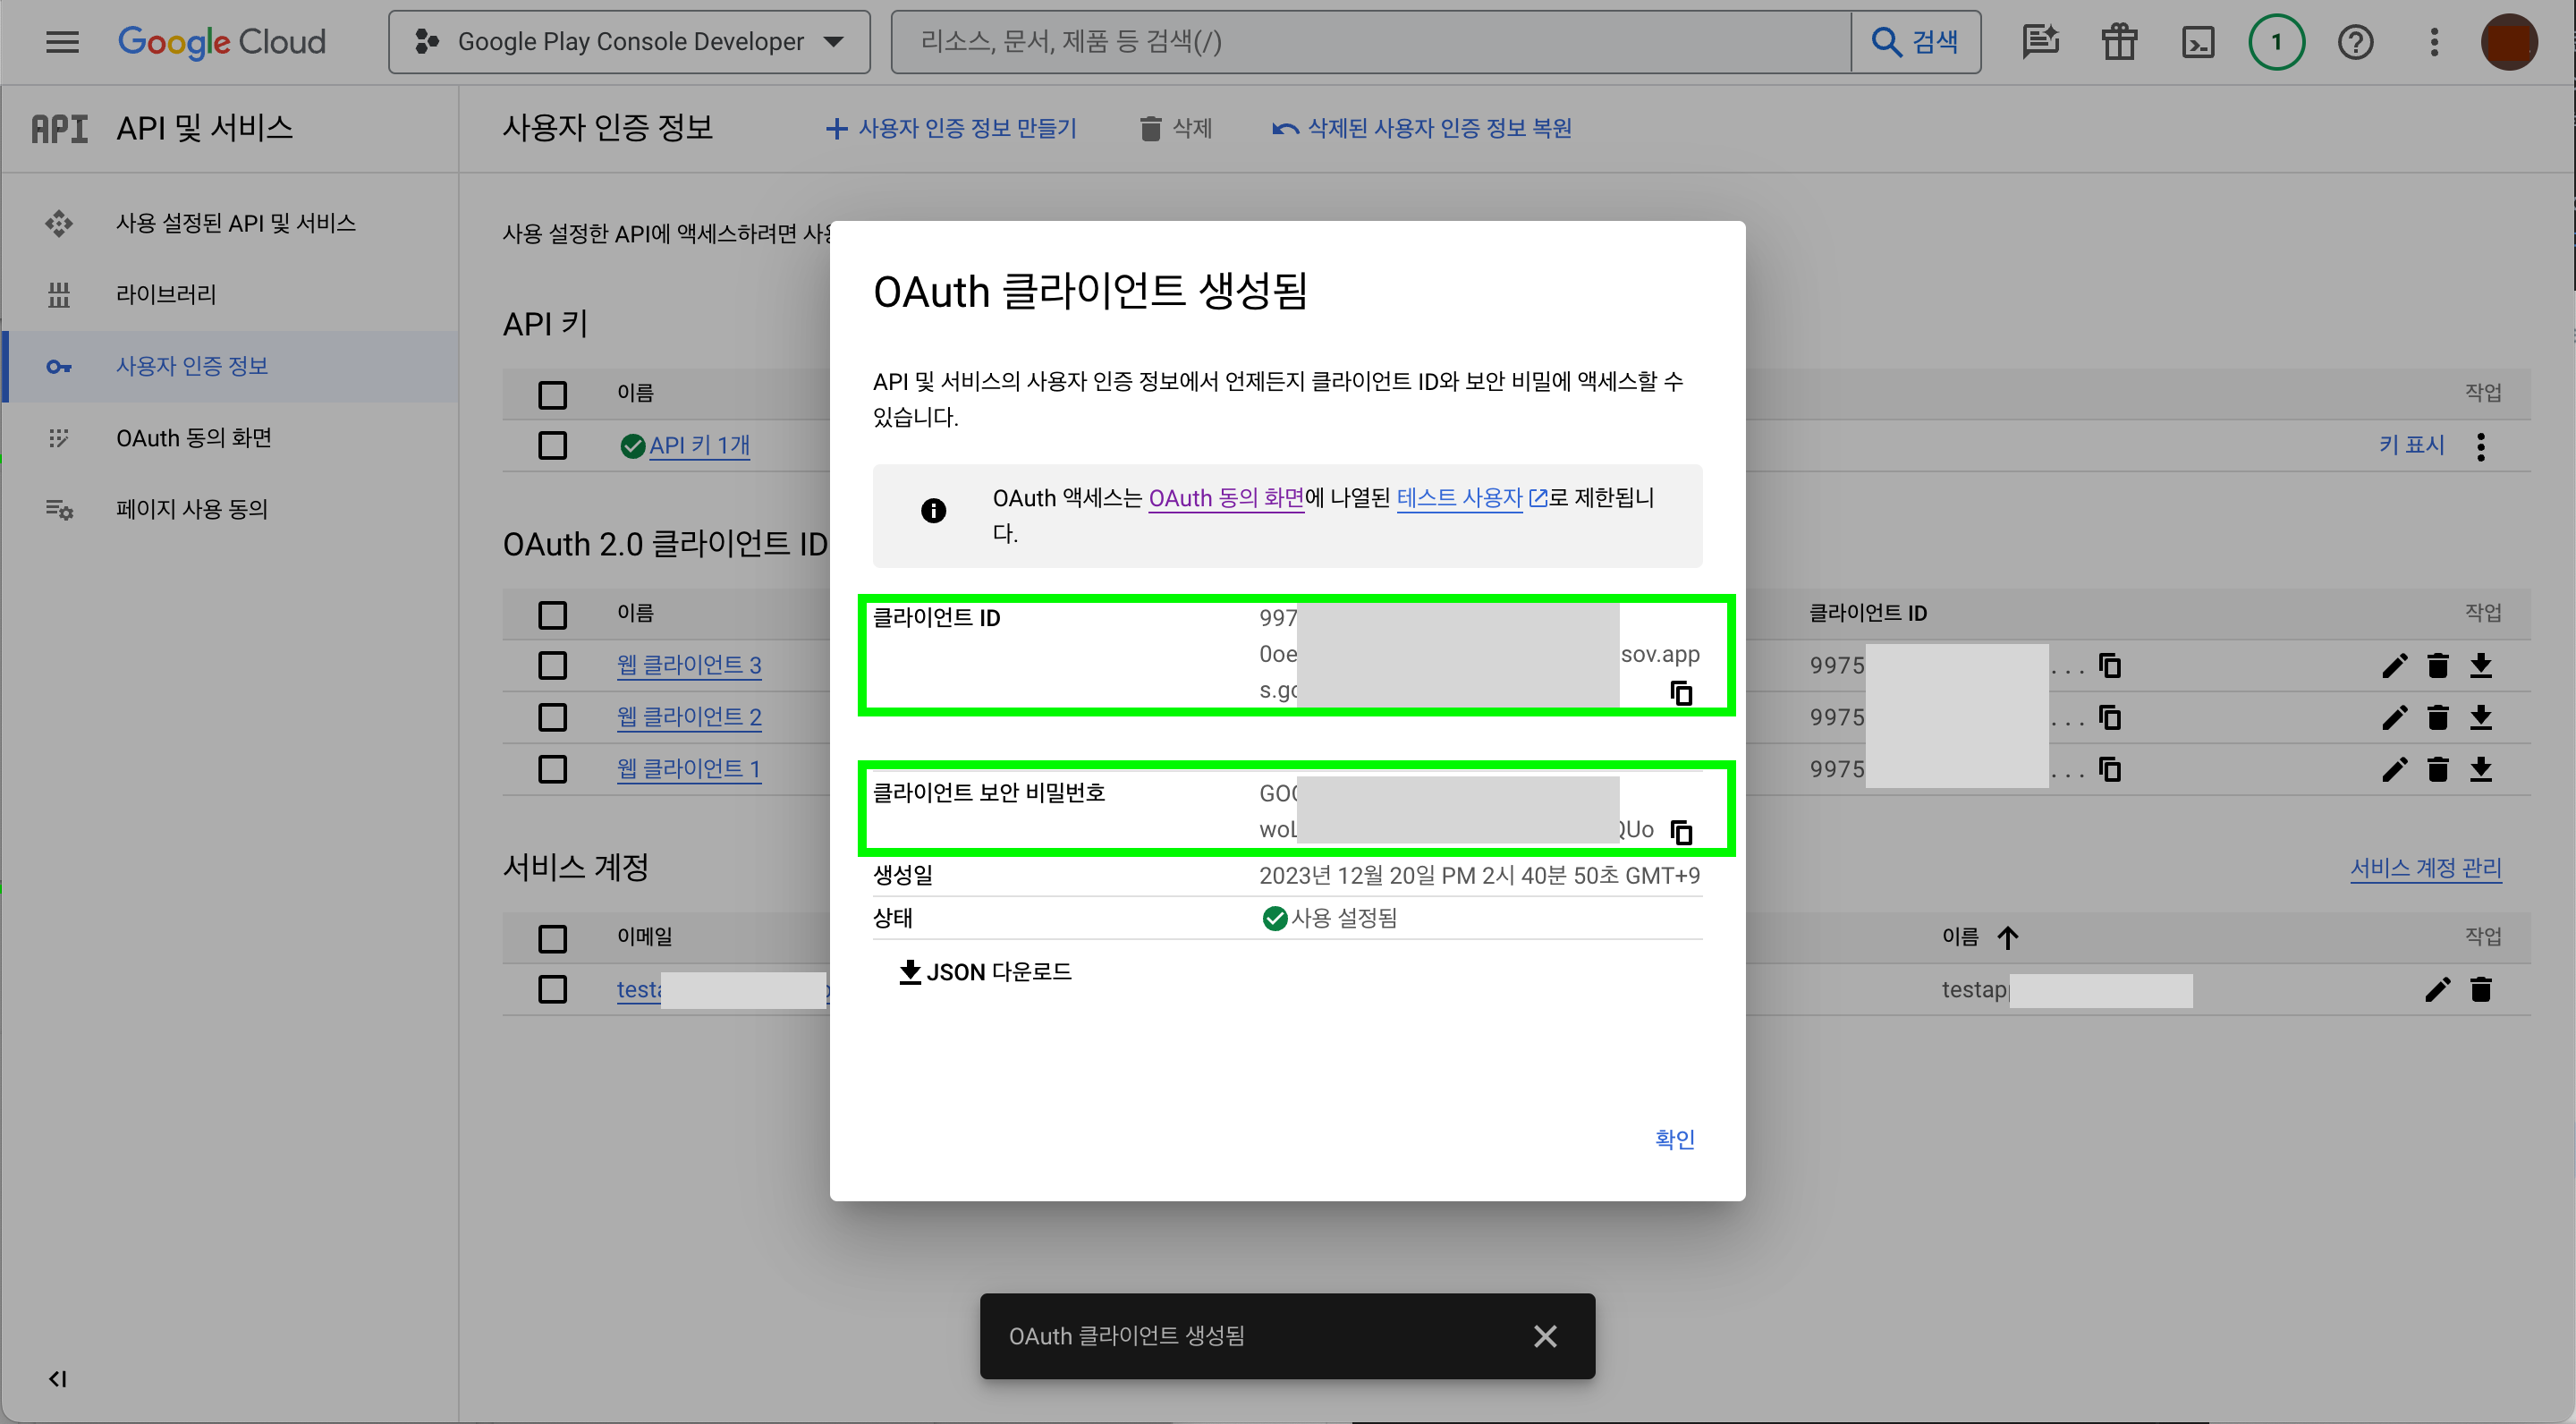
- Click Createto create an OAuth client, and you'll see the client ID and client security password.
3. Create a Refresh Token with OAuth Client
- Access the Google Developers - OAuth 2.0 Playgroundto generate a Refresh token.
- In Step 1, select https:
//www.googleapis.com/auth/androidpublisherof Google Play Android Developer API v3 used for authentication. - Click the gear button in the top right to open the OAuth 2.0 configuration , andcheck Use your own OAuth credentialsto bring up additional fields.
- Enter the client ID and client security password created earlier in OAuth Client ID and OAuth Client secret.
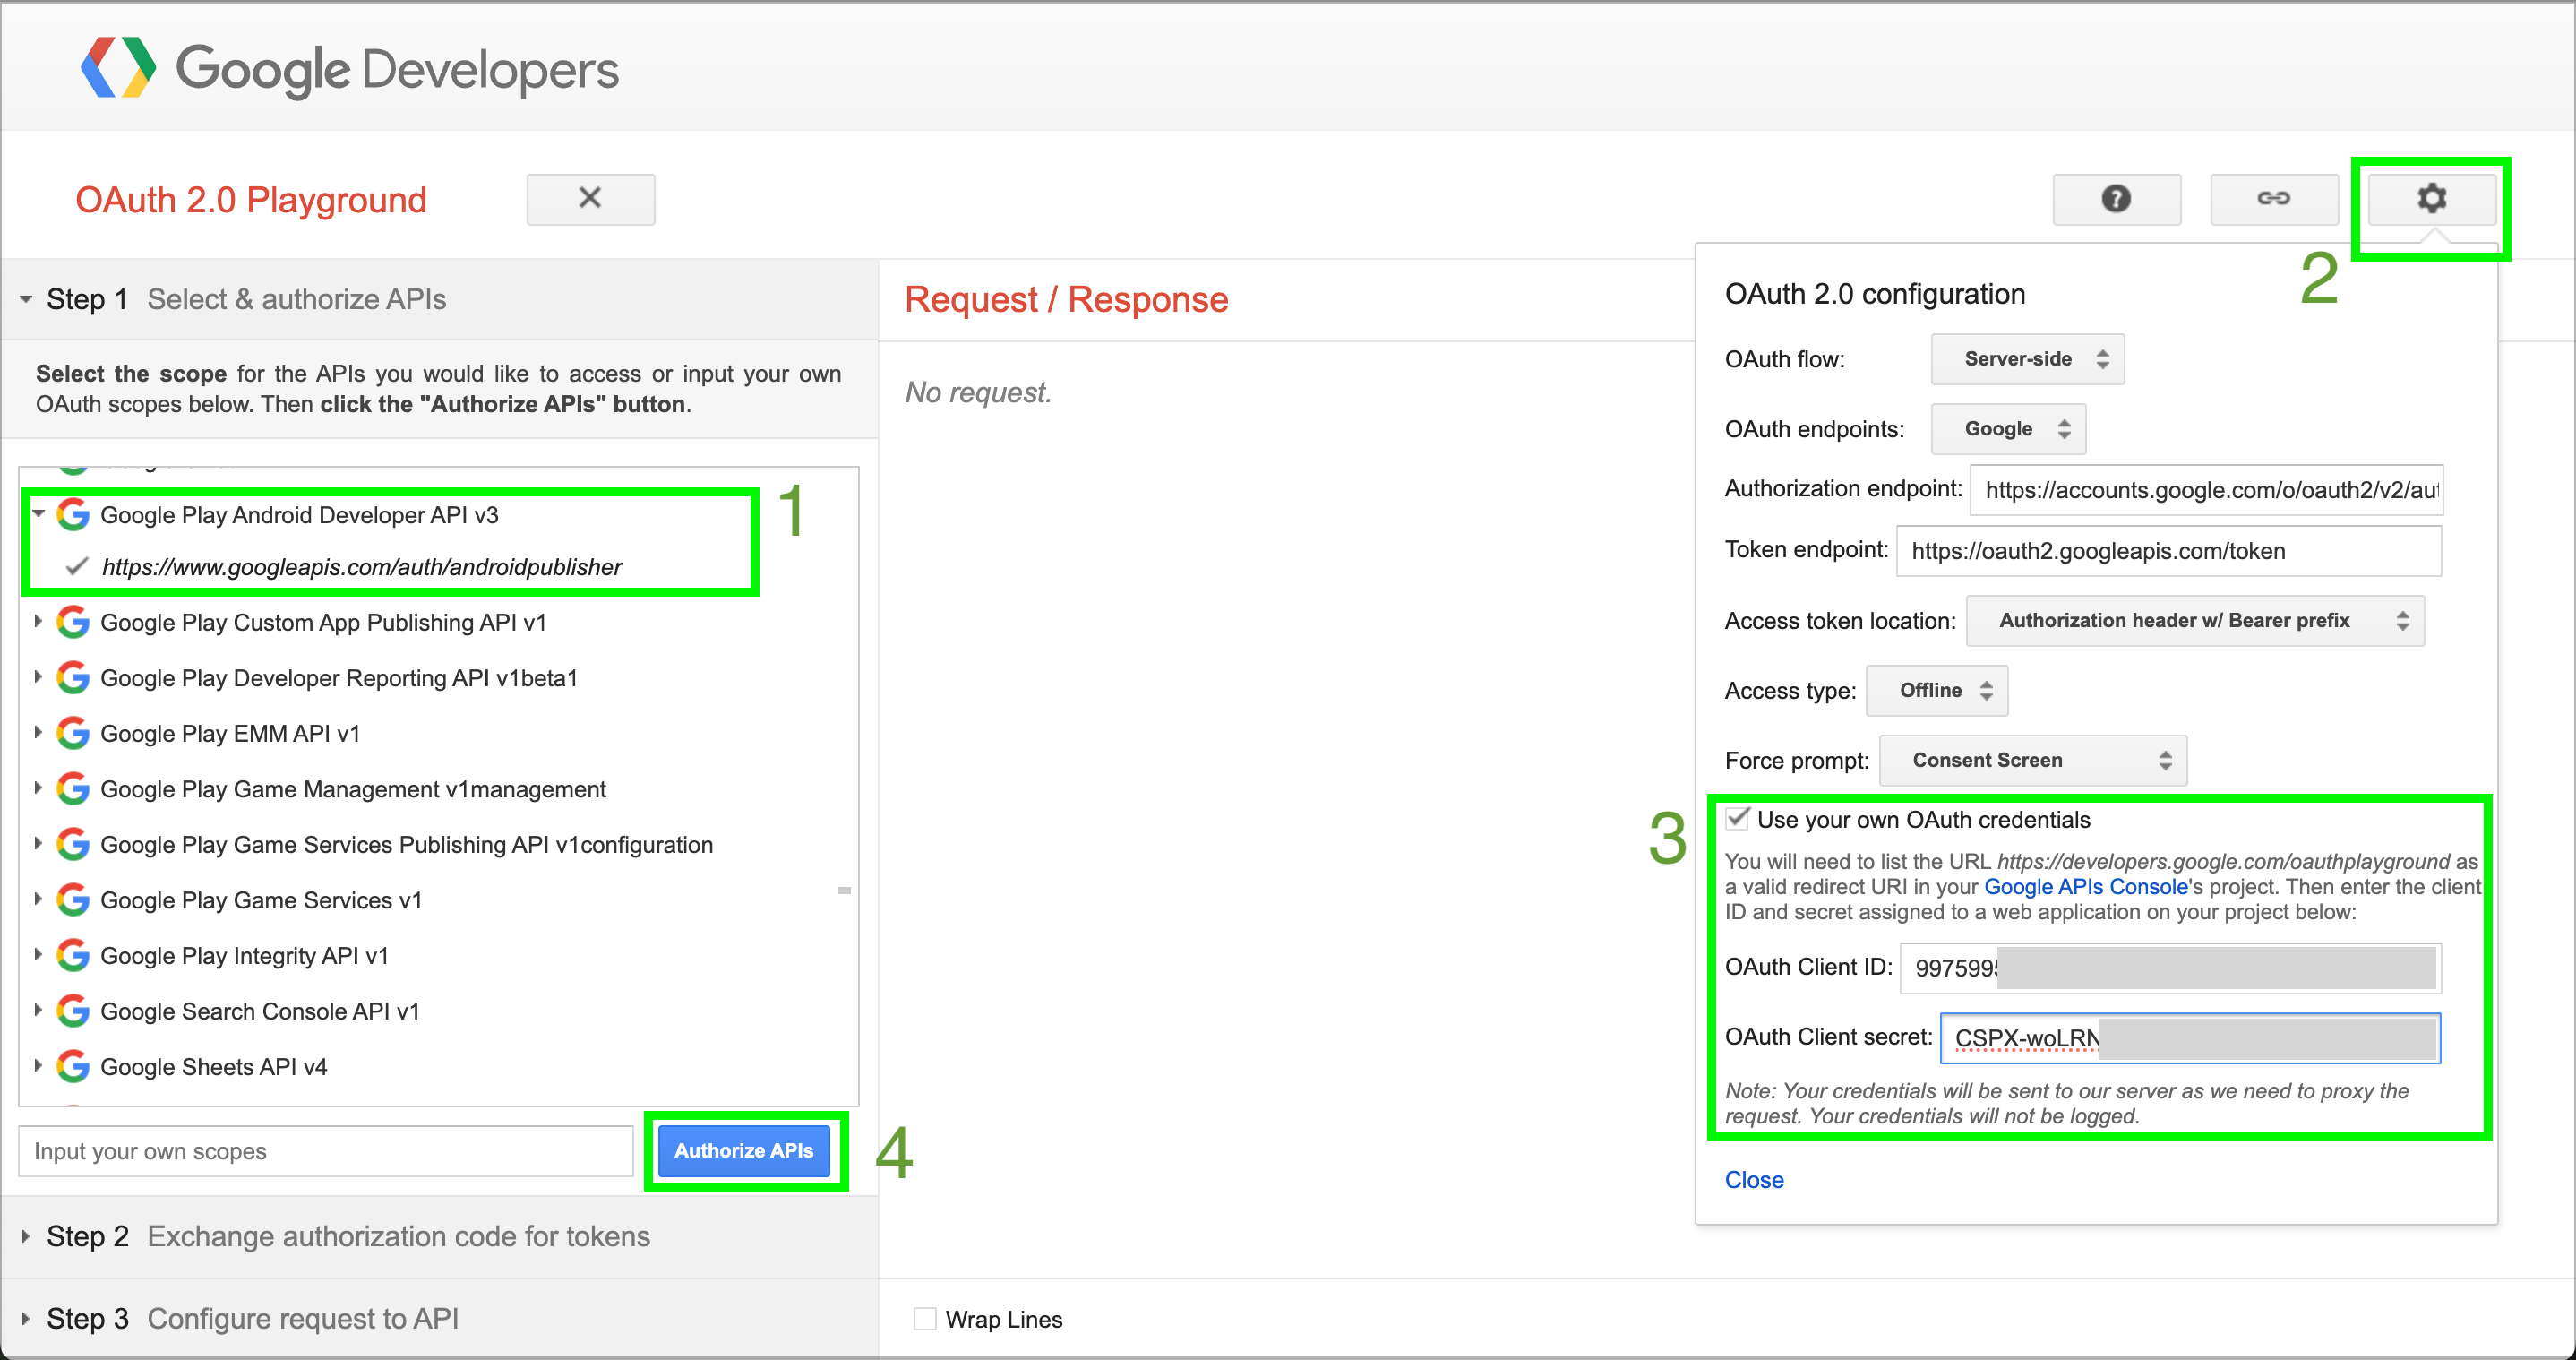
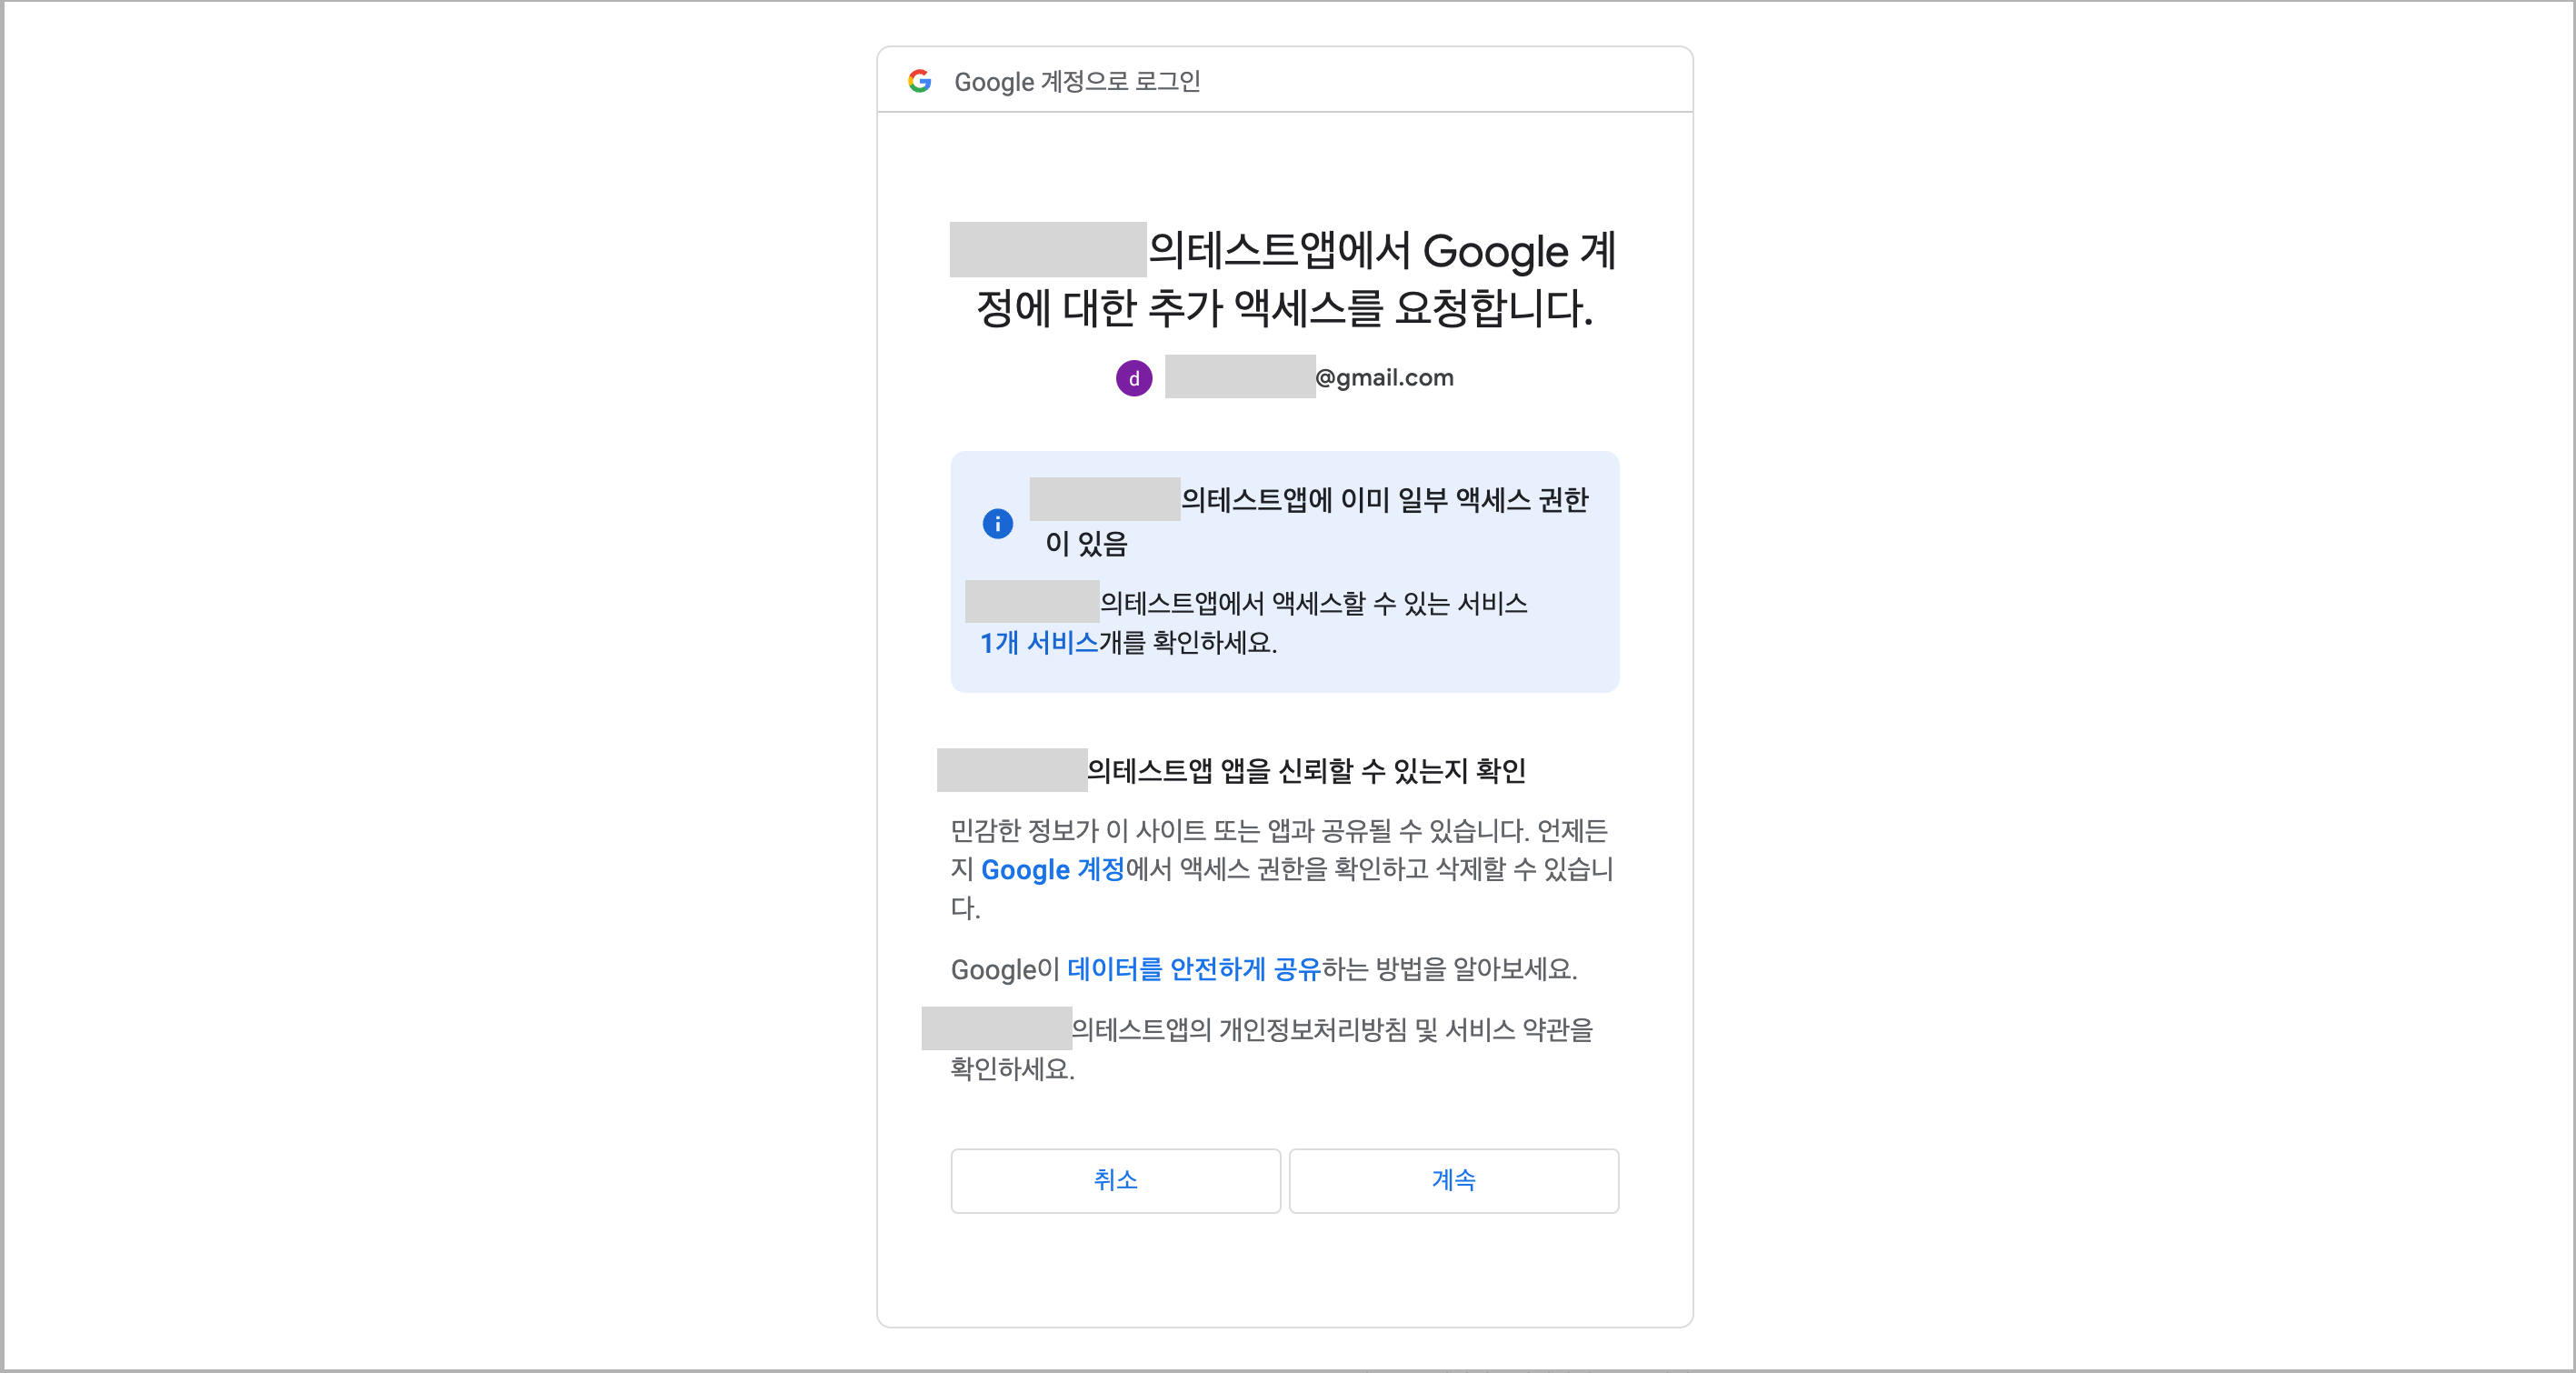
- Click the Authorize APIs button, and on the next sign-in page, sign in as a user with a Google Play Console developer account.
- When you sign in, you'll be taken to the page you configured in the OAuth consent screen menu.
- After clicking Continue, you will be redirected to Step 2 of Google Developers - Oauth 2.0 Playground.
- On the OAuth consent screen, if your publishing statusis Test, you might see the Apps not verified by Google screen.
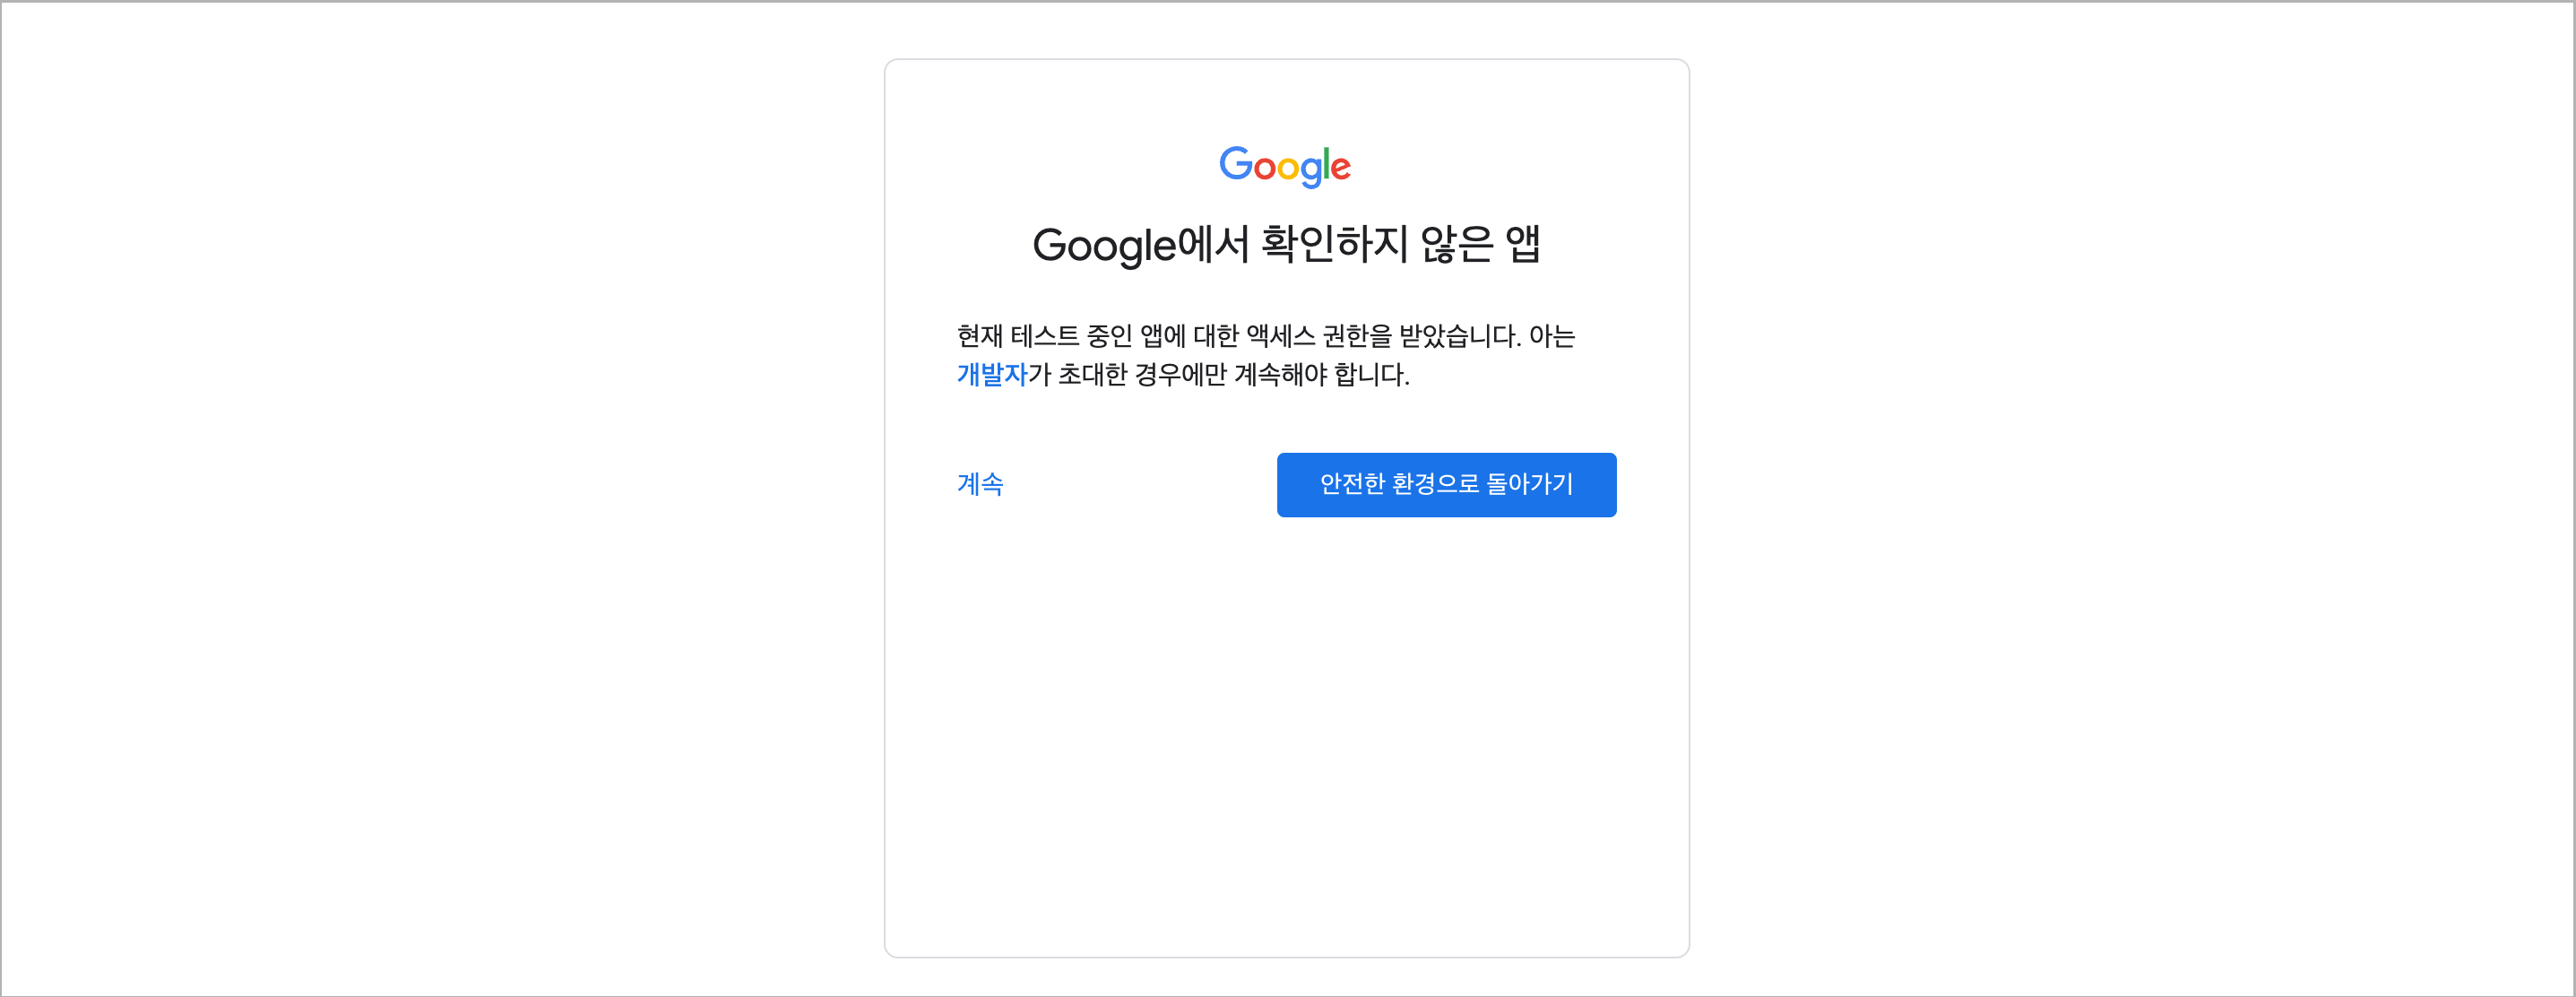
- If you didn't enter
https://developers.google.com/oauthplaygroundin the authorized redirect URI when you created your client ID, you cannot receive results. - If you are redirected successfully, you can verify your authorization code in Step 2.
- Here, click Exchange authorization code for tokensto get a Refresh token and Access token.
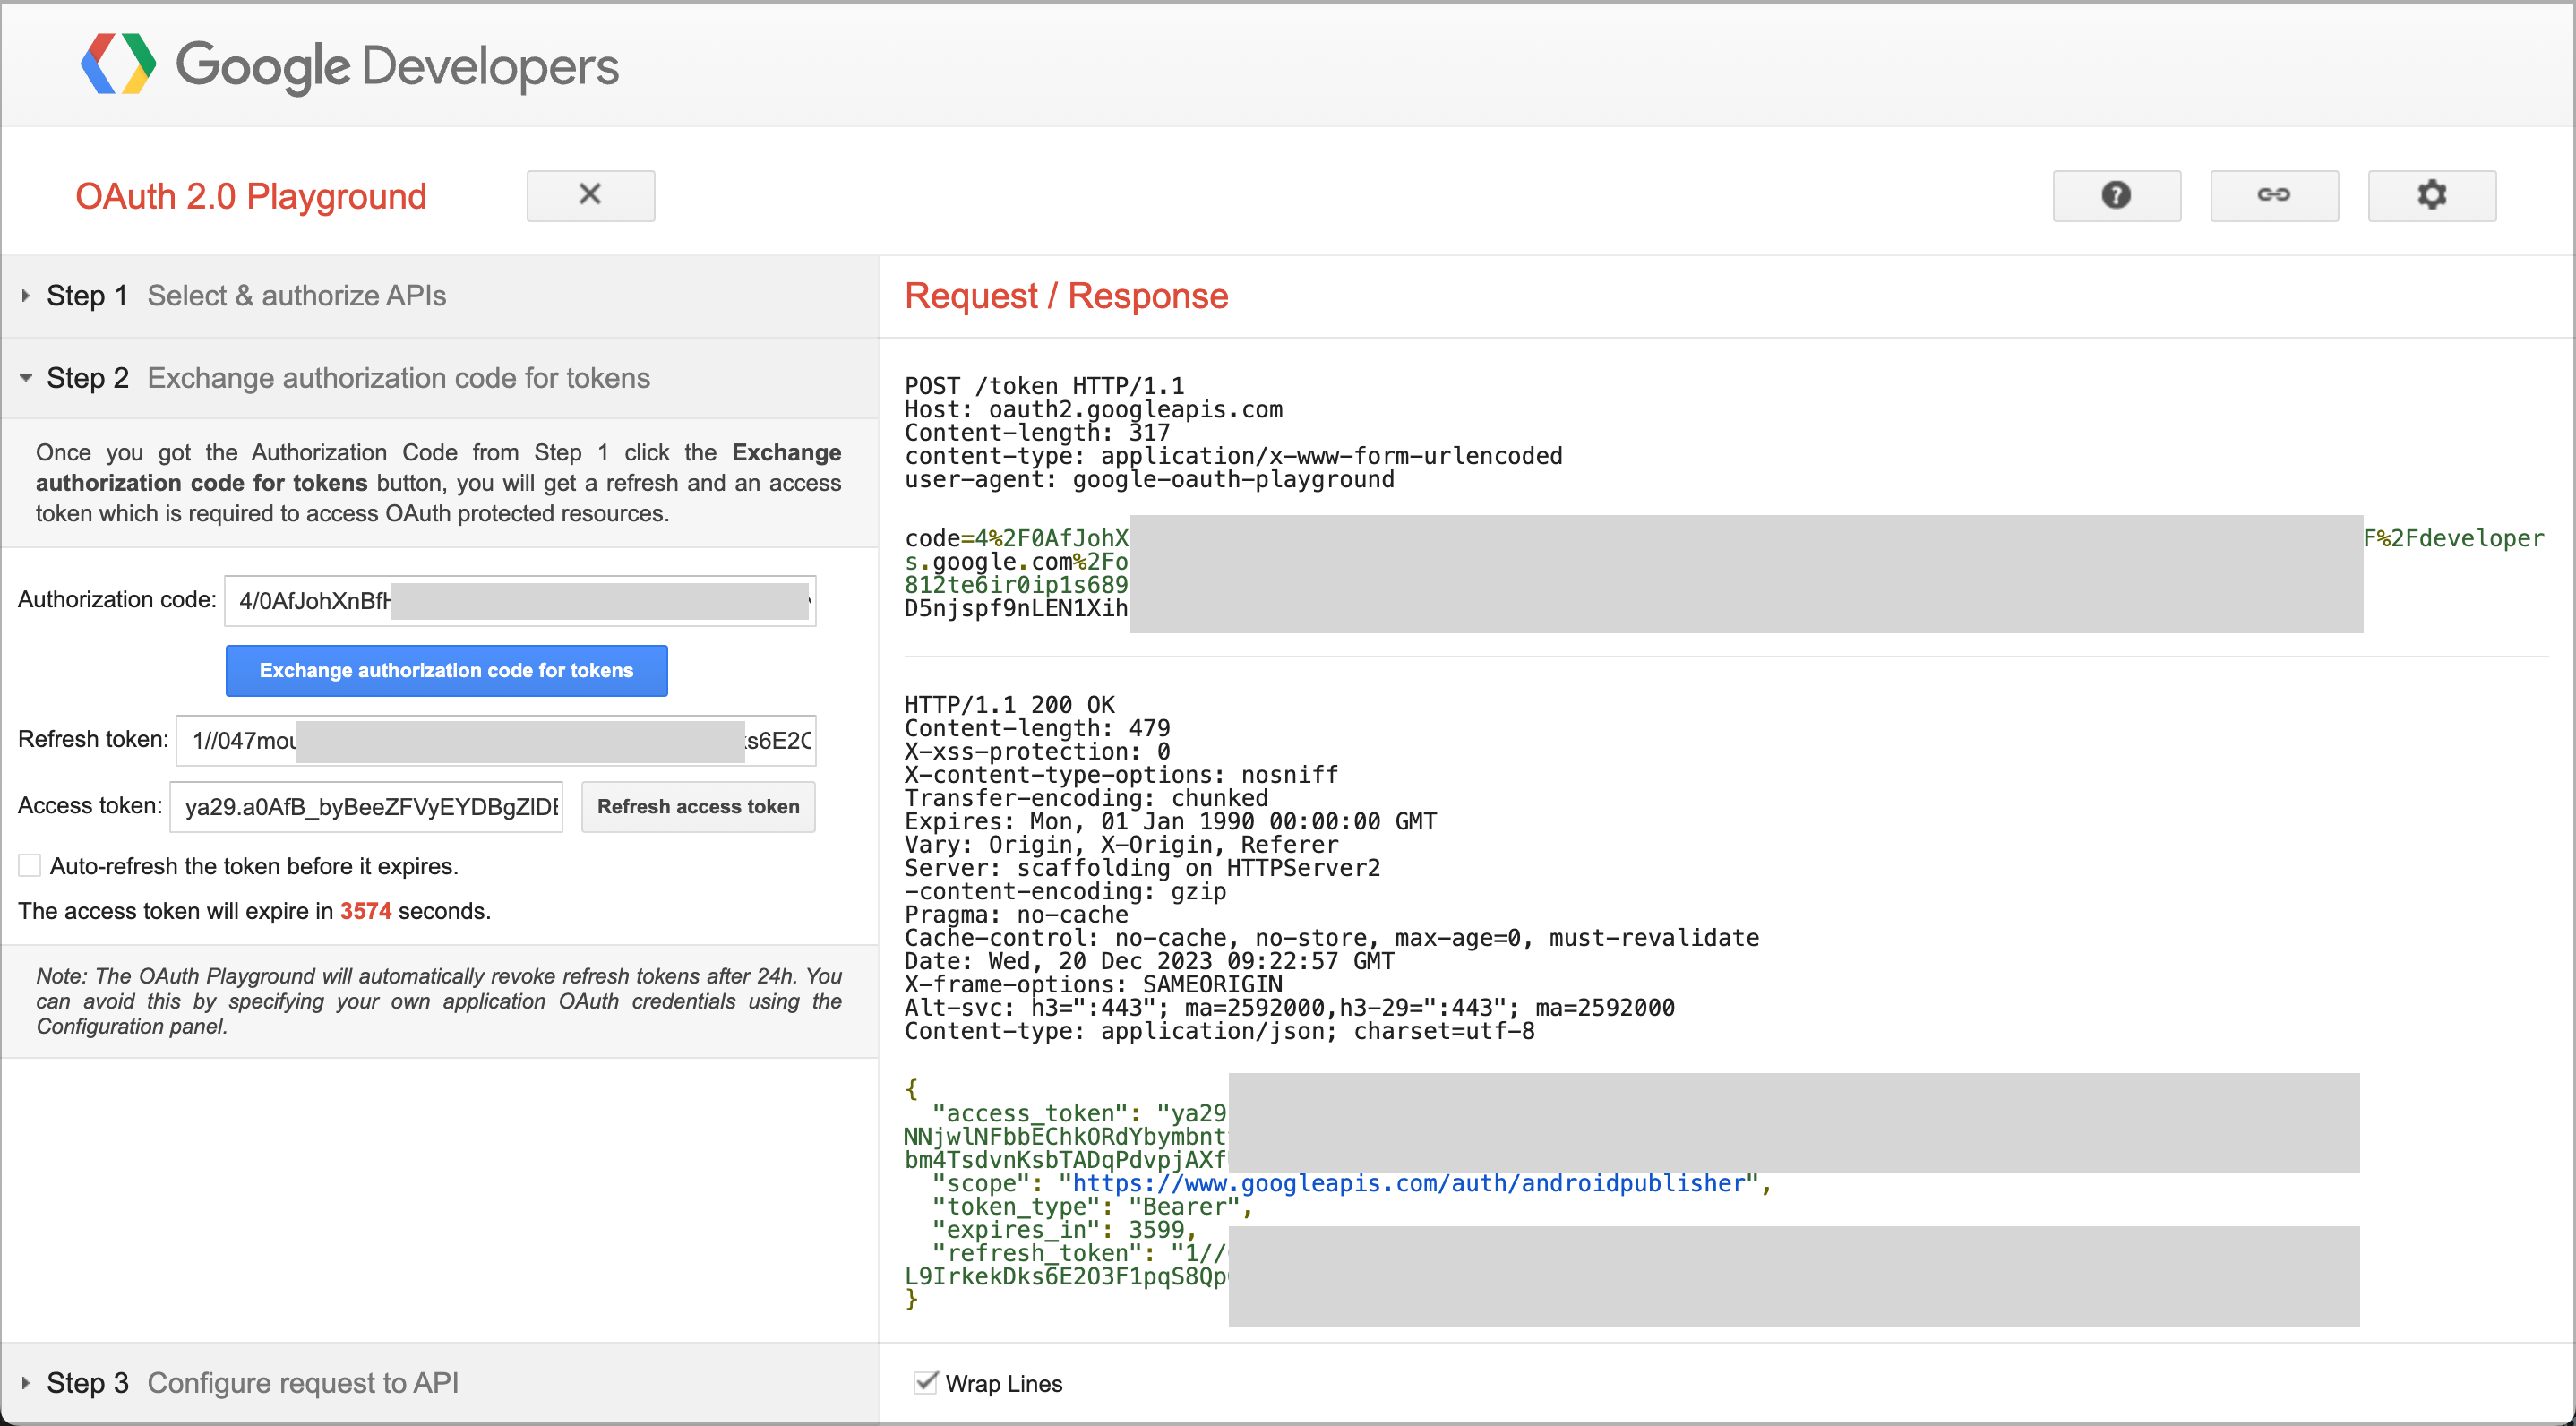
- You don't need to proceed with Step 3.
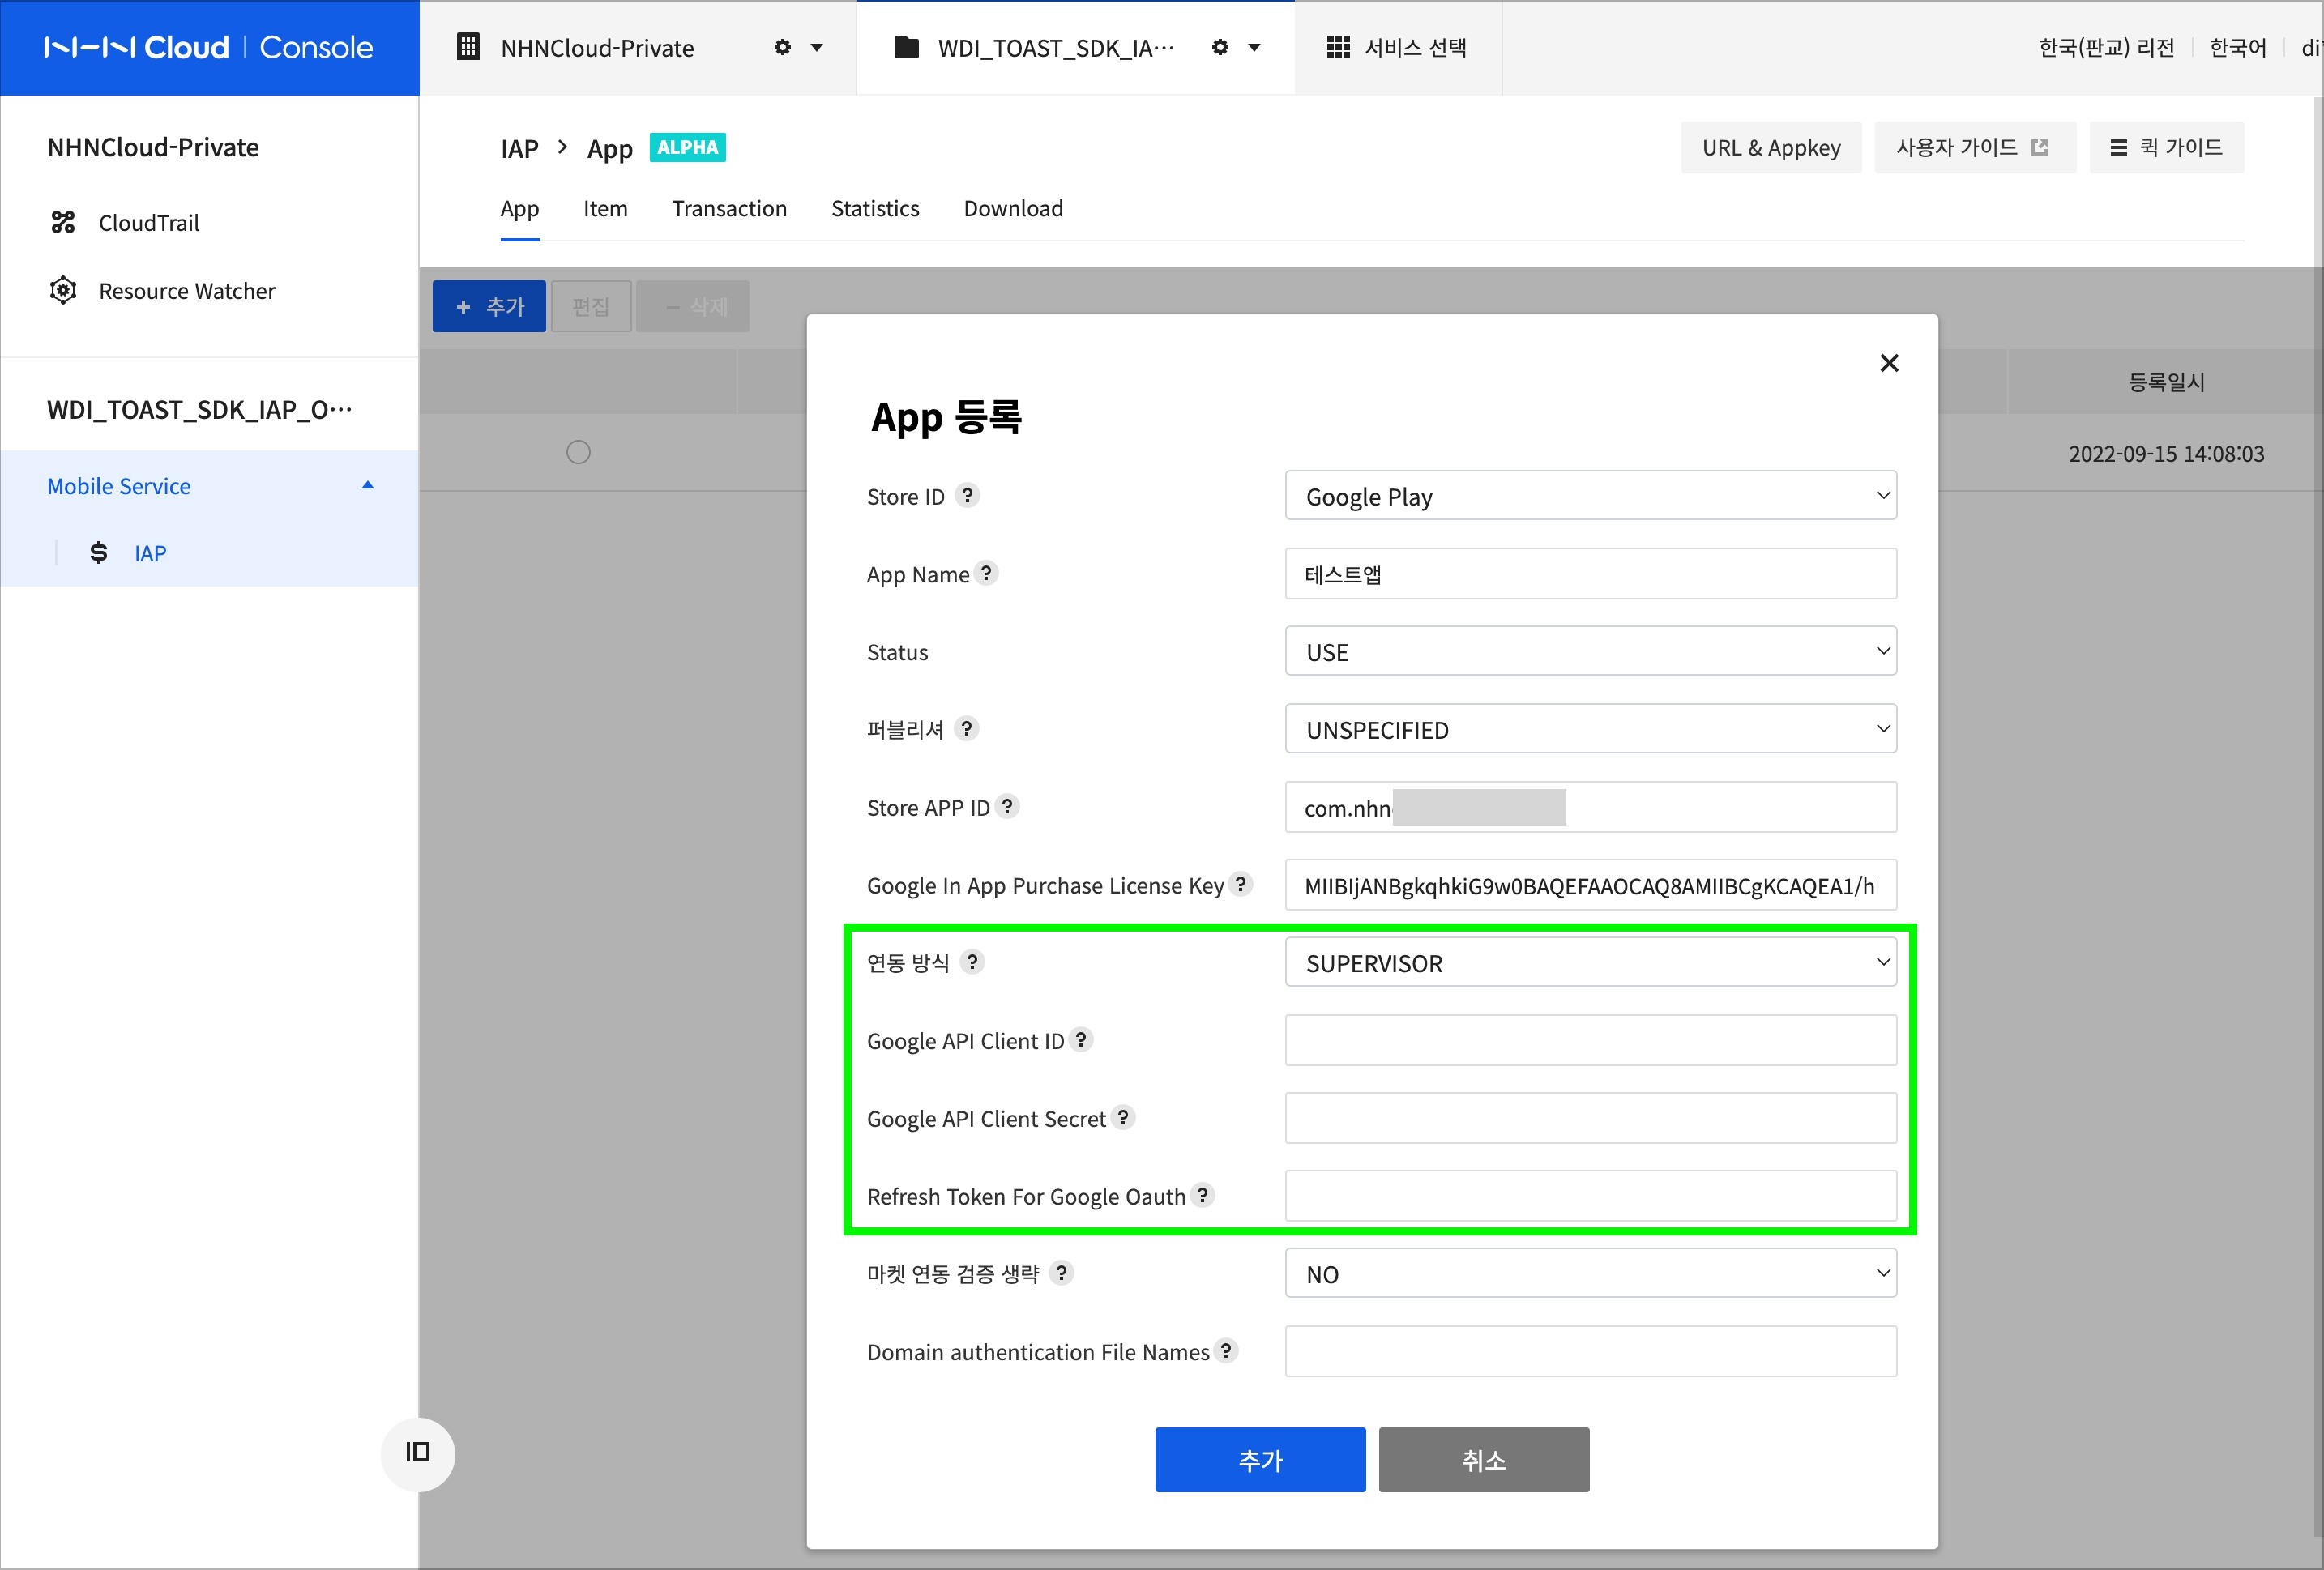
4. Set up Client Information in NHN Cloud IAP app
- In IAP > App > Add or Modify, enter the information you verified in Google Cloud Console and Google Developers.
- Google API Client ID: Enter your client ID
- Google API Client Secret: Enter your client security password
- Refresh Token For Google Oauth: Enter the Refresh tokenreceived from the Google Developers OAuth Playground
[Caution]
The Refresh token issued will expire immediately if you change the password of the user account you authenticated with. If your app is live, this can cause a failure. There are other reasons for expiration, please check out Google's OAuth 2.0 guide - Refresh token expiration.
Setting up the SERVICE_ACCOUNT Integration Method
You can issue service accounts in Google Cloud IAM to allow non-human users to access Google Cloud resources. For differences from user accounts and operational strategies, see the [Google Cloud IAM documentation or the Google Cloud Authentication documentation.
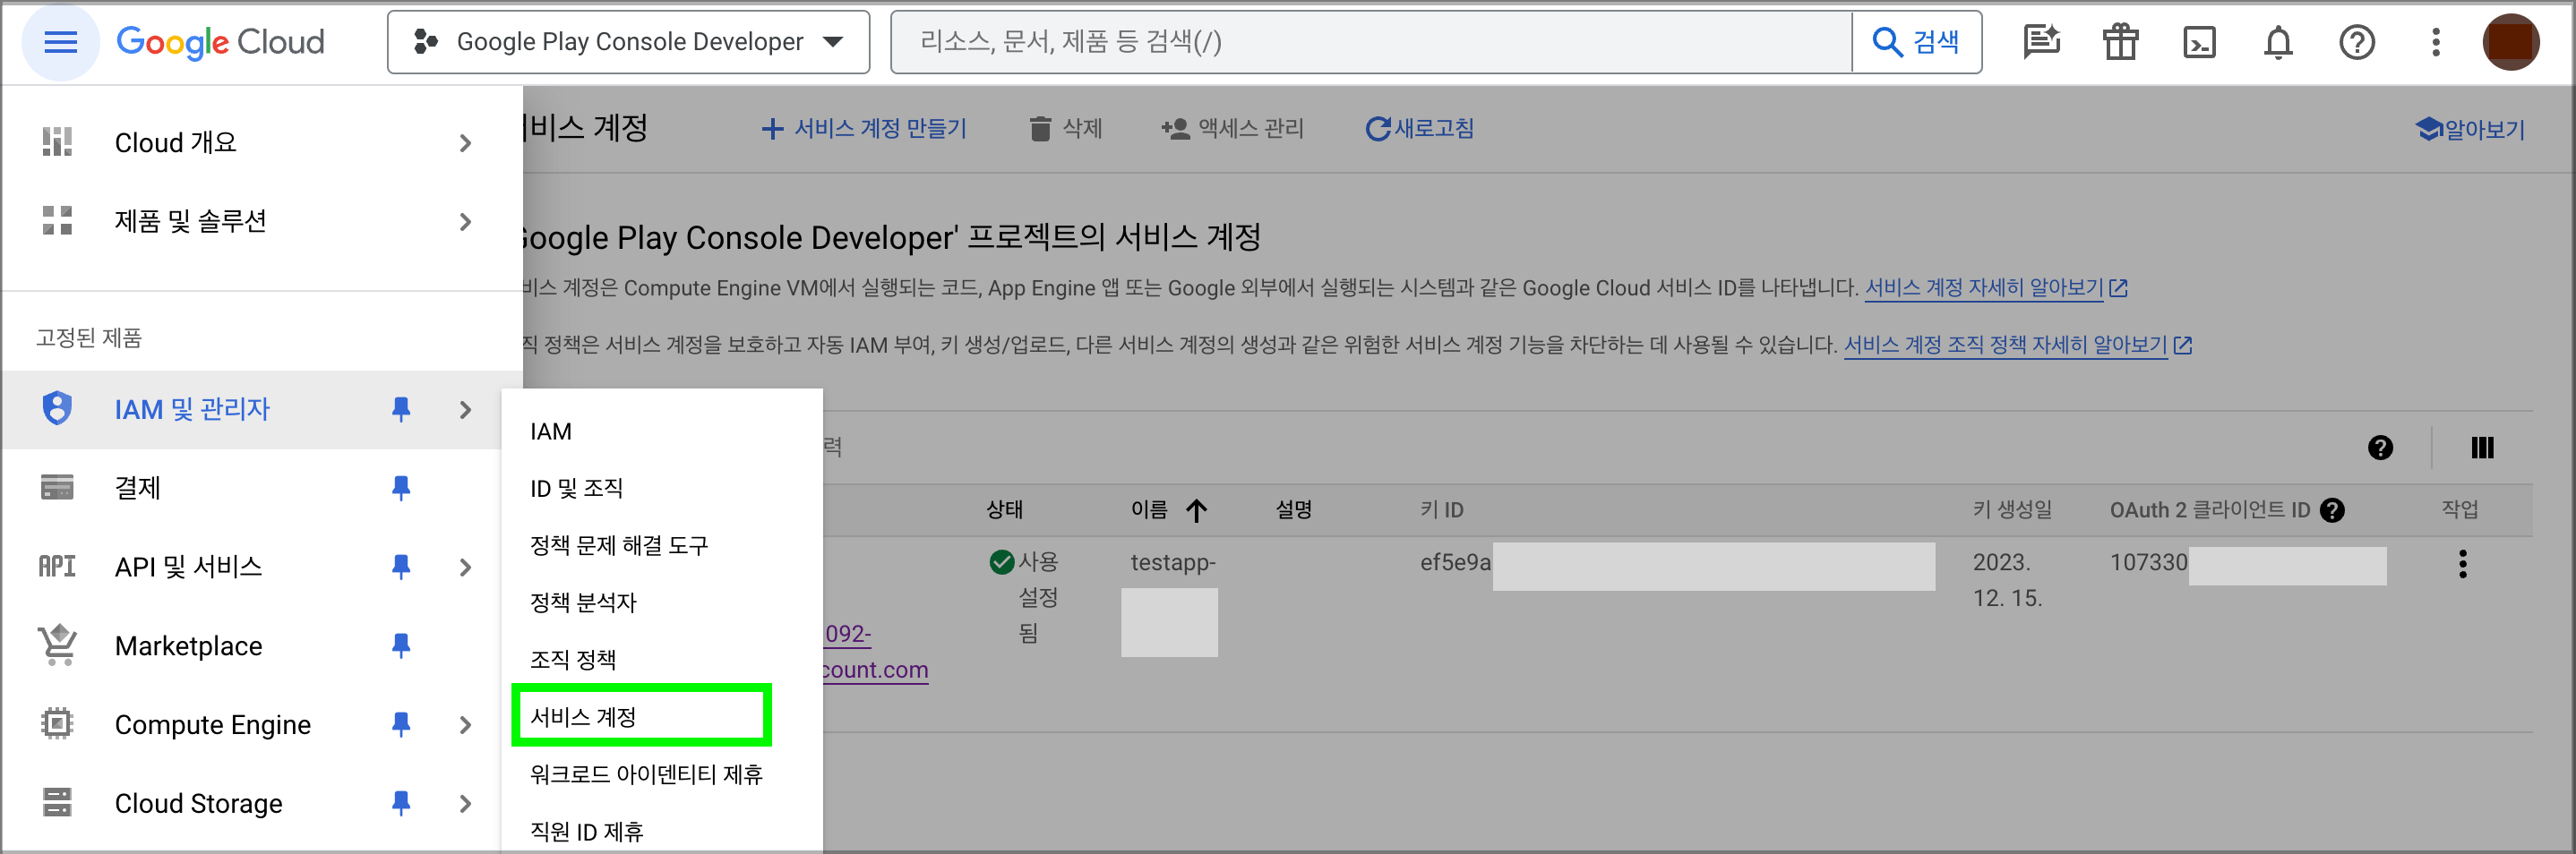
1. Create a Google Cloud Services Account
- In IAM & Admin > Service accounts, click Create Service Account, or in APIs & Services > User credentials, select Create User Credentials > Service Account.
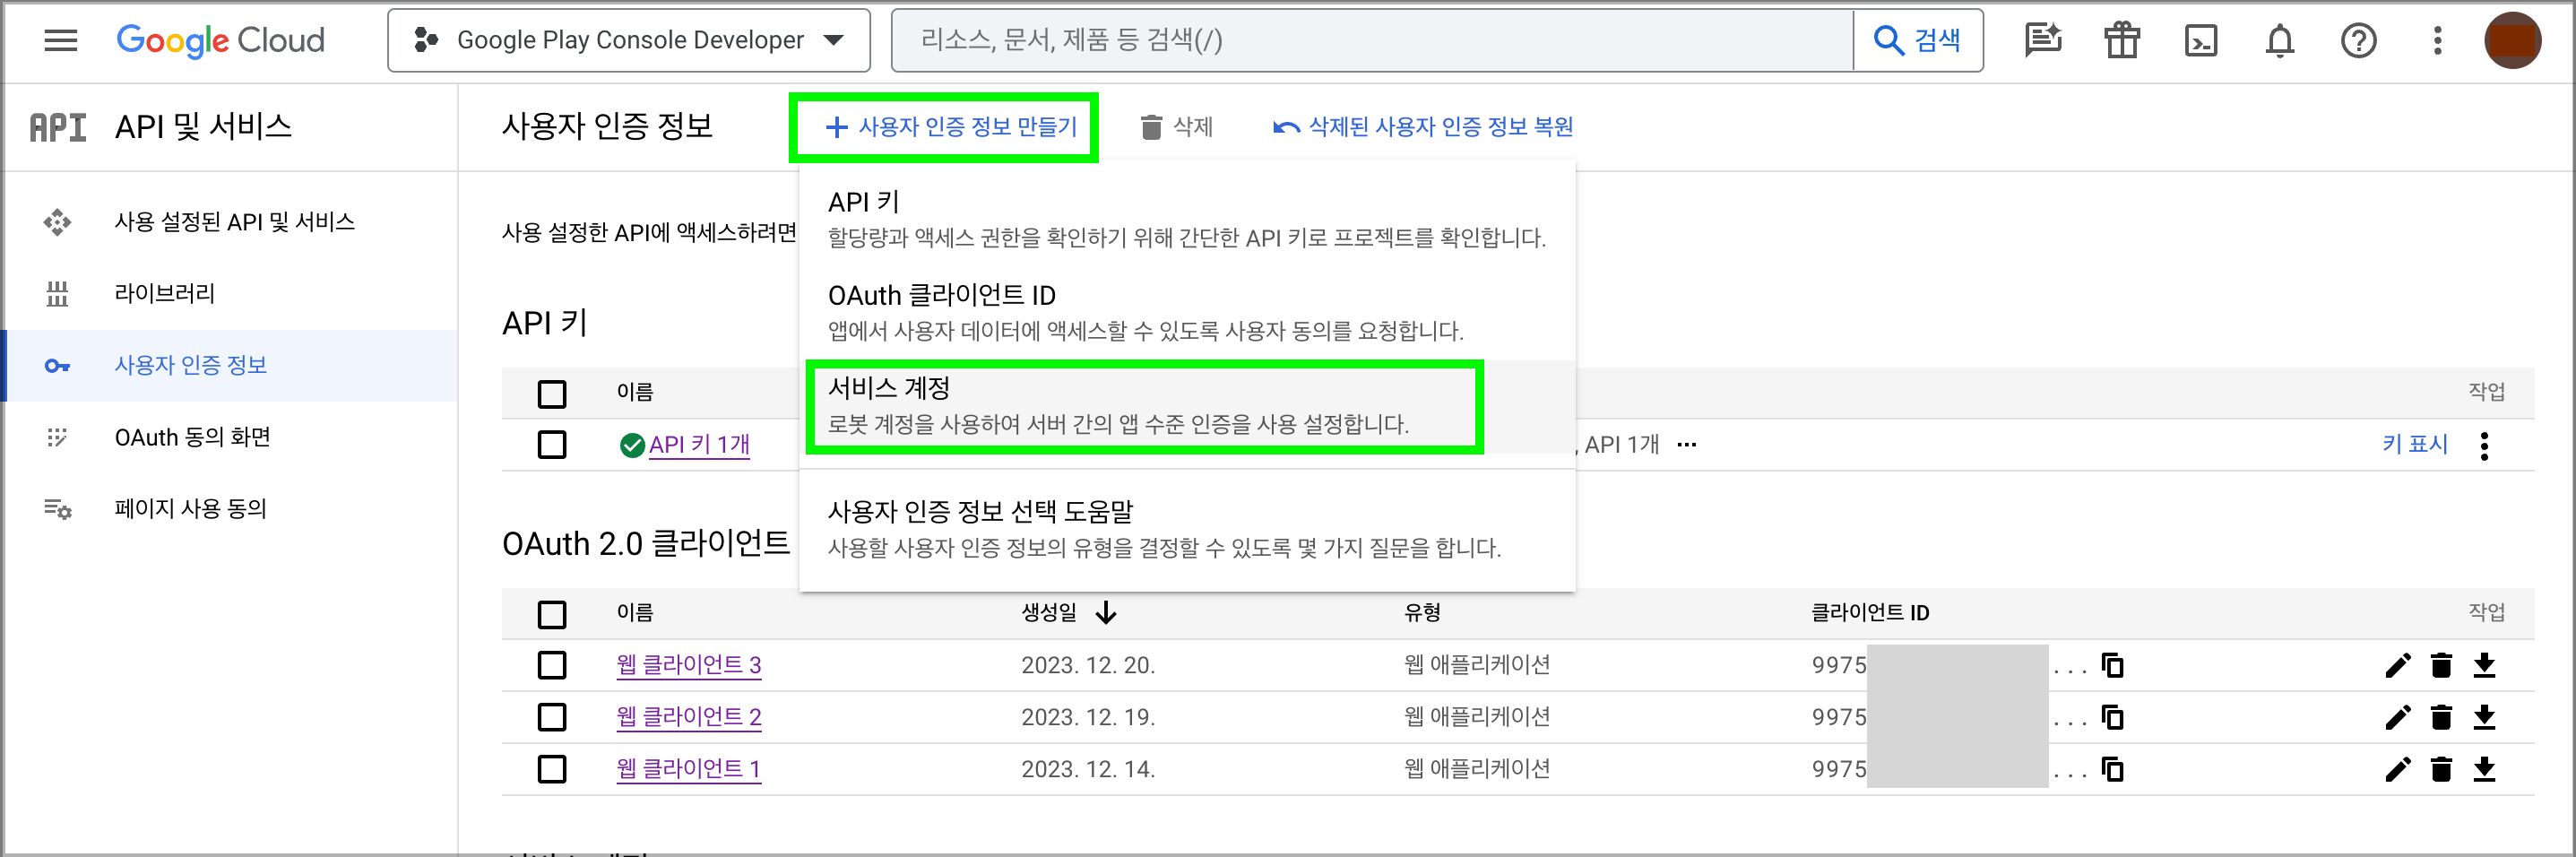
- Enter the appropriate information for the service account name and service account ID, then click Create and Continueto proceed to the next step.
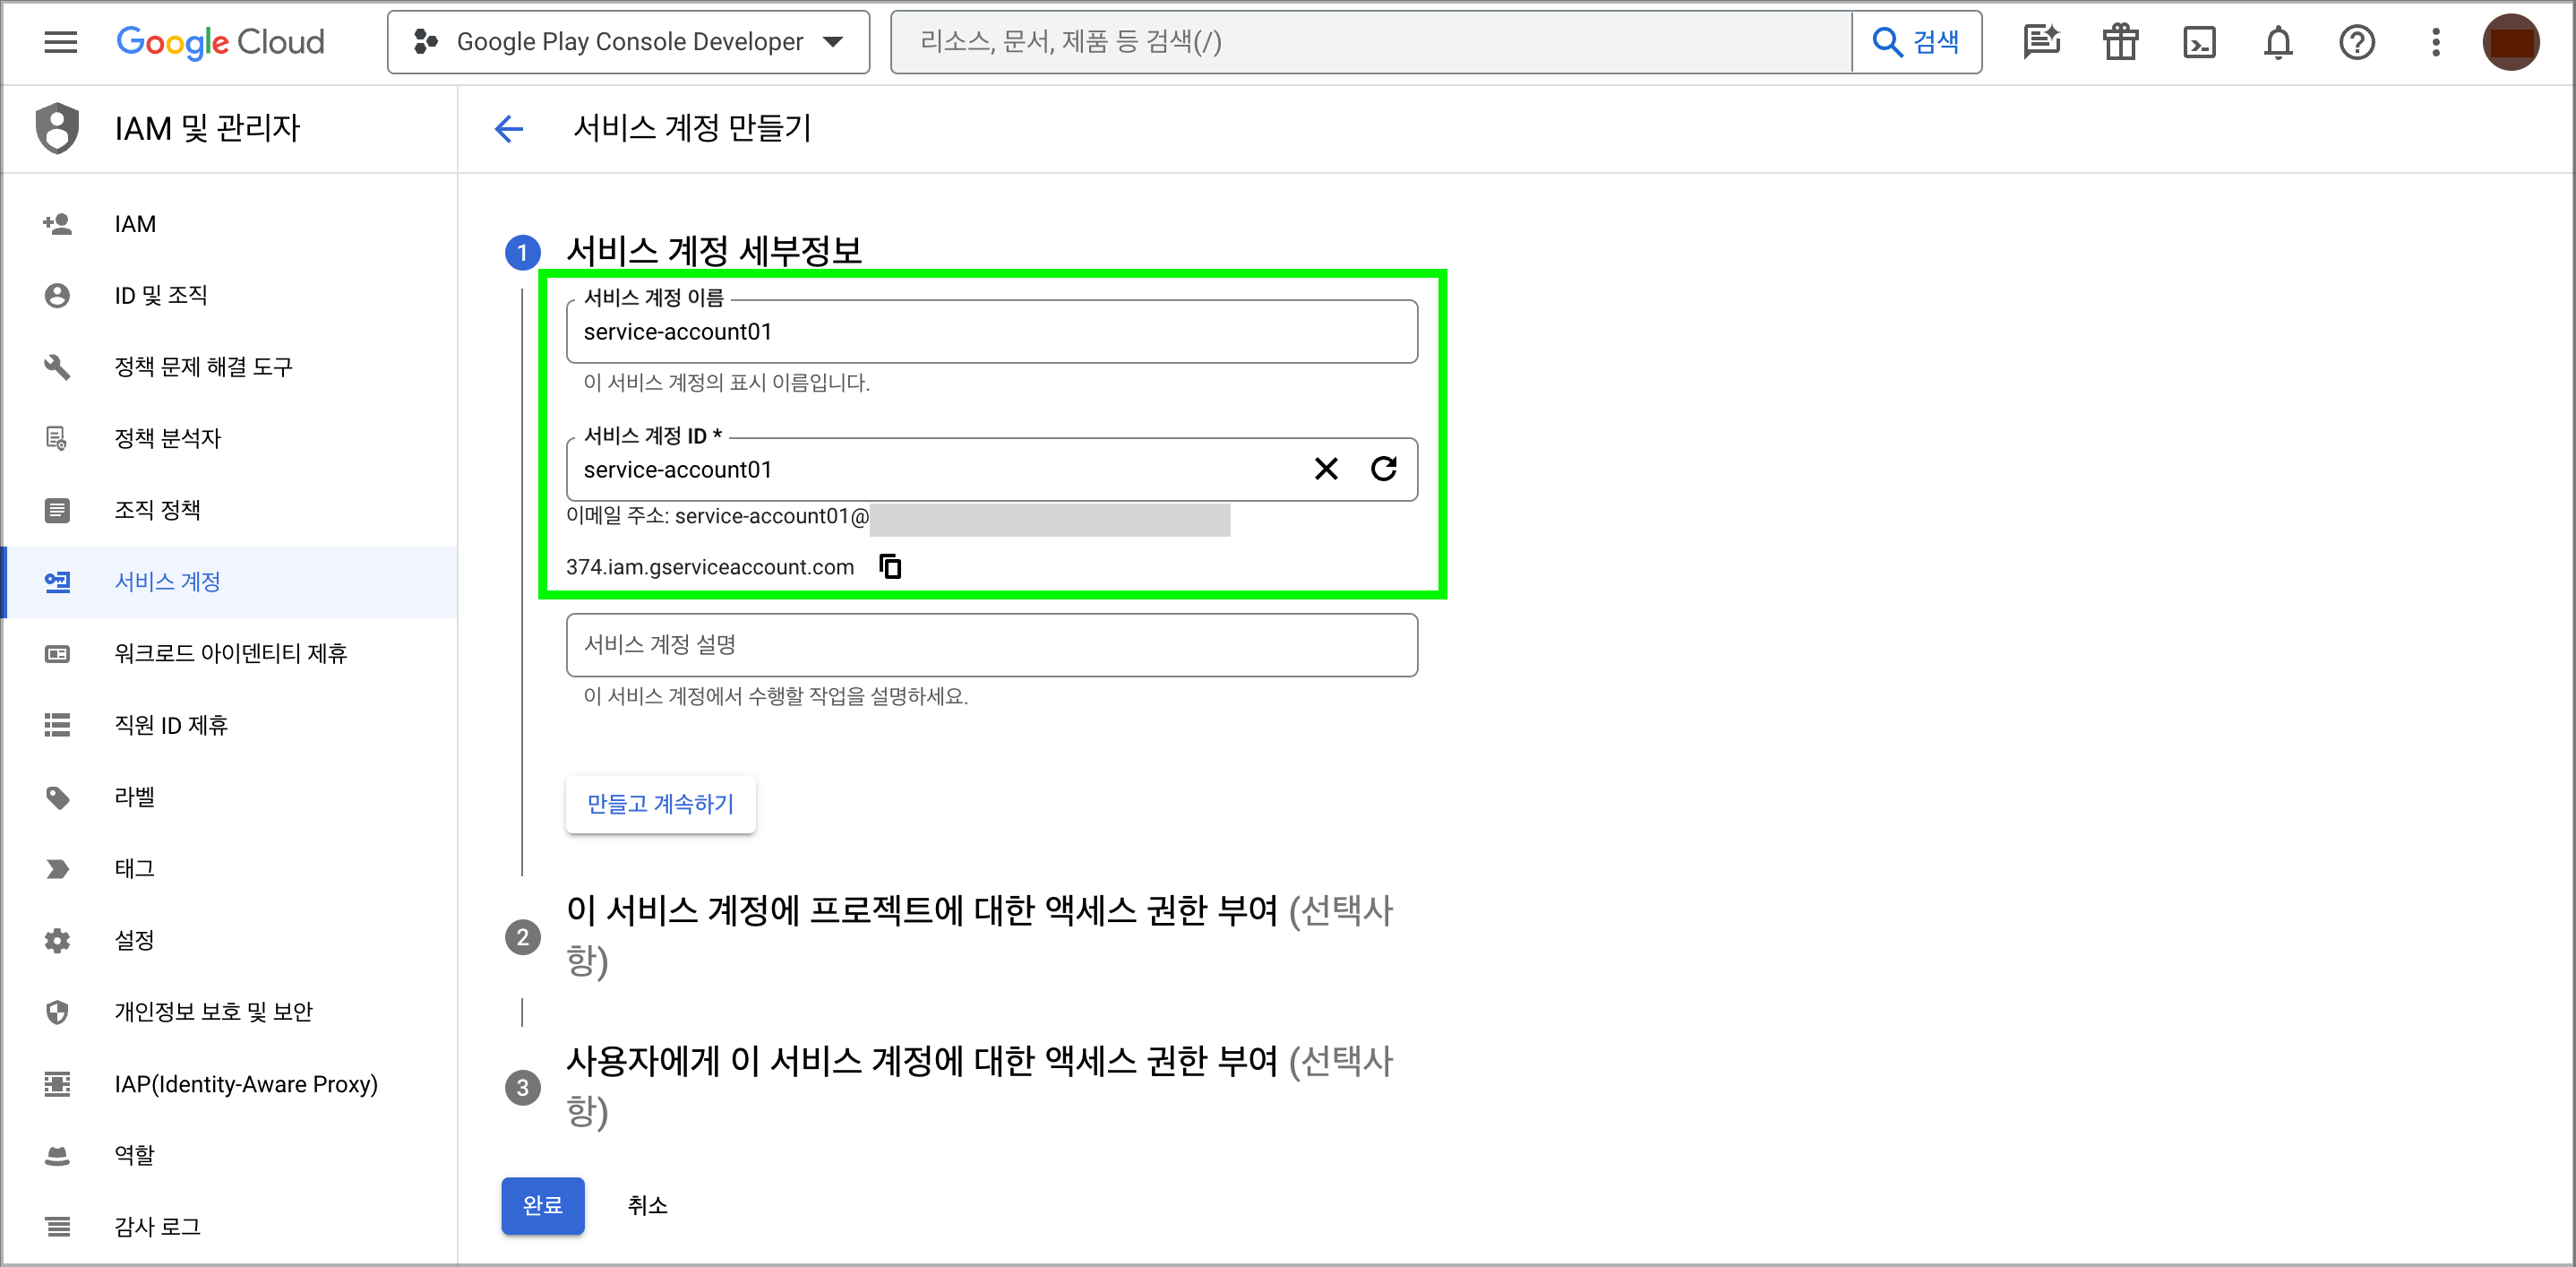
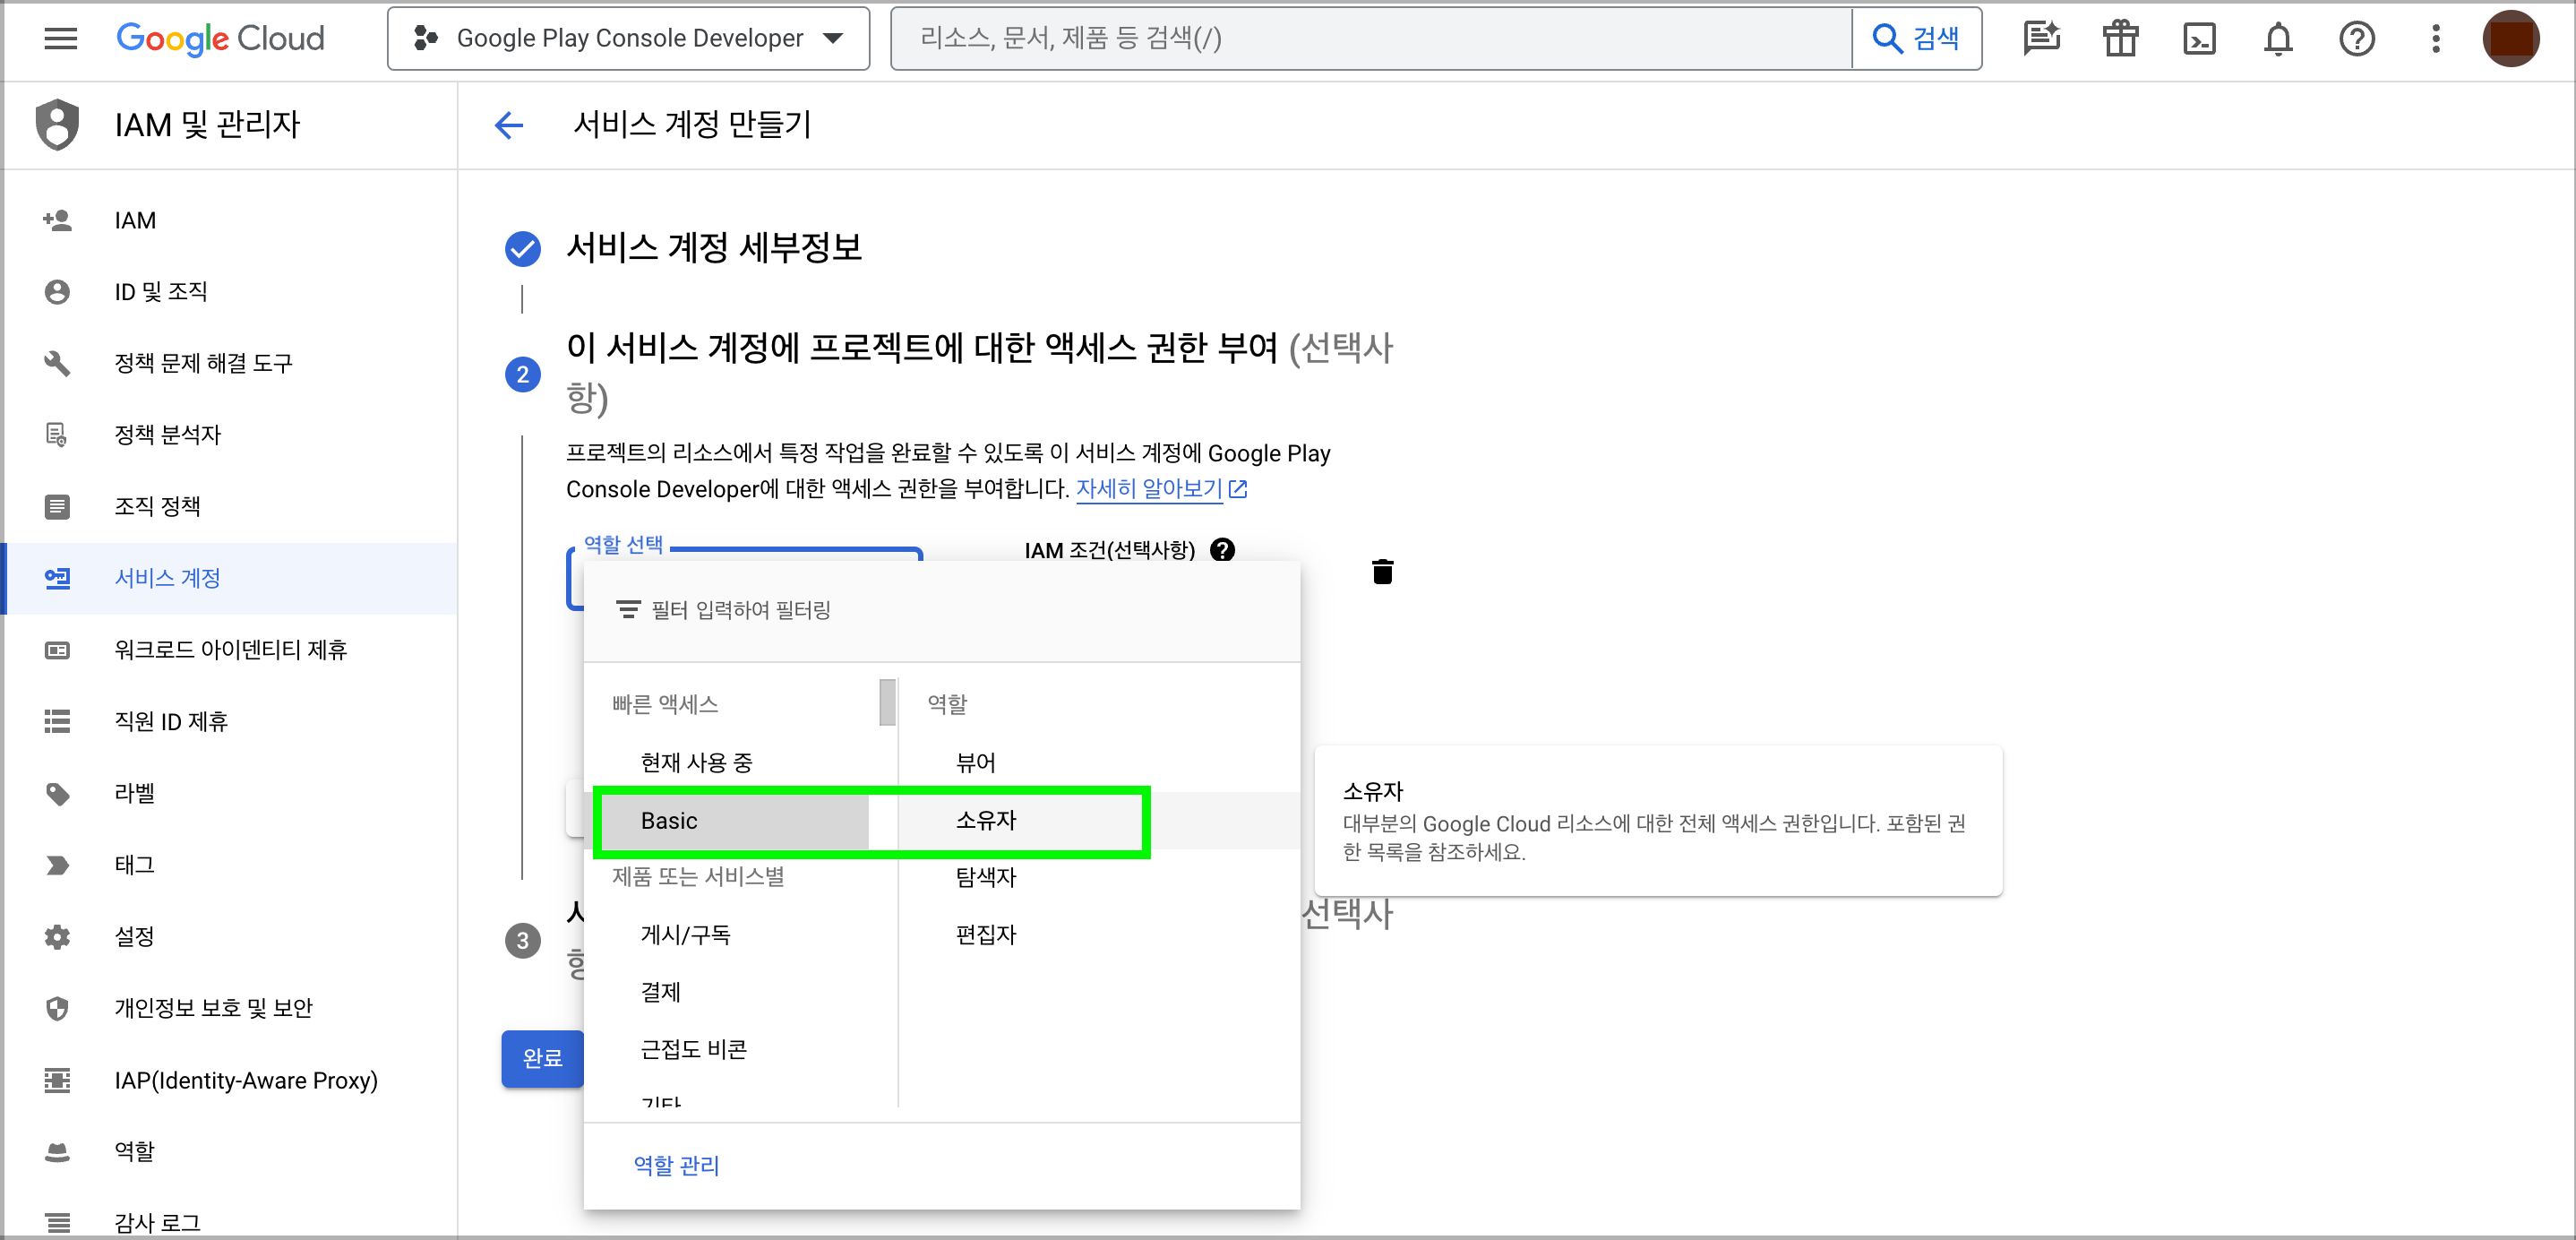
- To grant access, select Owner.
- You can then complete or register additional administrator emails for the service account. Registering an admin email gives you administrative permissions for the service account you're creating. If the registered email isn't currently working on a project, you'll receive an invitation.
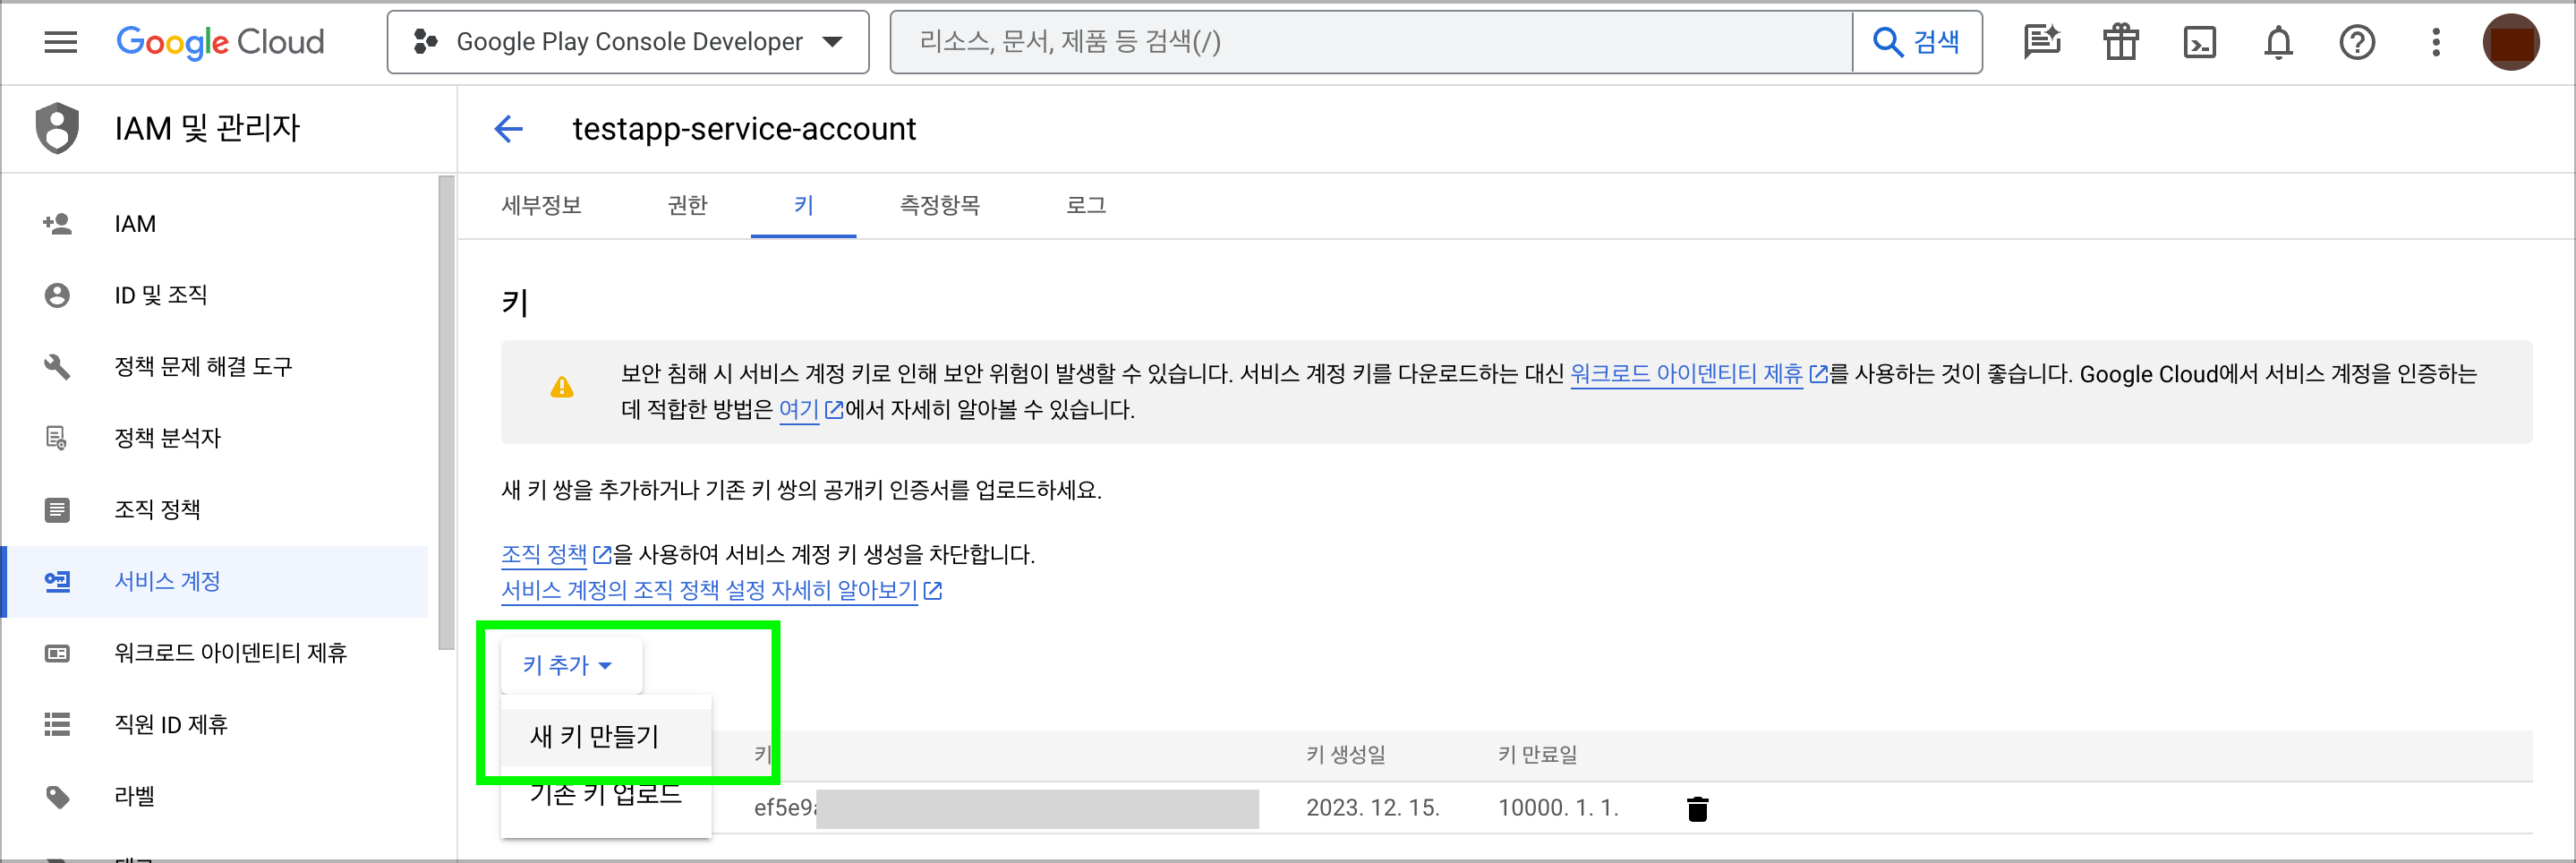
2. Generate a key for your Google Cloud Services account
- Click the created service account to view its details.
- Go to the Keys tab and select Add key > Create new key.
- Select JSON for the key typeand click Createto download the key file.
- The contents of the downloaded file are used to set up the NHN Cloud IAP app.
[Caution]
Once downloaded, the key file for a service account cannot be re-downloaded. If you lose the key, you must destroy it and generate a new one. Also, remember that keys can use any permissions you've granted to the service account, so be extra careful about key security.
3. Register a Service Account with Google Play Console
- Access Google Play Console.
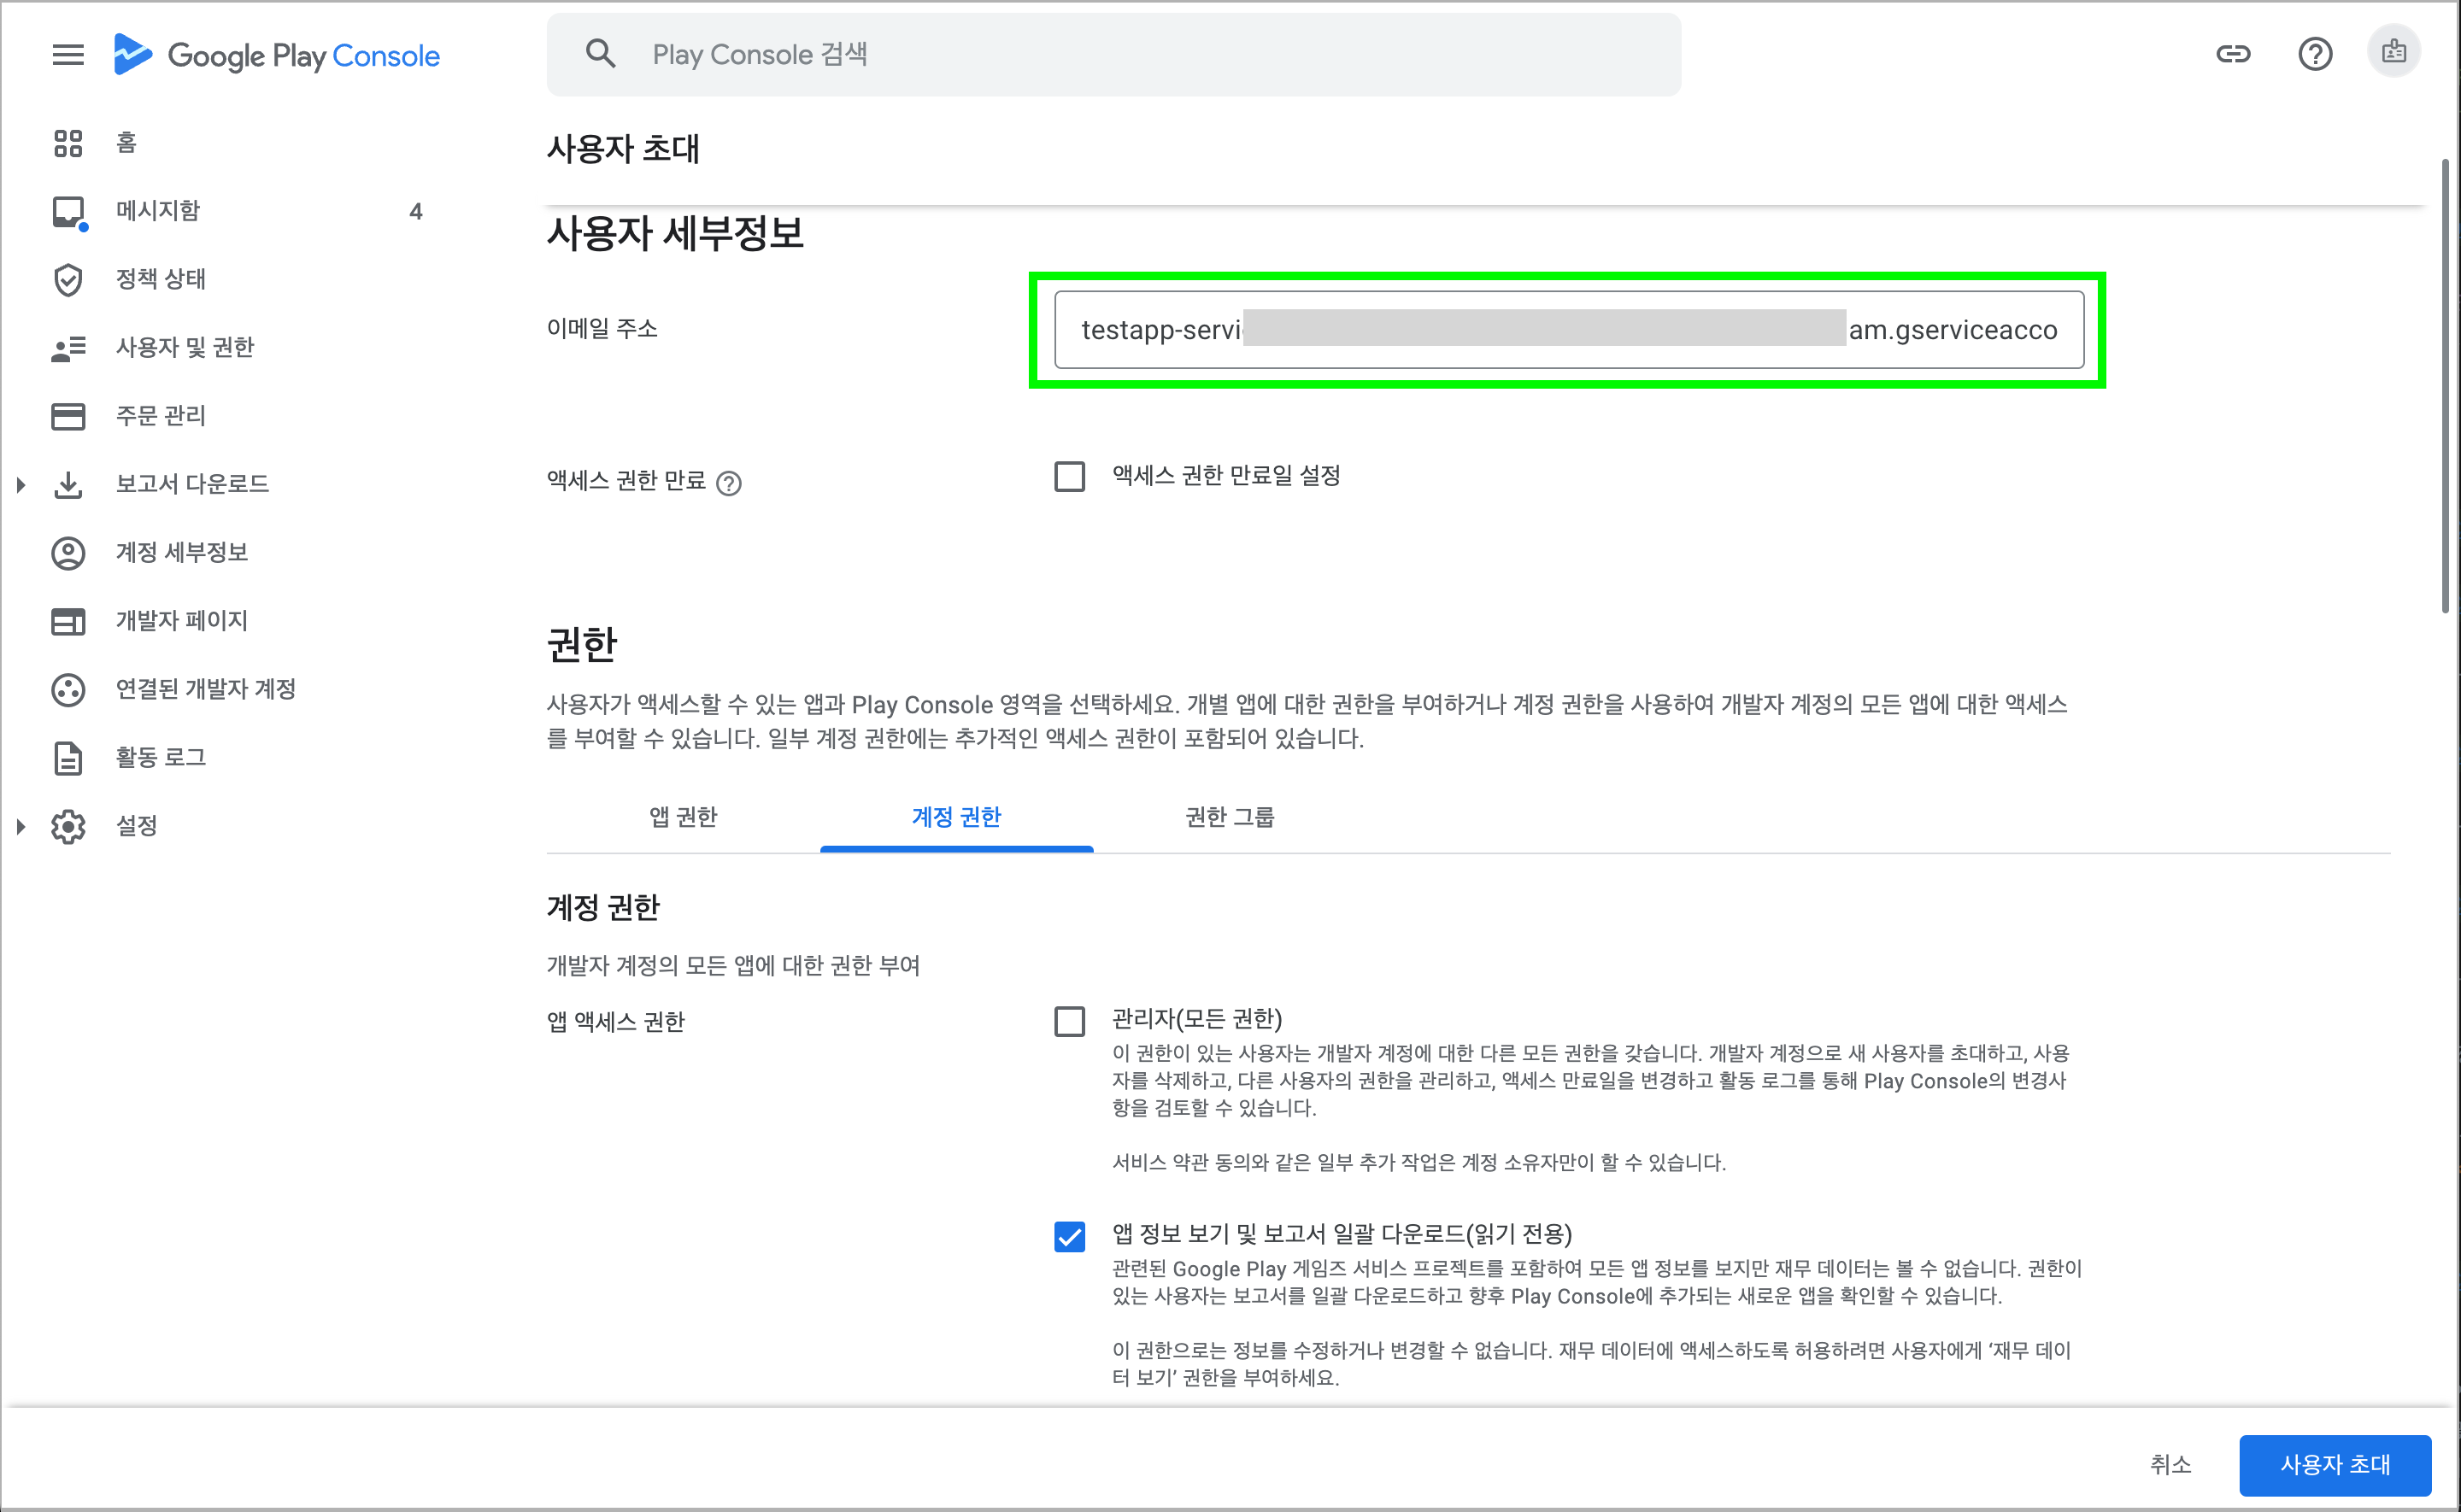
- In Users and permissions,click the Invite new user button.
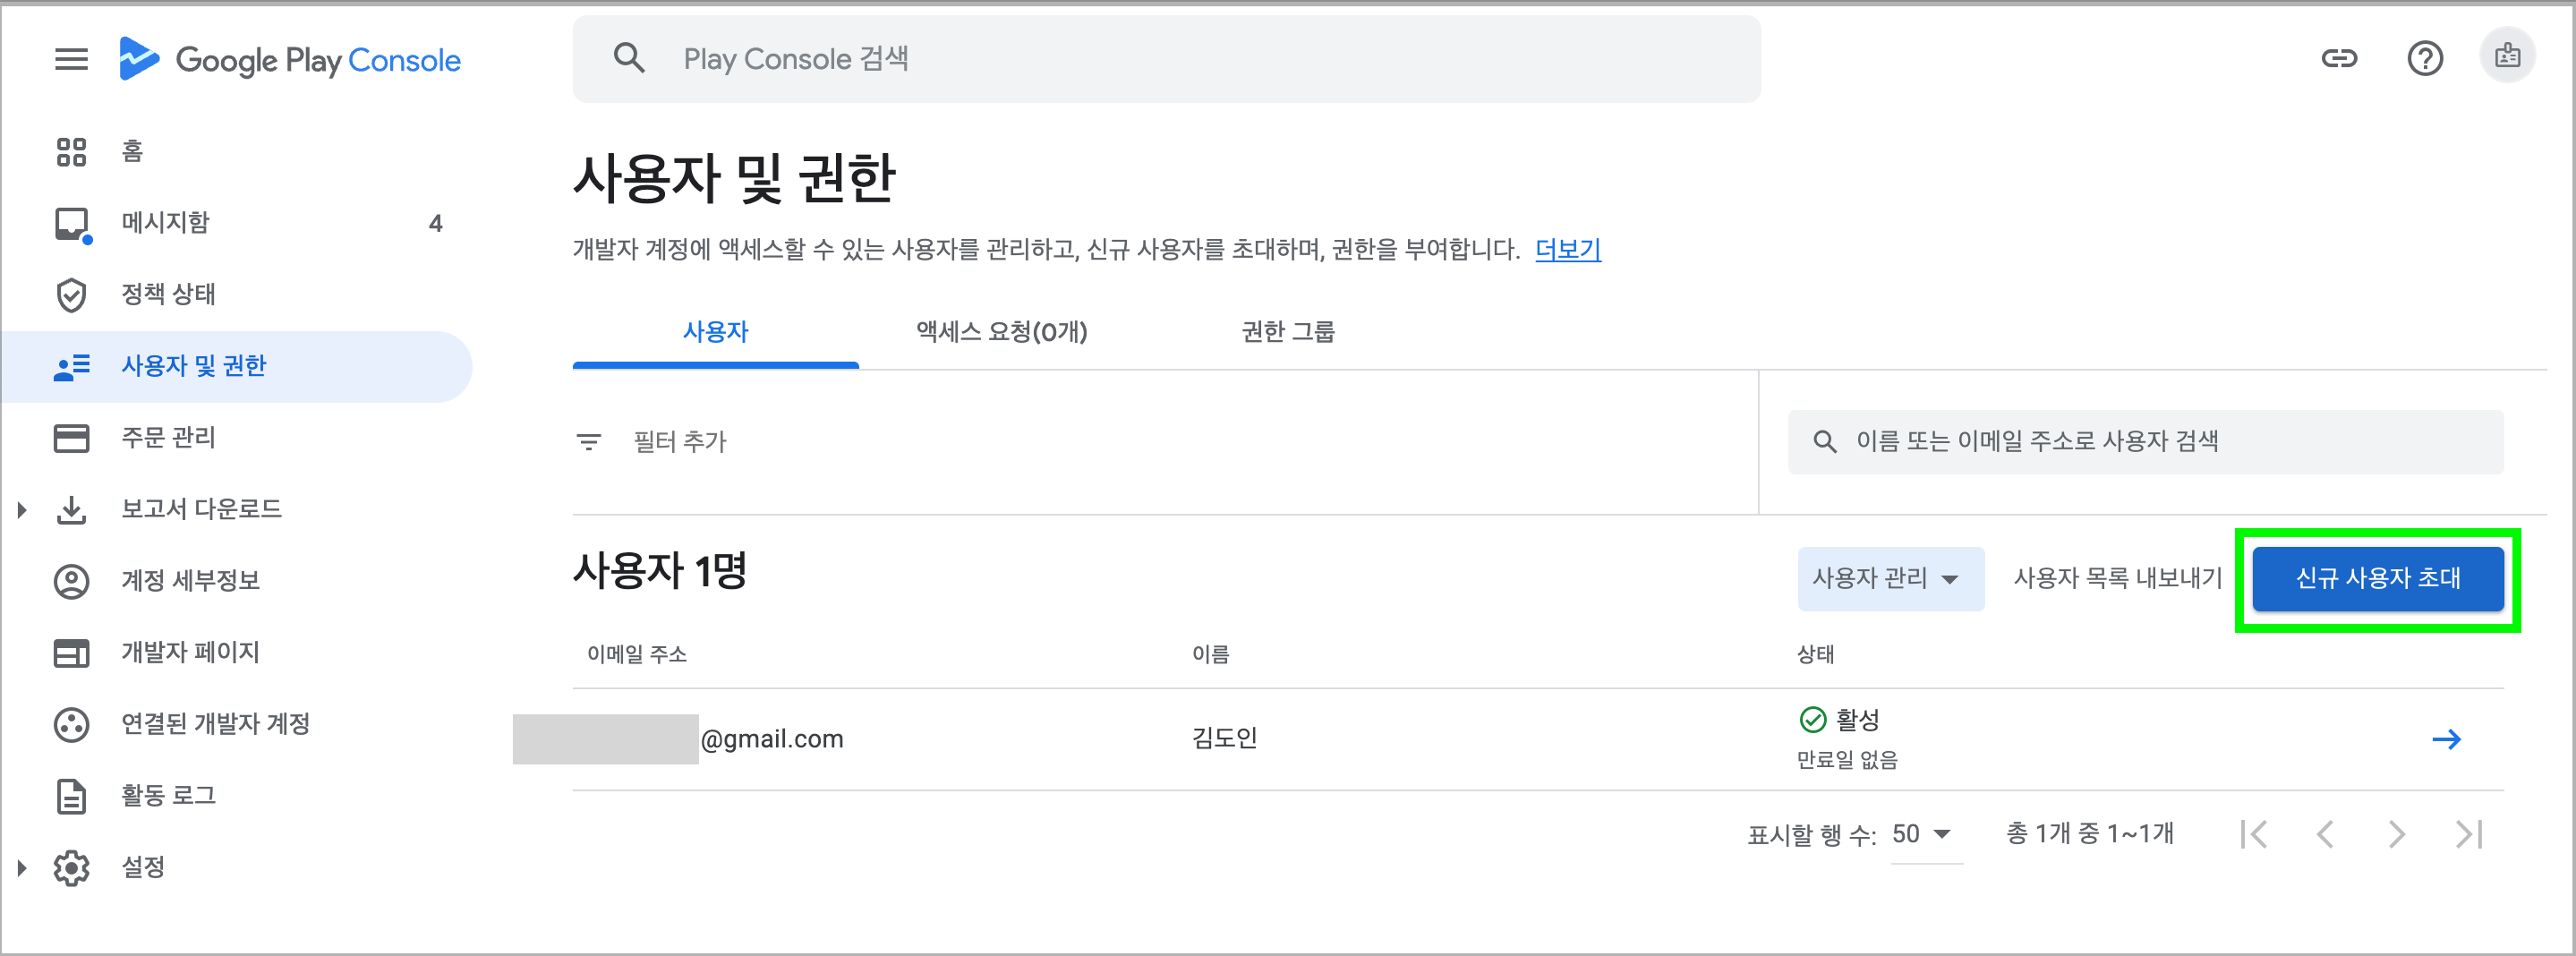
- Enter the service account email you created on the Invite users screen. Do not check Set access expiration date.
- Permissions can be granted on a per-app basis by adding applications under the service account, or they can be granted to the service account you register with. Here, we're registering with account permissions**.
- Set the scope to match your intent, but make sure to select View app info and bulk download reports (read-only), View financial data, order, and cancel survey responses, and Manage orders and subscriptions.
- It will take some time for your permission settings to be reflected. In some cases, it can take as long as 7 days.
- Service accounts are activated after invitation without requiring email authorization from the user.
Google's regular user account can also access the Google Cloud API through the client ID, just like the SUPERVISOR method, as long as the project is registered as a primary member in Google Cloud and the user is invited and authorized in the Google Play Console.
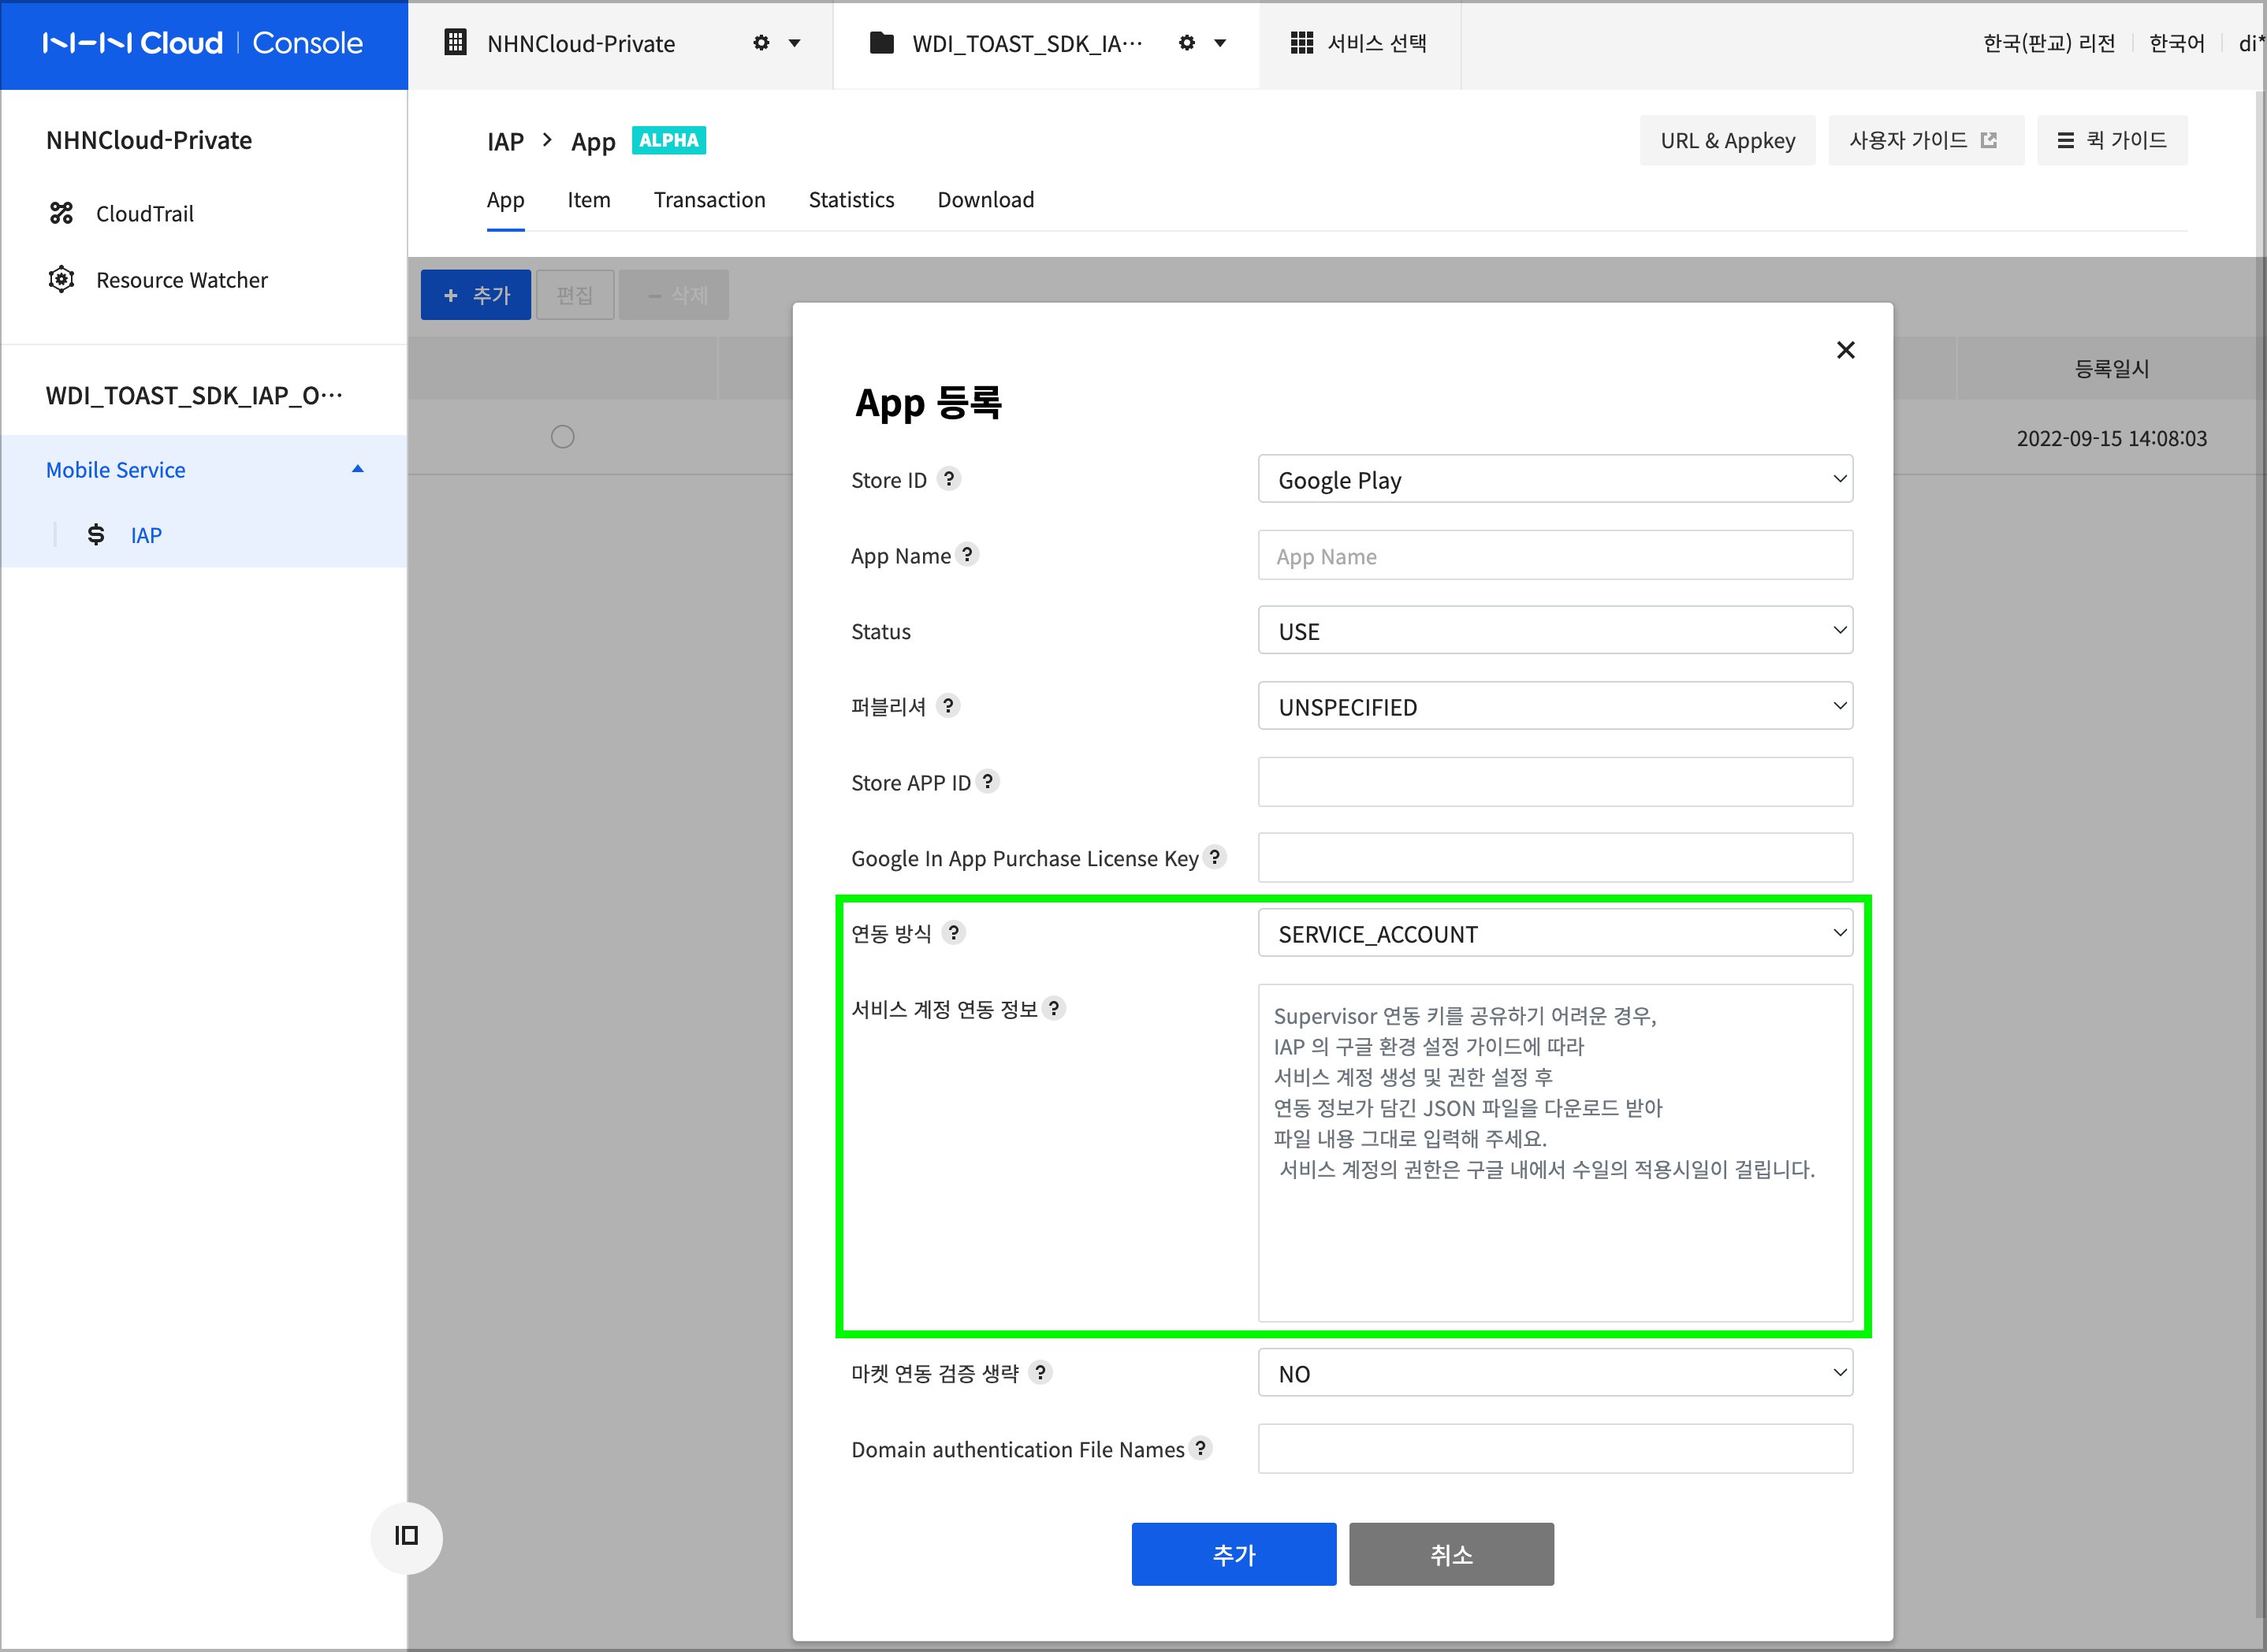
4. Set up a Service Account in the NHN Cloud IAP app
- In IAP > App > Add or Modify, in the Service account integration information field, enter the contents of the key file for the downloaded service account.
- When copying, use a text editor like notepad to copy the entire content.
Set up Google Notifications to receive real-time subscription status
If you sell subscription products on Google Play, you can receive notifications from Google in NHN Cloud IAP to manage the latest status of your subscriptions. Subscription products are automatically renewed within Google at the time of renewal. To track these subscription events within Google, you use Topics in Google Cloud. You can learn more about topics in Android Developers - Creating topics.
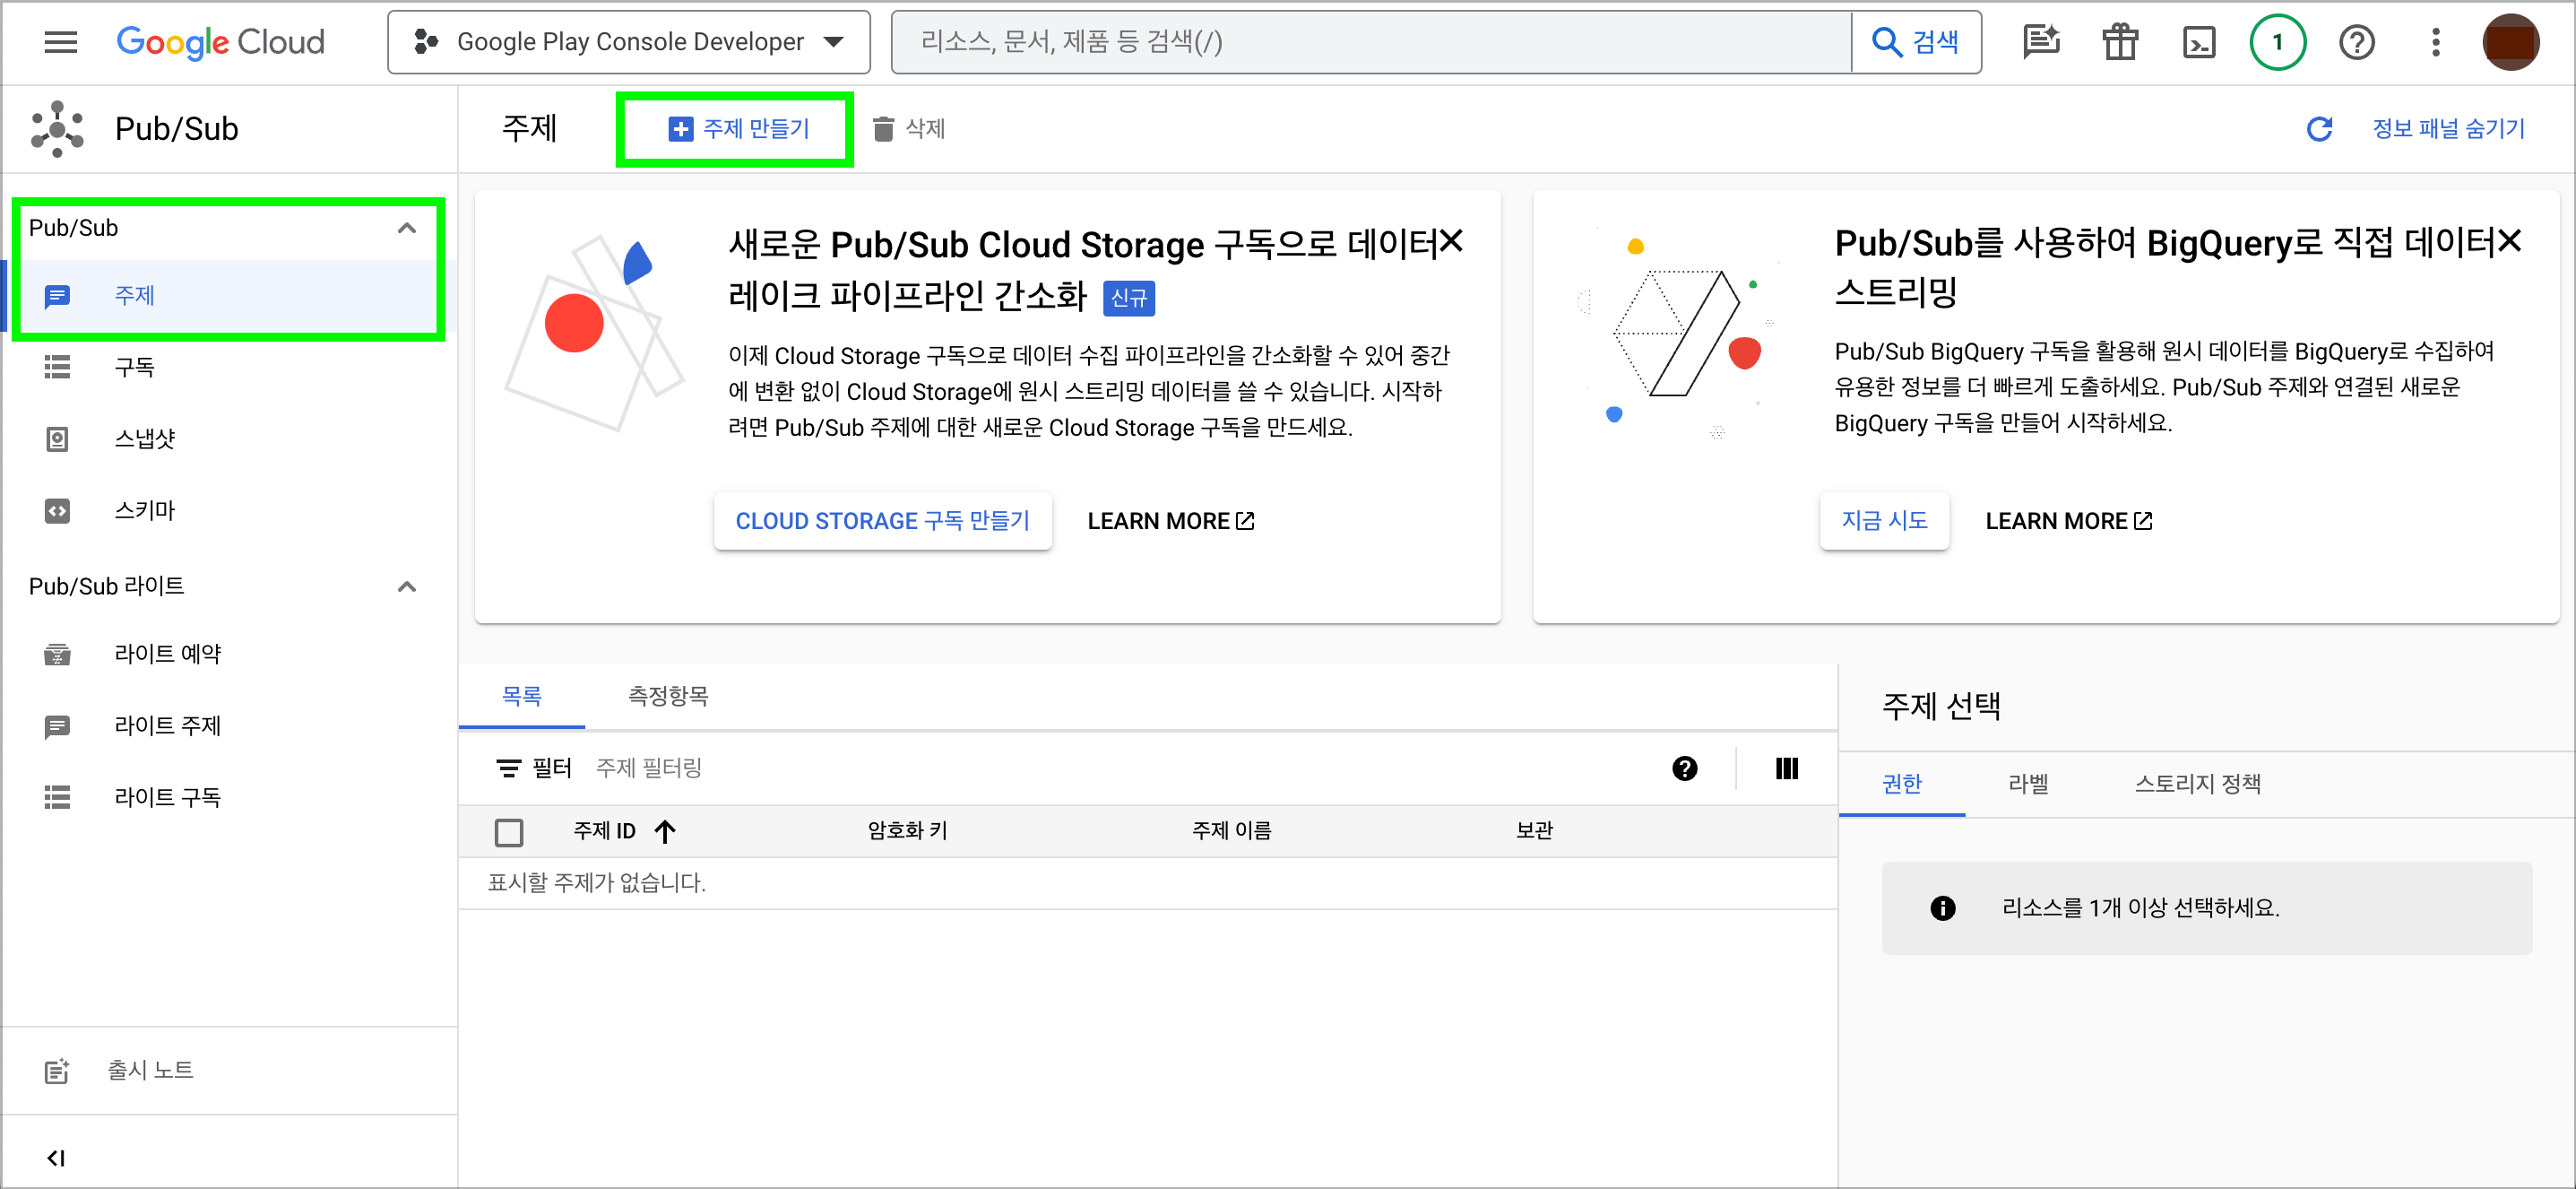
1. Create a Google Cloud Notification topic
- Access Google Cloud Console.
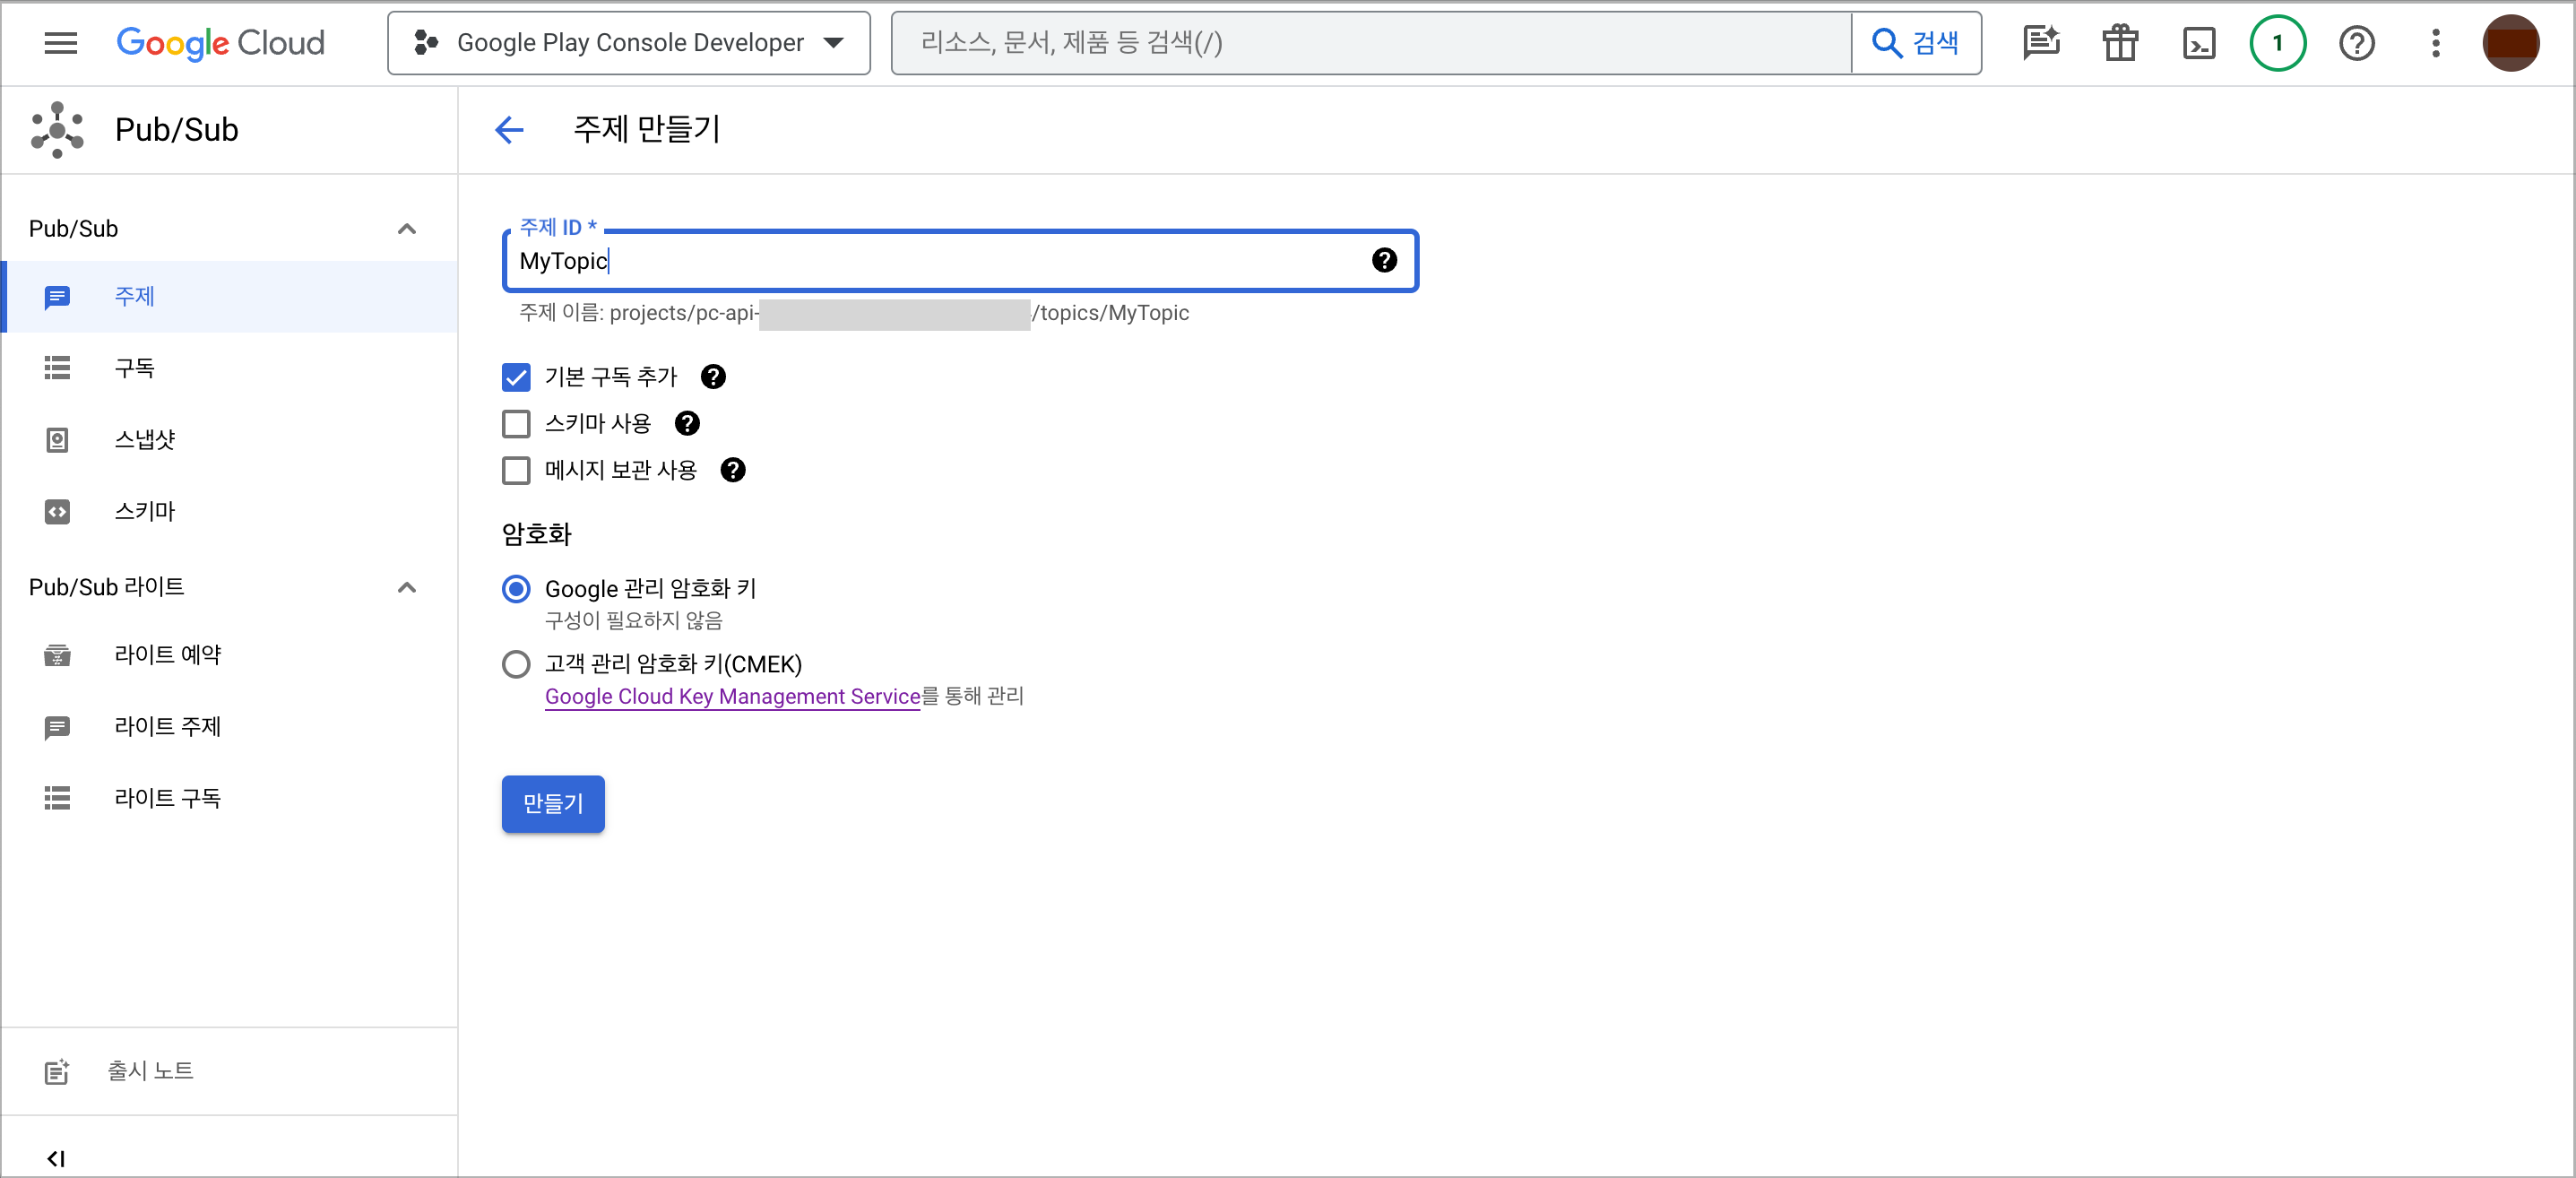
- In Pub/Sub,click Create a topic.
- Create a topic by entering a topic ID, adding a default subscription, and selecting a Google-managed encryption key.
- If you don't see the Pub/Sub menu, you can access it from Products & Solutions > All Products.
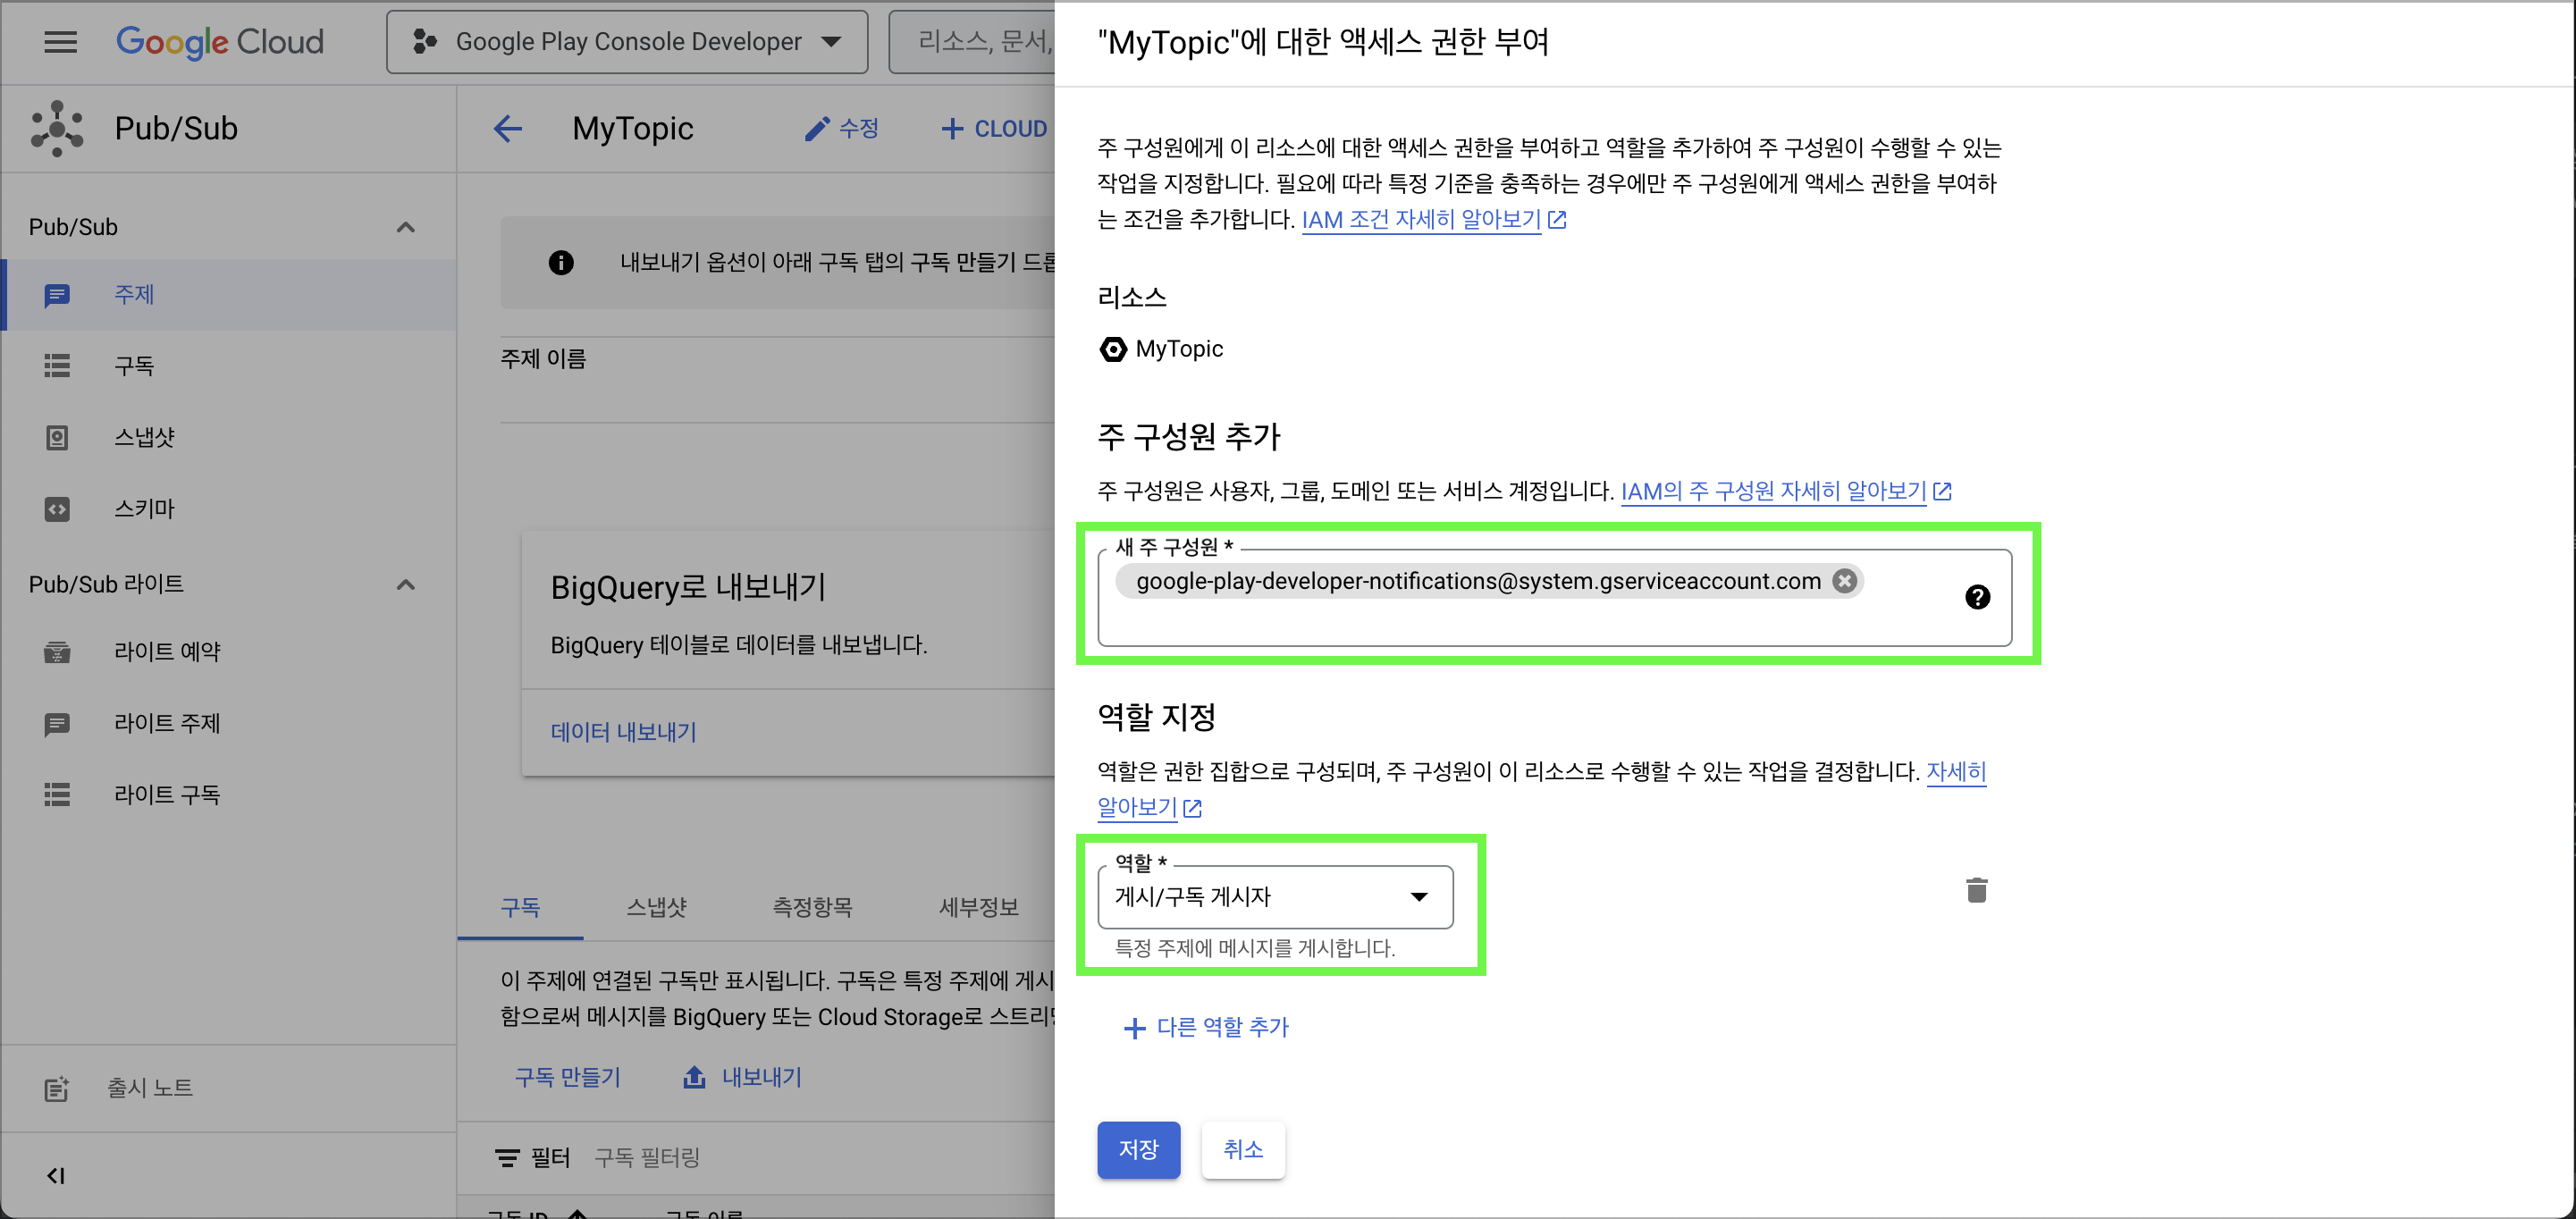
- Once the topic is created, you need to add a publisher to post to the topic when a subscription event occurs. Select the created topic and click Add primary memberon the Permissions tab.
- Select
google-play-developer-notifications@system.gserviceaccount.com를for the new primary member, publish/subscribe publisherfor the role, and save.
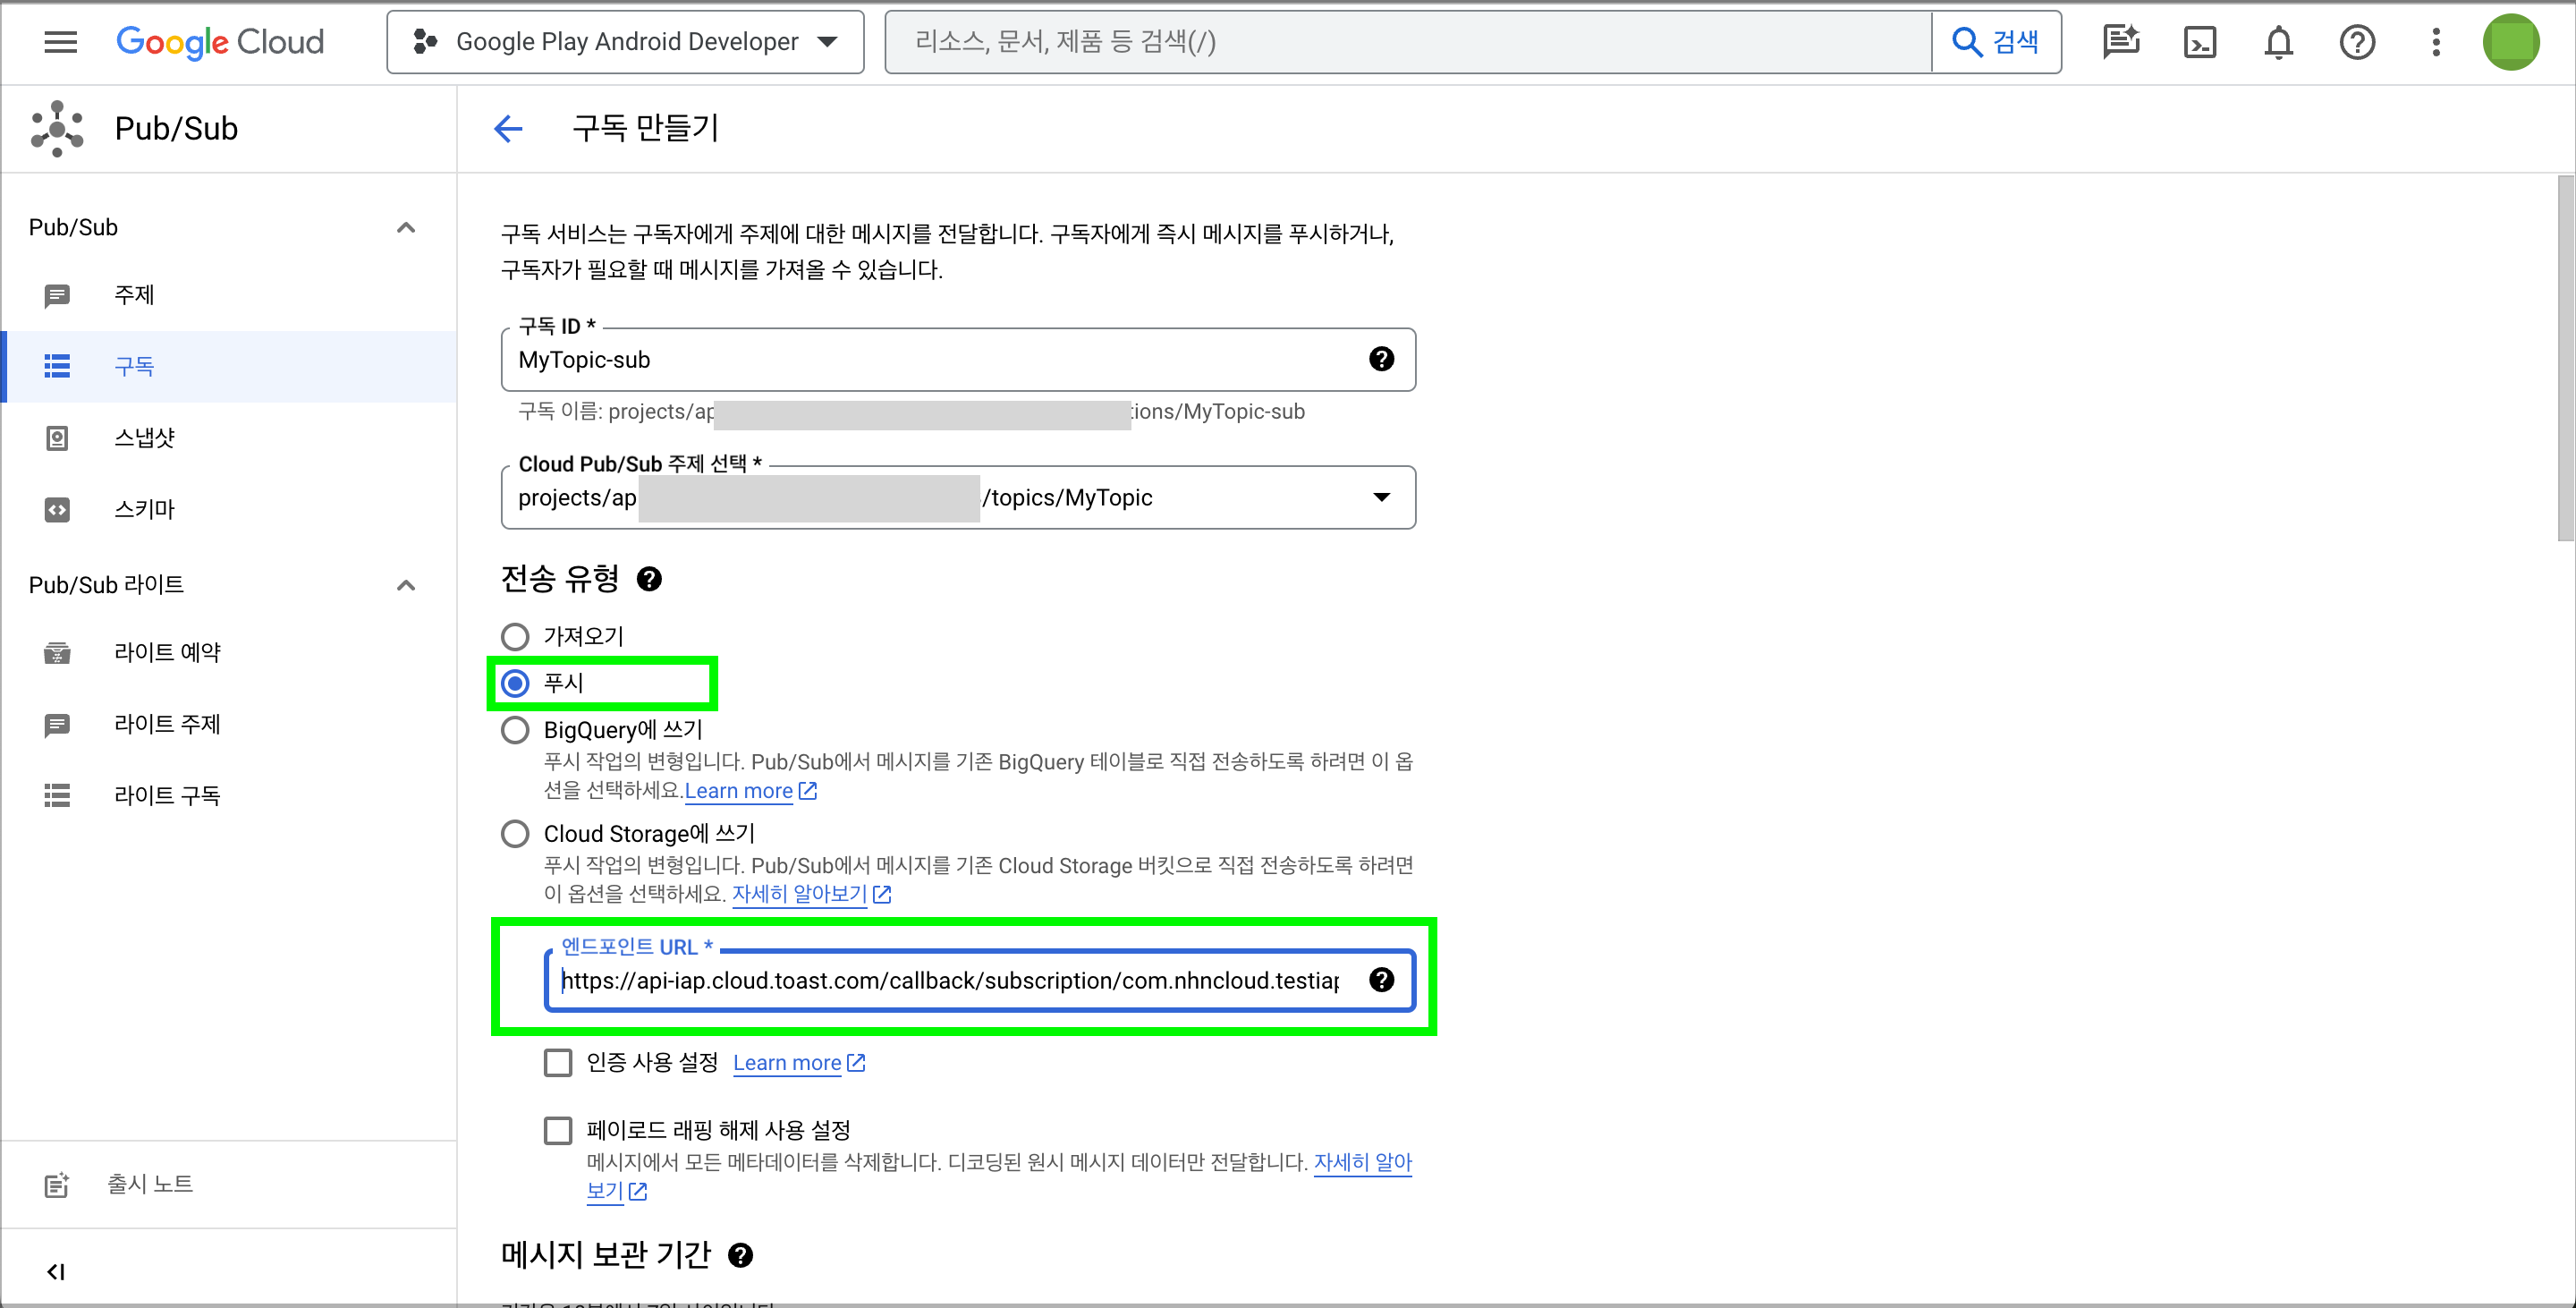
2. Set up Subscriptions to Publish to the Topic
- When you create a topic, you'll see a subscription for that topic created alongside it in the Subscriptions menu.
- Go to modify subscription, select Pushfor Delivery type, and enter
https://api-iap.cloud.toast.com/callback/subscription/{YOUR_PACKAGE_NAME}/GGas the endpoint URLto receive notifications from NHN Cloud IAP. When entering,{YOUR_PACKAGE_NAME}must be replaced with the same value as the Store App IDduring the NHN Cloud IAP app basic information entry above. - If you're using the Gamebase sandbox, enter the endpoint URL
as https://sandbox-api-iap.cloud.toast.com/callback/subscription/{YOUR_PACKAGE_NAME}/GG. - If you want to add a subscription to an already created topic, you can also add a subscription with Create Subscription**.
3. Register a Subscription Topic in Google Play Console
- From the home screen, select the apps you want to receive notifications for and enter the monetization settings.
- Under Google Play Payments, in Topic name, enter the name of the topic that you created earlier.
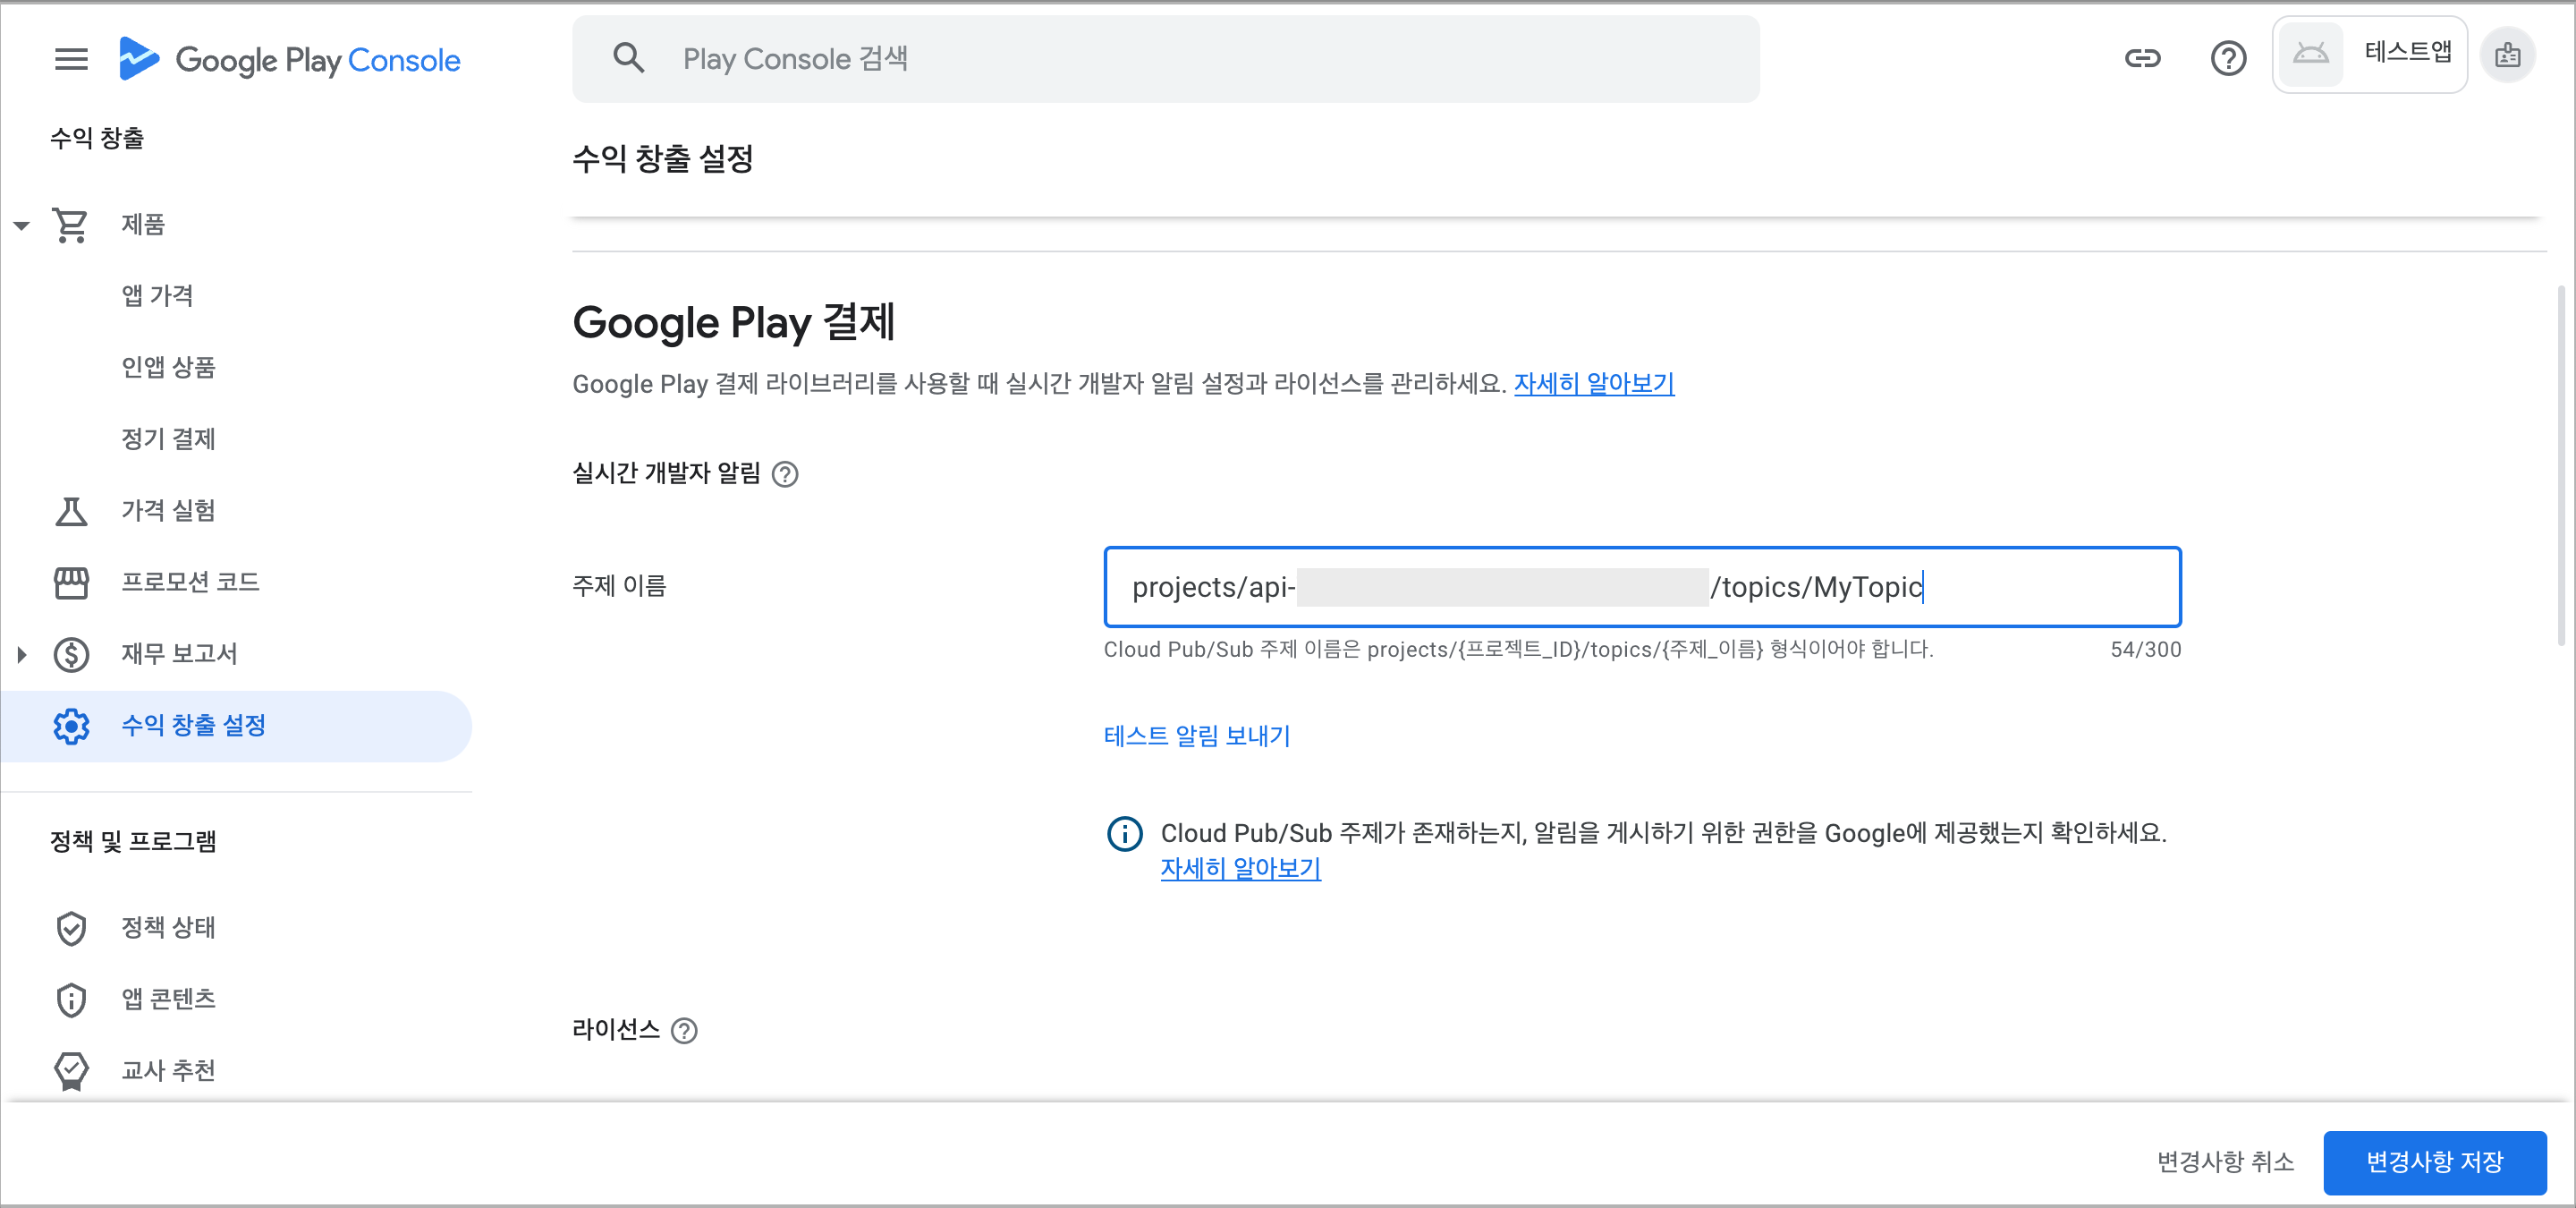
Table of Contents
- Mobile Service > IAP > Google Console Guide
- Google site
- Enter Basic Information
- 1. Store App ID
- 2. Google InApp Purchase License Key
- 3. Skip Market Integration Verification
- 4. Domain Authentication File Names
- Two Authentication Methods for Integration
- Set up Google Cloud Project
- 1. Create a project
- 2. Add APIs to Use in Your Project
- 3. Show the Google Cloud Console Menu
- Set up SUPERVISOR integration
- 1. Configure the OAuth Consent Screen
- 2. Create a Google Cloud Client ID
- 3. Create a Refresh Token with OAuth Client
- 4. Set up Client Information in NHN Cloud IAP app
- Setting up the SERVICE_ACCOUNT Integration Method
- 1. Create a Google Cloud Services Account
- 2. Generate a key for your Google Cloud Services account
- 3. Register a Service Account with Google Play Console
- 4. Set up a Service Account in the NHN Cloud IAP app
- Set up Google Notifications to receive real-time subscription status
- 1. Create a Google Cloud Notification topic
- 2. Set up Subscriptions to Publish to the Topic
- 3. Register a Subscription Topic in Google Play Console